Special tools
| • | J 45004 |
| • | Commercially Available Fuel Pump |
Fuel Tank Draining Method 1
- Ignition OFF.
- Disconnect the battery negative cable. Refer to Battery Negative Cable Disconnection and Connection.
- Raise and support the vehicle. Refer to Lifting and Jacking the Vehicle.
- Remove the right rear wheel. Refer to Tire and Wheel Removal and Installation.
- Remove the retaining hose clamp (1) from the fuel filler hose (2).
- Remove the retaining hose clamp (3) from the fuel filler hose (2).
- Remove the fuel filler hose (2) from the vehicle.
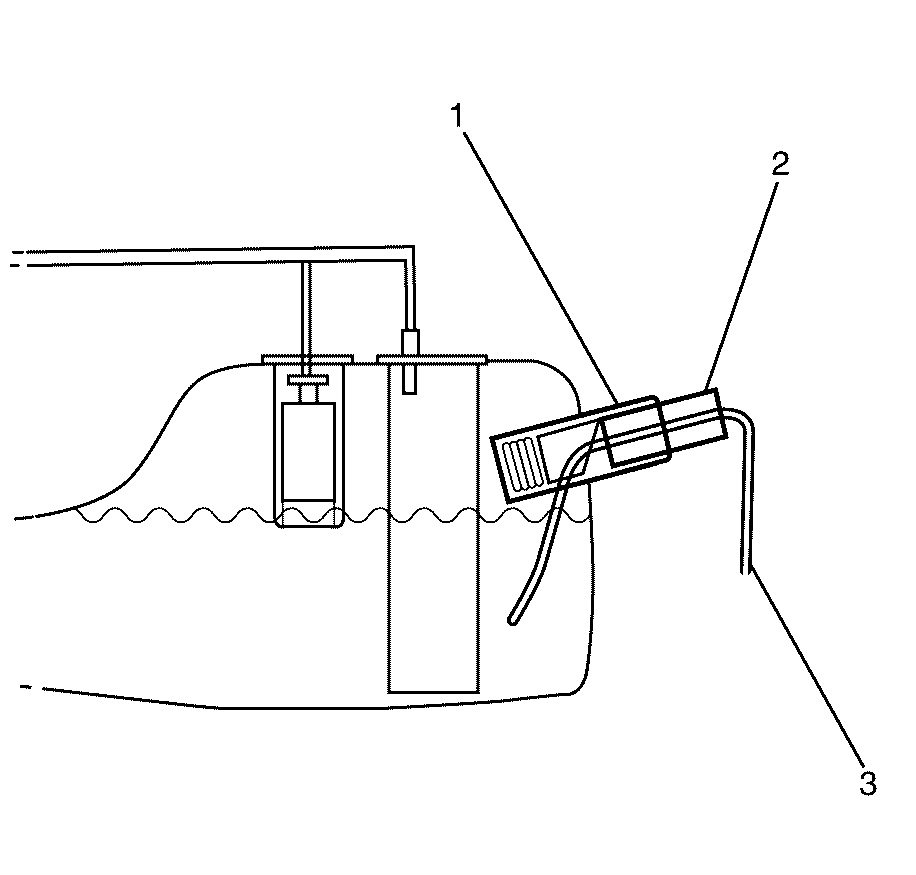
- Install the J 42960-2 (2) into the fuel tank fuel filler pipe (1).
- Insert the J 45004 (3) into the J 42960-2 (2) until the J 45004 (3) reaches the bottom of the tank.
- Use a commercially available pump to drain the fuel from the fuel tank.
Warning: Refer to Battery Disconnect Warning in the Preface section.
Warning: Refer to Safety Glasses Warning in the Preface section.
Danger: To avoid any vehicle damage, serious personal injury or death, always use the jackstands to support the vehicle when lifting the vehicle with a jack.
Warning: Refer to Gasoline/Gasoline Vapors Warning in the Preface section.

Warning: Never drain or store fuel in an open container. Always use an approved fuel storage container in order to reduce the chance of fire or explosion.

Note: Up to approximately 36 liters (8 gallons) of residual fuel may remain in the secondary side of the fuel tank.
Note: The J 42960-2 (2) is used to keep the roll over anti spill valve open.
Adding The Drained Fuel to The Tank.
- Remove the J 45004 (3) from the J 42960-2 (2).
- Remove the J 42960-2 (2) from the fuel tank fuel filler pipe (1).
- Install the fuel filler hose (2) to the vehicle.
- Install the retaining hose clamp (3) to the fuel filler hose (2) and tighten to 4 N·m (35 lb in).
- Install the retaining hose clamp (1) to the fuel filler hose (2) and tighten to 4 N·m (35 lb in).
- Install the right rear wheel. Refer to Tire and Wheel Removal and Installation.
- Lower the vehicle to the ground. Refer to Lifting and Jacking the Vehicle.
- Add the drained fuel to the fuel tank.
- Connect the battery negative cable. Refer to Battery Negative Cable Disconnection and Connection.


Warning: Never drain or store fuel in an open container. Always use an approved fuel storage container in order to reduce the chance of fire or explosion.
Caution: Refer to Fastener Caution in the Preface section.
Fuel Tank Draining Method 2
Special Tools
- Install the fuel pressure gage to the vehicle. Refer to Fuel Tank Draining.
- Place the bleed hose of the fuel pressure gage into a suitable container.
- Command the fuel pump ON with a scan tool.
- Open the bleed valve on the fuel pressure gage just enough to cause a restriction to the flow of the fuel rate at the bleed hose.
- Command the fuel pump OFF with the scan tool as soon as it is observed that no more fuel is coming out of the bleed hose.
- Remove the fuel pressure gage from the vehicle. Refer to Fuel Tank Draining.
Note: Do not leave the vehicle unattended when performing this procedure.
Note: Do not fully open the bleed valve on the fuel pressure gage. To drain both sides of the fuel tank simultaneously there should be a restriction on the flow rate at the bleed hose.
Note: To avoid damage to the fuel pump do not allow the fuel pump to run dry while the fuel pump is in the ON state.
