Info - Pre-Delivery and Service Guide

| Subject: | PRE-DELIVERY AND SERVICE GUIDE |
| Models: | 2004-2006 Pontiac GTO |
This bulletin is being revised to add the 2005 and 2006 model years and new information pertaining to those model years. Please discard Corporate Bulletin Number 03-00-89-041 (Section 00 - General Information).
ABOUT THE VEHICLE:
The 2004 GTO is a 2 Door Coupe with rear wheel drive, powered by a 5.7 liter Gen III V8 engine. The 2005 and 2006 GTO is powered by a 6.0L V8 engine. It is manufactured for the Pontiac Division by the General Motors assembly plant in Adelaide, Australia.
POWERTRAIN
The engine on the 2004 GTO is a 5.7L, Gen III, LS1, V8 rated at 350 HP and 365 lb ft of torque. The automatic transmission is a 4L60E (RPO Code M30). The manual transmission is a Tremec 6 speed (RPO Code M12). The final drive is a 3:46 axle ratio for both auto and manual transmissions.
The engine on the 2005 and 2006 GTOs is a 6.0L LS2 V8 rated at 400 HP and 400 lb ft of torque. The automatic transmission is a 4L60E (RPO Code M30). The manual transmission is a Tremec 6 speed (RPO Code M12). The final drive is a 3:46 axle ratio for both auto and manual transmissions.
CHASSIS/SUSPENSION AND BRAKES
The independent front suspension consists of struts with variable rate coil springs, front lower control arms, control arm rods, and a stabilizer shaft. The independent rear suspension consists of lower control arms, adjustable links, shock absorbers, variable rate coil springs, and a stabilizer shaft. Power-assisted disc brakes, with ventilated front rotors, solid rear rotors, (twin piston front calipers/single piston rear calipers) by Bosch® 5.3 series four-channel, four-wheel ABS in 2004, by Bosch 8.0 series ABS in 2005 and 2006, and traction control are standard. The traction control integrates throttle relaxation, brake intervention and engine air/fuel intake adjustment. When sensors at the wheel detect imminent rear wheel spin, engine torque is reduced. If one of the rear wheels is about to spin, braking is applied to transfer torque to the wheel with better traction.
BODY AND TRIM
A welded steel "safety cage" extending from the A-pillar to the C-pillar and roof rail to rocker structure, resists deformation, providing a high degree of occupant protection.
The 200-watt AM/FM stereo includes 10 strategically located speakers, and provides such features as digital display, seek, manual tuning, and equalizer (EQ) built into its pre-set to adjust to various types of music, road speed-dependent volume, dynamic distortion limiting, and station memory store. A 6-disc in-dash CD changer is standard and integral with the Blaupunkt audio system.
All seats are fully covered in leather, with a perforated pattern that enhances ventilation and contributes to their sporty appearance. Driver and front passenger seats incorporate eight-way power adjustments. Front seatbacks flip forward with a lever near the top of the outboard sides of the front seats. Holding the lever up and pressing the button under the lever moves the whole seat forward for rear-seat entry. Releasing the lever and pressing the button will restore the seatback to the original position. Pressing the button again or continuing to hold the button will continue to move the seat rearward until it reaches full rear position.
The headlamp integrates the low-beam, high-beam, and signal lamps - features crystal-clear polycarbonate lenses. Headlamps feature next-generation quartz halogen H9 and H11 bulbs. The low beam lights use projector technology that throws a wide and even beam pattern. High beam lights incorporate Multi Focal Reflector (MFR) technology with the H9 bulbs.
The center high mounted stop lamps (CHMSL) are located in the spoiler and the back glass. Should customers request, the CHMSL in the back glass may be disabled by disconnecting the wire under the rear package shelf.
The key assembly consists of the metal key, the transmitter, and 2 screws that retain the metal key to the transmitter. The key/transmitter includes a battery and separate switches for remote door locking, unlocking and trunk opening. The doors are unlocked with a unique rolling RAF frequency code. The GTO security system includes:
| • | An electronic engine immobilizer which disables the car when the key is removed from the ignition |
| • | Content theft alarm system which sounds the horn and flashes the yellow exterior lights if any door or the deck lid is opened without activating the door locks using the key transmitter. |
| • | The trunk does not have a lock cylinder. The trunk can be released via the key transmitter, a button in the glove box or a manual release lever located under the passenger side headrest of the back seat. |
| • | Interior-only control for the fuel filler door |
FLUIDS AND LUBRICANTS:
Many of the fluids and lubricants specified for the GTO may differ from those used in other GM products. Please ensure that only correct fluids and lubricants are used. Damage may result from use of incorrect materials.
The following chart summarizes some of the most critical fluids/lubricants. Please refer to Service Manual (Document #1318760) and Owner manual for a complete list.
Location | Fluid/Lubricant | Quantity |
|---|---|---|
Fuel | Premium unleaded with a posted octane of 91 or higher | 70L (18.5 gallons) |
Engine Oil | GM Goodwrench Motor Oil SAE 5W-30, GM P/N 12345610, or the equivalent engine oil SAE 5W-30 SJ ILSAC GF-3 | 6.2 L (6.5 q) with filter change |
Engine Coolant | A 50/50 mixture of water and GM Vehicle Care DEX-COOL® Antifreeze, (GM6277M), GM P/N 12346290, or the equivalent DEX-COOL® Antifreeze | 2004: 14.3L (15.1 q) |
Auto Trans Oil | GM Goodwrench Automatic Transmission Fluid -- DEXRON® III, GM P/N 12378470, or the equivalent DEXRON® III Automatic Transmission Fluid | 5.0L (5.3 q) service refill |
Manual Trans Oil | GM Goodwrench Automatic Transmission Fluid -- DEXRON® III GM P/N 12378470, or the equivalent DEXRON® III Automatic Transmission Fluid | 4.4L (4.6 q) |
Rear Axle | GM Vehicle Care Synthetic Gear Oil GM P/N 89021809 AND GM Vehicle Care Limited Slip Differential Friction Modifier GM P/N 89021958 | 1.575L (1.664 q) 0.025L (0.026 q) |
Brakes | GM Vehicle Care Brake and Clutch Fluid Super DOT-4, GM P/N 88958860, or the equivalent DOT-4 brake fluid |
|
Power Steering | GM Goodwrench Automatic Transmission Fluid -- DEXRON® III, GM P/N 12378470, or the equivalent DEXRON® III Automatic Transmission Fluid |
|
Wheel Nut Torque | 140 N·m (100 lb ft) |
|
Location | Fluid/Lubricant | Quantity |
|---|---|---|
Fuel | Premium unleaded with a posted octane of 91 or higher | 70L (18.5 gallons) |
Engine Oil | The engine requires a special engine oil meeting GM Standard GM4718M. Oils meeting this standard may be identified as synthetic, and should also be identified with the American Petroleum Institute Certified for Gasoline Engines starburst symbol. However, not all synthetic API oils with the starburst symbol will meet this GM standard. You should look for and use only oil that meets GM Standard GM4718M. GM Goodwrench® oil meets all requirements for your vehicle. | 6.2 L (6.5 q) with filter change |
Engine Coolant | A 50/50 mixture of clean, drinkable water and use only DEX-COOL® Coolant. | 11L (11.6 qt) |
Auto Trans Oil | DEXRON®-VI Automatic Transmission Fluid | 4.7L (5.0 qt) service refill |
Manual Trans Oil | DEXRON®-III Automatic Transmission Fluid. Look for "Approved for the H-Specification" on the label. | 4.4L (4.6 q) |
Rear Axle | SAE 75W-140 GL-5 Synthetic Gear Oil GM P/N 89021809 With a complete drain and refill, add 1 oz (25 ml) of Limited-Slip Differential Friction Modifier 7098 (GM P/N 89021958) | 1.575L (1.664 q) 0.25 mL (1.0 oz) |
Brakes | Hydraulic Brake Fluid. Use only GM P/N 88958860 (in Canada, use P/N 88901244) Super DOT-4 brake fluid | 0.62L (0.65 qt) |
Power Steering | DEXRON®-III Automatic Transmission Fluid. Look for "Approved for the H-Specification: on the label. | 0.5L (0.52 qt) |
Wheel Nut Torque | 140 N·m (100 lb ft) |
|
TOOLS:
The following summarizes the availability of diagnostic and special service tools and manuals.
Diagnostic Tools
Tech 2®
Special Service Tools
Refer to the listing of essential tools below. These are tools which are considered by General Motors Corporation to be essential to enable dealerships to properly support this product. All tools were automatically shipped and billed through the General Motors Essential Tool Program. Additional tools are available from SPX/Kent Moore.
Tool # | Tool Description | Ship to Dealer Date |
|---|---|---|
BO 46832 | Door Hinge Sleeve Remover | October 24, 2003 |
BO 46833 | Door Hinge Setting Tool | October 24, 2003 |
BO 46835 | Door Hinge Sleeve Installer | October 24, 2003 |
DT 47544 | Seal Installer | October 24, 2003 |
CH 46839 | Rear Crossmember Centering Tool | October 24, 2003 |
EL 46867 | Driver's Side Airbag Dummy Load | November 24, 2003 |
EL 46841 | Dummy Load | October 24, 2003 |
DT 46842 | Quick Connect | October 24, 2003 |
EL 46843 | Quick Connect Fitting Release Tool | October 24, 2003 |
EL 46844 | Drivers Airbag Removal Tool | October 24, 2003 |
EL 46845 | Harness Adapter for Pretensioner | October 24, 2003 |
EL 46850 | Deployment Harness Adapter | October 24, 2003 |
DT 46853 | Pinion Oil Seal Installer | October 24, 2003 |
BO 46862 | Radio Removal Tool | October 24, 2003 |
EL 46863 | Test Leads | October 24, 2003 |
J 42094A | Hub Installer/Remover (Dealers without J 42094) | November 24, 2003 |
J 42094-100 | Hub Installer/Remover Modification Kit (Dealers with J 42094) | December 2003 |
J 45019A | Pinion Cartridge Remover (Dealers without J 45019) | December 2003 |
J 45019-3 | Rear Differential Bolts (Dealers with J 45019) | December 2003 |
Key Cutting
Important: In the event a customer loses the ignition key and the vehicle must be towed to a dealership to obtain a new key, the cost associated for the tow and the replacement of the key and transmitter are not covered by GM. Roadside Assistance may handle the call but the owner is responsible for cost associated with lost keys.
The ignition and door key used in the GTO features a special high security side milled profile. Cutting of replacement keys requires special key cutting equipment. Refer to Corporate Bulletin Number 03-00-89-037. A key will be cut and shipped to the dealership within 24 hours. If the customer has lost the key and transmitter, a duplicate transmitter must be obtained through GMSPO and mated with the new key. Once the new key and transmitter are assembled, they must be programmed to the specific vehicle.
Electronic Service Information
All required service information is currently online on GM eSI. A Dealership can also find the most current Owner’s Manual and Labor Time Guide online at website http://spo.gm.com/dept/eng/naspe/naspe.shtml and under common links.
SERVICE SUPPORT:
Paint
The original equipment paint is supplied by ‘PPG’. Material to make paint repairs is available from your local paint supplier. For GM approved refinish material, please see GM publication GM4901M-D-2003. This information or the publication can be found at www.gmgoodwrench.com. PPG paint color references are shown below:
Color Names | PPG Reference | WA Number |
|---|---|---|
Torrid Red | 343 48533 | 687F |
Yellow Jacket | 343 49458 | 871J |
Phantom Black Metallic | 459 48552 | 690F |
Quicksilver Metallic | 459 49343 | 470G |
Impulse Blue Metallic | 159 49768 | 987K |
Barbados Blue Metallic | 459 49550 | 946J |
Cosmos Purple Metallic | 459 49635 | 970L |
Cyclone Gray Metallic | 907446 | 276M |
Midnight Blue Metallic | 907445 | 718H |
Brazen Orange Metallic | 910752 | 347N |
Pulse Red | 907447 | 129L |
Instrument Cluster
Clusters are not repairable and must be replaced as an assembly. Should a new cluster be required, a replacement part should be ordered from AJR International Inc. AJR will send a pre-exchange unit to the dealership and the dealership will need to return the original cluster. AJR International Inc is located at:
951 North Larch Ave.
Elmhurst, IL 60126
Ph: 800-232-3965 or 630-832-0222
Fax: 630-832-0333
Audio System
Support for the audio system is handled through AJR International Inc. The audio system will be handled on an exchange basis. Use the contact information for AJR indicated above.
BCM
The vehicle Body Control Module has security data recorded during vehicle production. The radio PIN and ignition key code can be accessed from the BCM via the Tech 2®.
QUALITY PRE-DELIVERY INSPECTION (PDI):
Performing a quality pre-delivery inspection is one of the most important functions your dealership can do for the customer. Most customers consider the condition of their new vehicle during delivery as a direct reflection of your dealership and your service department. A quality PDI is essential to improving a customer's perception of your dealership and increasing his/her satisfaction with their new vehicle.
Paint Protection
A plastic film known as ‘Rapguard’ is applied to external horizontal painted surfaces to provide protection from ultra violet light, fallout and chemical attack from bird droppings etc. This covering is to be removed within 6 months of the vehicle build date.
Underhood Transit Corrosion Protection
This protection is provided by a urethane coating on all surfaces. This is colorless and does not need to be removed.
Underbody Transit Corrosion Protection
This is a light color spray wax which does not need to be removed, but should this require removal from visible components, dissolve by using " Prepsol" or a similar product.
Loose Parts
A "loose parts" package is provided in the vehicle trunk. This package includes the following components:
- Wheel nut caps and wheel covers
- Floor mats and retainers
- Spare ignition and glovebox compartment keys
- License plate attaching bracket and screws
- Security data card
Wheel Nut Caps
The wheel nut caps are NOT threaded. Push the wheel nut caps onto the wheel nuts. Use the wheel nut cap removal tool in order to remove the wheel nut caps. The wheel nut cap removal tool stores with the spare tire service equipment in the rear compartment.
Customer Information CD
This CD is shipped with the vehicle and is loaded into the audio CD player. It is important that the CD remain in the CD player until the customer removes it. The cover for the CD should remain in the glovebox. The CD should be explained to the customer during the delivery process.
Security Data Card
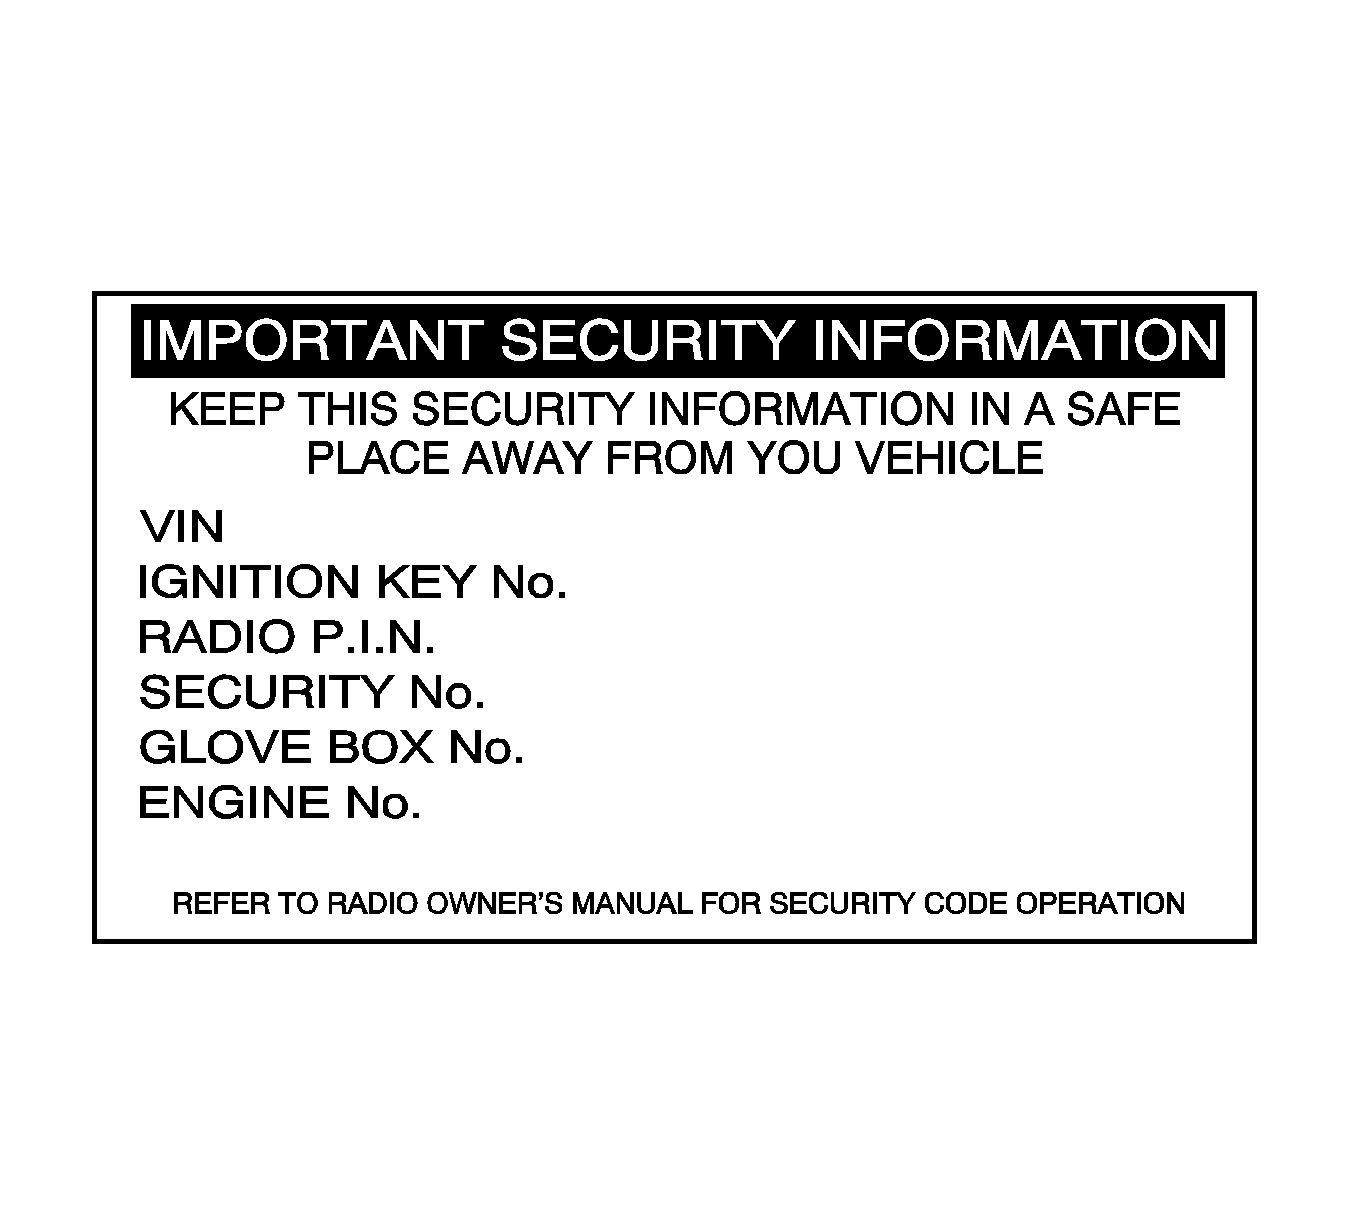
Important: The security card includes security data relevant to the security of the vehicle, including radio PIN, key cutting codes and remote key reprogramming code. Please request that the owner keep this card in a safe place, preferably not in the vehicle.
The vehicle security data card is shipped in the loose parts package in the vehicle trunk. It includes critical data for the vehicle including key codes, BCM Security Code, and radio PIN. This should be provided to the customer during the delivery process, and the customer advised to keep it in a safe place. The selling dealership must make a copy of the security card and retain a copy in the sales file. The security information is required any time the battery is disconnected, for instance, during vehicle servicing or repair, the radio PIN will need to be re-entered. The security card is of the same size as a credit card. An example is shown below.
Rapgard Removal
Notice: Rapgard may become brittle and difficult to remove if left on the painted surfaces for periods in excess of 6 months. If the vehicle is to be stored for a period greater than this, it is recommended that the Rapgard be removed or paint damage could occur.
Under normal circumstances, the Rapgard film should easily peel away from the surface, and leaves no residue.
Door Edge Protection
The foam blocks are designed to protect the vehicle while in storage or on display. The foam blocks should not be removed until the vehicle is delivered to the owner.
Interior Protection Removal
Within 6 months of the vehicle build date, and prior to vehicle retail delivery, remove all of the components of the interior protection package.
Brake Disc Protection Covers
These impregnated paper covers which are fitted to the brake discs behind the wheels, can be removed by tearing them away from the brake disc area. There is no need to remove the wheels.
Description of covers -- The covers are manufactured from a high strength plastic material with vapor emitting paper attached to the inner surface. They are designed to provide surface corrosion protection and are intended to prevent tearing during vehicle movement in shipping.
Method of Removal -- It is necessary to remove covers as part of the PDI process. There is no need to remove covers while the vehicle is in storage, however, effectiveness will progressively reduce as the cover ages.
Complete the following removal procedure for each of the 4 covers:
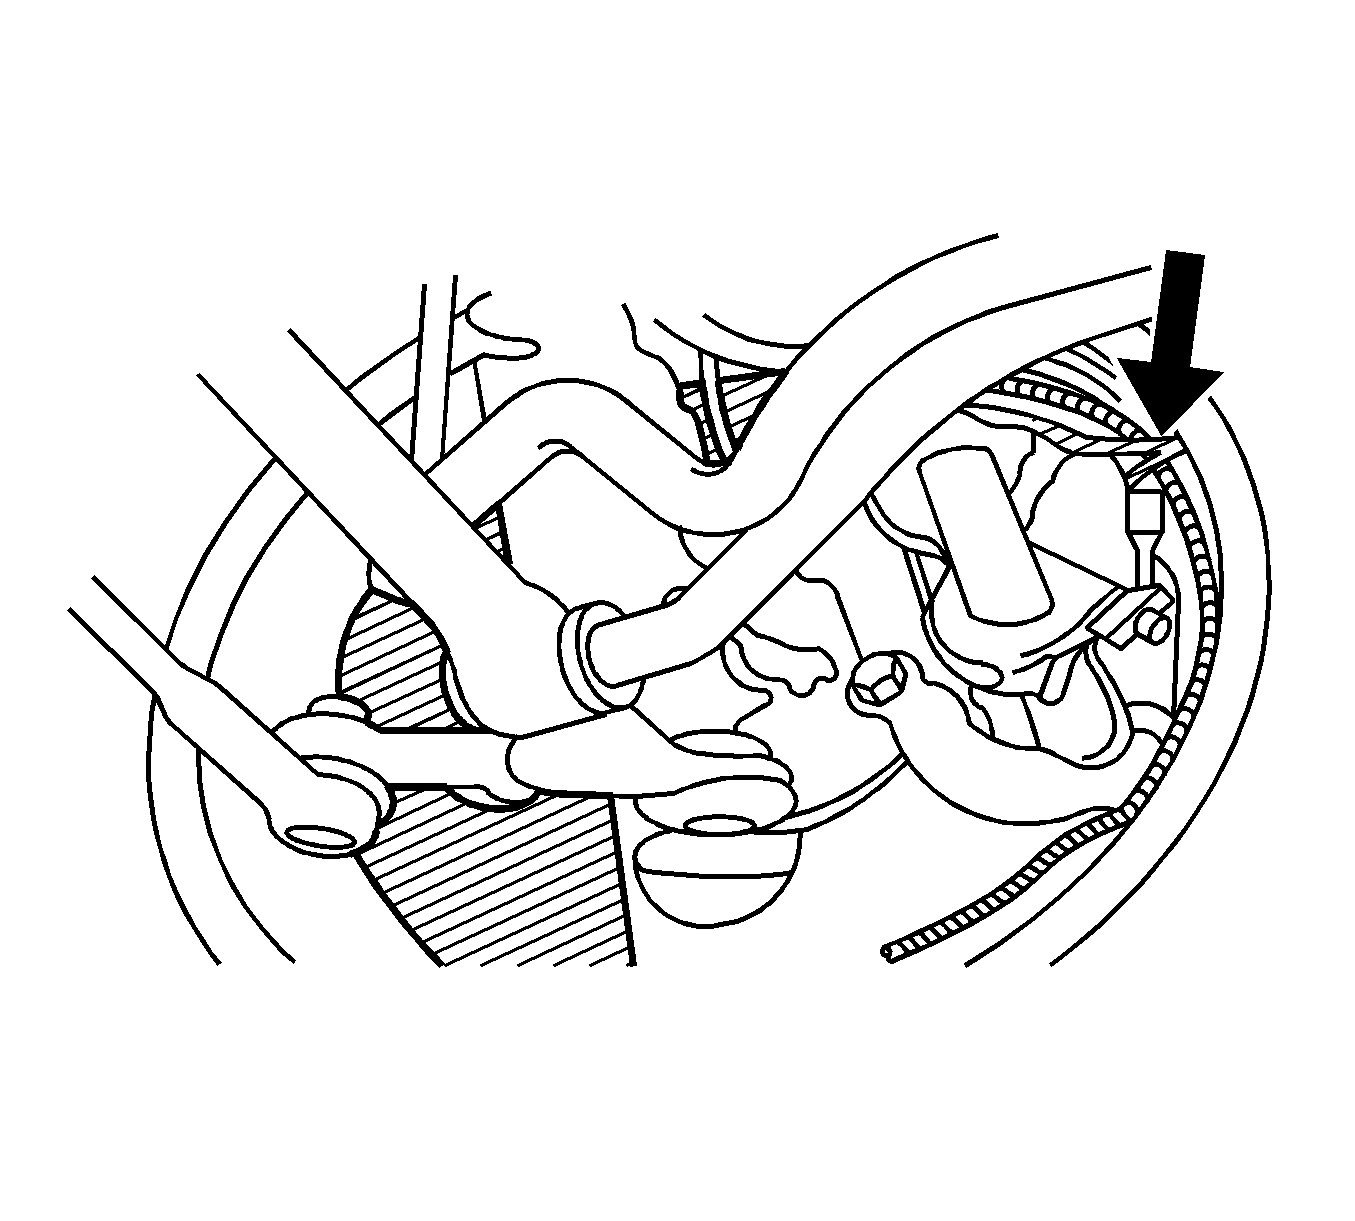
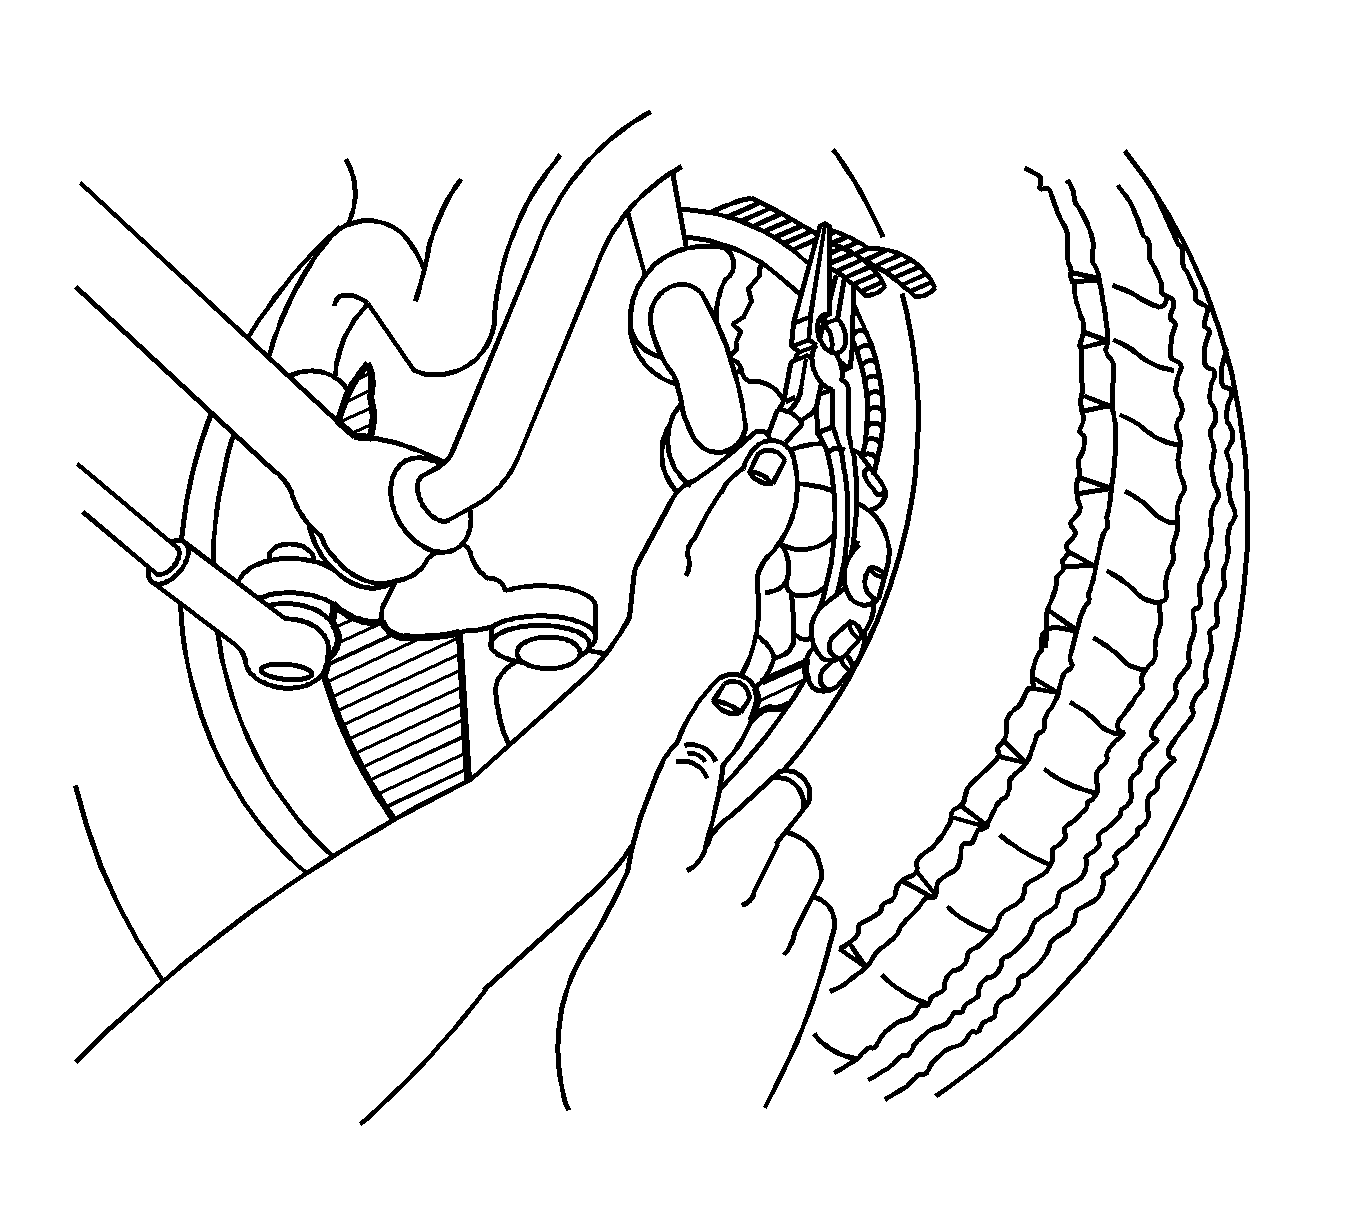
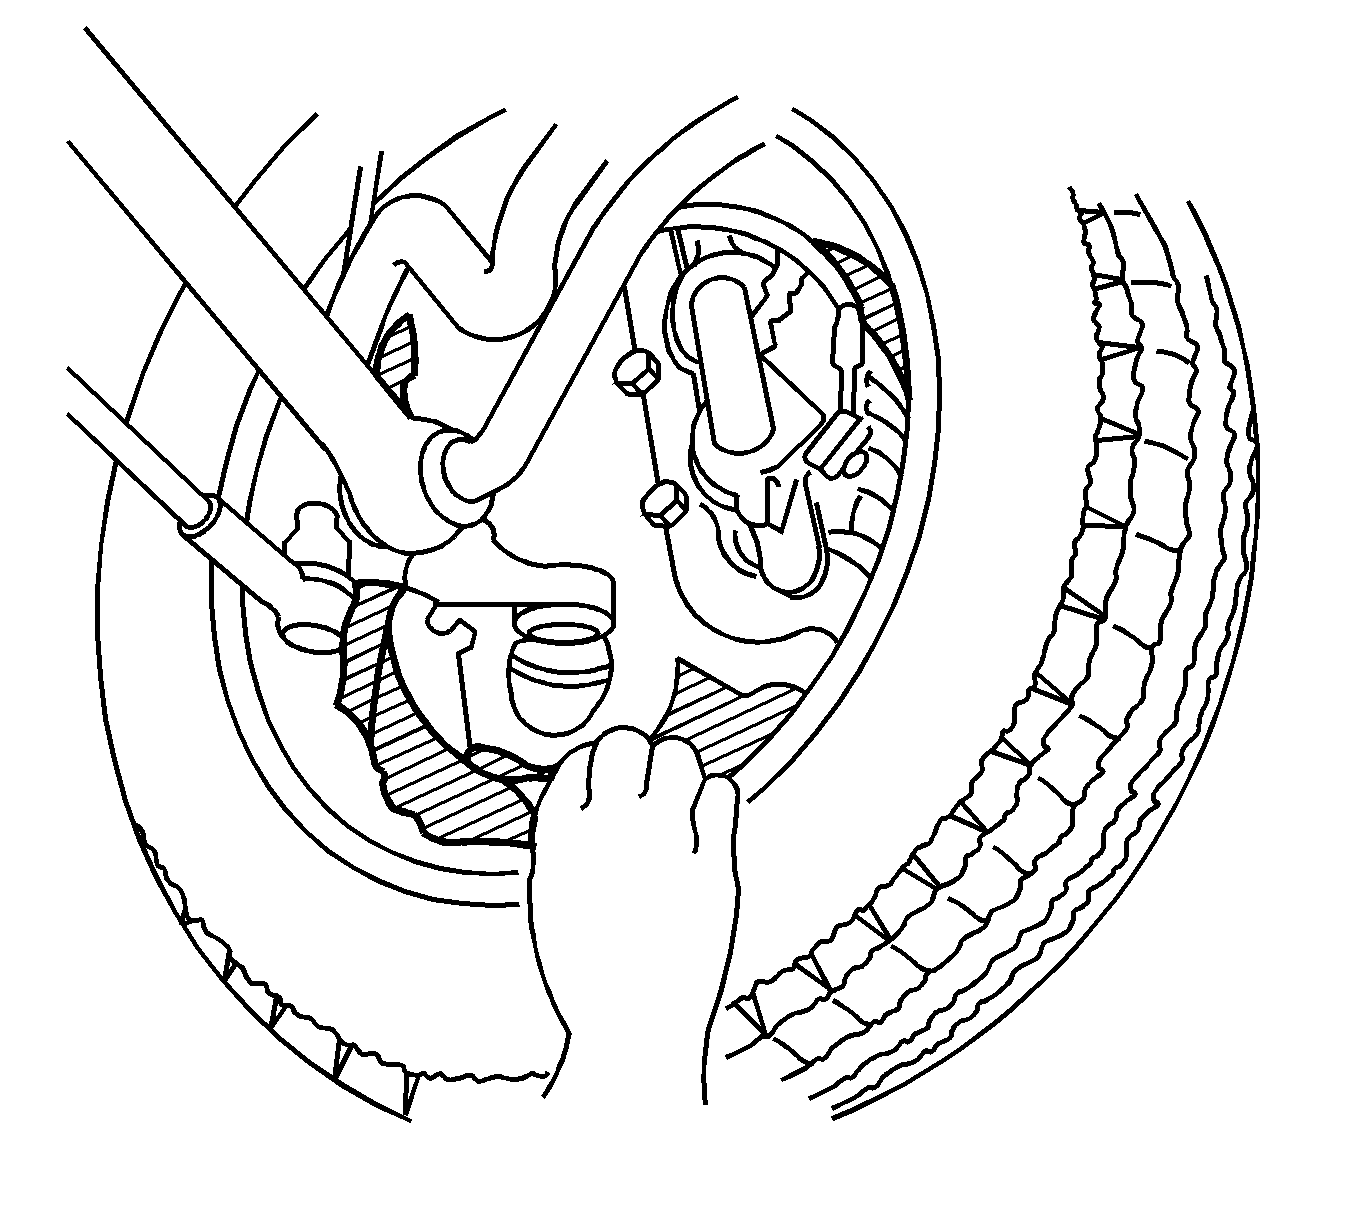
- With the vehicle on a hoist, locate the tie wire. The wire is wrapped around the caliper brake hose. This wire is located on the cover in a perforated area and will assist the operator to tear the cover at this point.
- Untie the wire from the hose. Using a pair of pliers to grip the wire, pull out and down to tear the wire through the disc cover.
- Rotate the wheel while at the same time pulling the torn end of the cover away from the brake disc and wheel. Remove all of the cover material.
License Plate Installation
Certain State laws require the use of a front license plate. A front license plate bracket and instructions are supplied with every vehicle in the loose ship parts box in the trunk.
Set Time Display on Radio
- To set the correct time, press the ‘Time’ button on the radio to reveal time display. Hold for two seconds. The display will show ‘TIME ADJ’ and the time will flash.
- To adjust hours, press SEEK/TRACK button.
- To adjust minutes, press the TUNE button.
Front Suspension Chocks
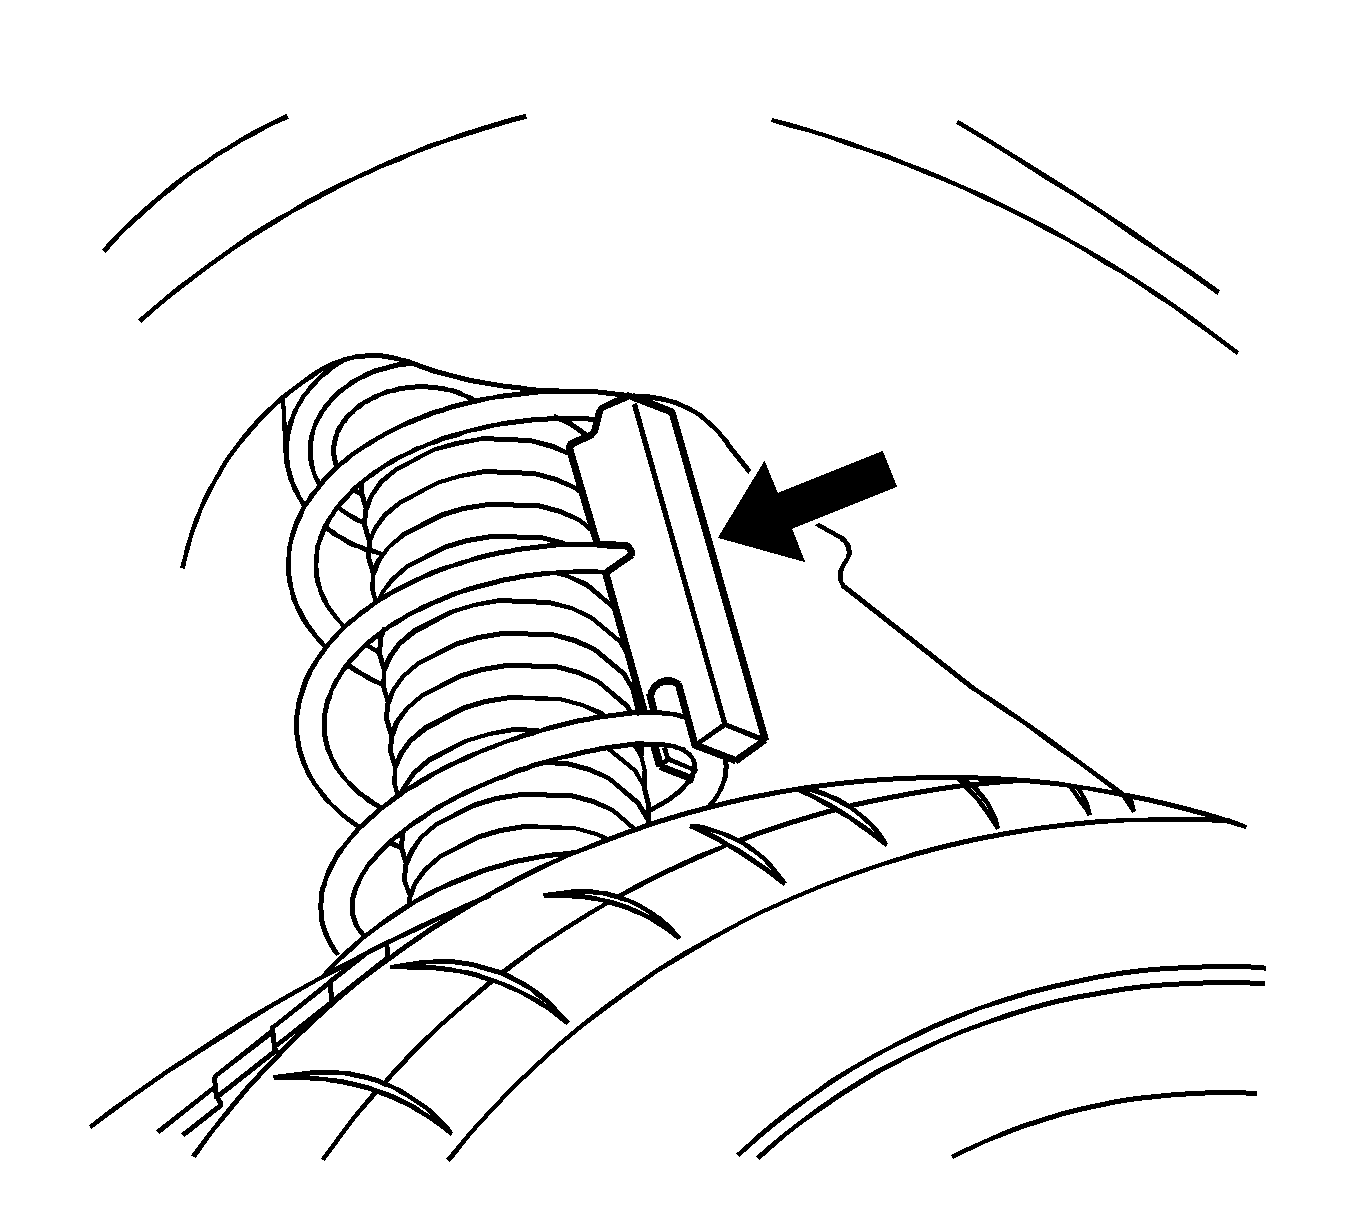
The chocks are fitted to both the front suspension springs to raise the suspension height during new vehicle shipment. These must be removed before the vehicle is driven on public roads. While the vehicle is on a hoist for the under body inspection, remove the front suspension chocks. Once the vehicle’s weight is removed from the wheels and the wheel is hanging, the chock can be grasped and twisted out for removal.
Tire Pressure
Tires are inflated to 60 psi at the Assembly Plant for transportation. This will also prevent flat spotting of tires when left in storage for prolonged periods, but is not suitable for normal driving. Ensure this pressure is maintained while the car is kept in storage. Deflate tires to pressures indicated on the placard on the rear face of the driver's side door prior to retail delivery. For best ride quality, GM recommends the tire pressures be set to 30 psi.
PDI Checklist
Action Required | PDI Check List | ||||||||||||||
|---|---|---|---|---|---|---|---|---|---|---|---|---|---|---|---|
Remove the paint film protection -- ensure door edge foam blocks remain in place |
| ||||||||||||||
Inspect the following contents of the "loose items" pack, and fit components to vehicle
|
| ||||||||||||||
Copy the security data card and retain security data in a safe place |
| ||||||||||||||
Remove all interior protection |
| ||||||||||||||
Remove the brake rotor protective covers |
| ||||||||||||||
Remove the front suspension shipping chocks |
| ||||||||||||||
Ensure customer information CD is in the audio CD player |
| ||||||||||||||
Set the clock time on the radio |
| ||||||||||||||
Set tire pressures. Important: The maximum specifications are found on the tire placard located on the rear face of the driver's side door. For best ride quality, GM recommends the tire pressures be set to 30 psi. |
| ||||||||||||||
Inspect fluid levels. Add the following fluids if necessary:
|
|
