Caution: When working with any type of glass or sheet metal with exposed or rough edges, wear approved safety glasses and gloves in order to reduce the chance of personal injury.
Caution: When the vehicle interior has been exposed to extensive water intrusion, such as waterleaks, window left open, driving through high water and so forth, the Sensing and Diagnostic Module (SDM) and the SDM connector may need to be replaced. With the ignition OFF, inspect the area under the front seat and the area around the SDM, including the carpet. If any significant soaking or evidence of significant soaking is detected, the water must be removed, water damage repaired and the SDM and the SDM connector MUST be replaced. Before attempting any of these repairs, the SIR system must be disabled. Refer to the Supplemental Inflatable Restraint (SIR) System for instructions on how to disable the SIR system. Failure to disable the SIR system may result in possible air bag deployment, personal injury or otherwise unneeded SIR system repairs.
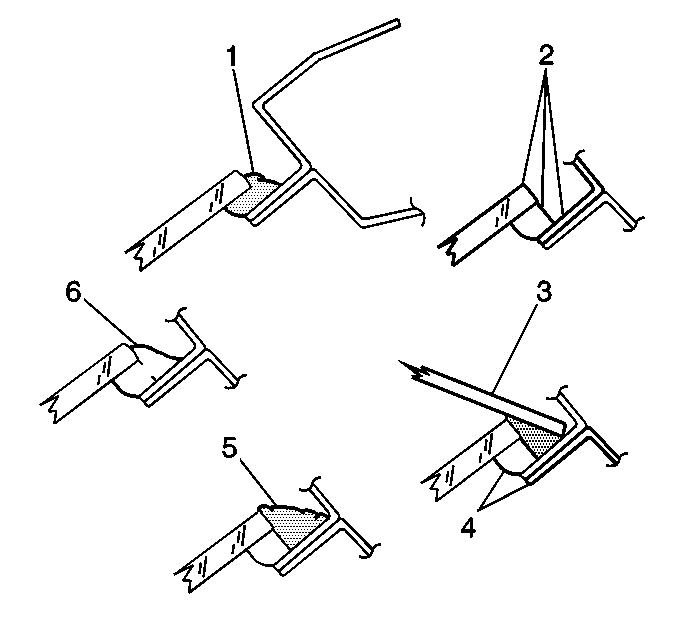
Use the kit GM P/N 12346284 or the equivalent in order to repair waterleaks without removing and reinstalling the window. Use the following method only when using the urethane adhesive furnished in the kit:
- Remove the reveal moldings in the area of the leak.
- Mark the location of the leak.
- Apply water to the area of the leak while performing the following steps:
- From the outside of the body, use water in order to clean any dirt or foreign material from the leak area.
- Use a sharp knife in order to trim off the uneven edges of the urethane adhesive material (1) at the leak point.
- Prime (2) the affected area using Pinch-Weld Primer, Black Number 3.
- Apply the urethane adhesive material at the following locations:
- Apply the urethane adhesive material 75-100 mm (3-4 in) on both sides of the leak point or leak area.
- Use a flat-bladed tool (3) in order to work the urethane into the leak point of the original material and body. This action ensures a watertight seal.
- Use warm or hot water in order to test the area.
- Replace all of the previously removed components.
- Clean the excess urethane adhesive from the surface of the repaired window.
- Allow the window to air dry.
Remove the garnish moldings or finishing lace as needed in order to locate the source of the leak.
| 3.1. | Push outward on the window in the area of the leak in order to determine the extent of the leak. |
| 3.2. | Mark the extent of the leak area. |
Use an air hose in order to dry the area.

Trim off the uneven edge of urethane adhesive material 75 to 100 mm (3 to 4 in) on both sides of the leak point or leak area.
Allow the primer to dry for 10 minutes.
| • | The leak point |
| • | On both sides of the leak point or leak area |
Important: Do not run a heavy stream of water onto freshly applied urethane adhesive.
Ensure that the leak is corrected.
Use a damp cloth in order to apply the GM Window Cleaner GM P/N 1050427 or isopropyl alcohol.
