Glycol Usage
Before you drain and refill the cooling system, inspect the system. Perform any service needed to ensure that the system is clean, does not leak, and is in proper working order.
Some coolant manufacturers mix other types of glycol into their coolant formulations. Propylene glycol is the most common new ingredient. However, do not use propylene glycol in GM vehicles that were manufactured with Dex-Cool coolant.
A hydrometer does not always provide a correct measurement of freeze protection when anything other than ethylene glycol and water is being tested. The degree of inaccuracy varies depending on the proportion of other glycols present in the coolant.
Hydrometers test the amount of glycol in a mixture by measuring the specific gravity of the mixture: the more ethylene glycol, the higher the float balls go, and the better the freeze protection. Because ethylene glycol and propylene glycol do not have the same specific gravities, hydrometer readings of mixtures containing propylene glycol give incorrect values. Use a refractometer when you test coolant. Refractometers test the amount of glycol in a coolant mixture by measuring the speed of light as the light passes through the fluid, and is not affected by the specific gravity of the glycol.
Engine Coolant Recycling
Tools Required
GM approved Recycling System such as Pro Clean (Available in the GM Dealer Equipment Program)
Whenever the cooling system needs maintenance or repairs, remove and replace the coolant with qualified new or recycled coolant.
If you only drain the radiator, up to 50 percent of the used, contaminated coolant can remain in the cooling system.
Use any of the following methods in order to remove the coolant:
| • | Use a waterless coolant evacuation system, available in the GM Dealer Equipment program, or equivalent, that removes the used coolant and replaces the coolant with new or recycled coolant. |
| • | Use a GM approved coolant recycling system, available in the GM Dealer Equipment program, or equivalent, that recycles the coolant on the vehicle. This eliminates the need for coolant evacuation. |
| Important: Do not recycle coolant on vehicles manufactured with GM Goodwrench Dex-Cool. |
| • | Recover the used coolant. Store the coolant in a used coolant holding tank. Submit the used coolant for recycling on a regular basis. |
Draining Procedure
- Park the vehicle on a level surface.
- When the engine is cool, remove the surge tank cap. Refer to Radiator Assembly .
- Insert a piece of 5/16 inch fuel line tubing, or equivalent, through the lower tie bar. Attach the hose over the radiator drain tube.
- Open the radiator drain cock at the bottom left-hand side of the radiator end tank.
- Remove the engine block coolant drain hole plug if necessary.
- Allow the coolant to completely drain.
- Inspect the drained coolant.
Notice: When adding coolant, use DEX-COOL® coolant. If silicated coolant is added to the system, premature engine, heater core or radiator corrosion may result. In addition, the engine coolant will require change sooner-at 50 000 km (30,000 mi) or 24 months.
Caution: With a pressurized cooling system, the coolant temperature in the radiator can be considerably higher than the boiling point of the solution at atmospheric pressure. Removal of the surge tank cap, while the cooling system is hot and under high pressure, causes the solution to boil instantaneously with explosive force. This will cause the solution to spew out over the engine, the fenders, and the person removing the cap. Serious bodily injury may result.


For procedures requiring the cooling system to be partially drained, opening the radiator drain cock provides sufficient draining. No further actions should be required.

Notice: Dispose of used engine coolant in the proper manner, such as in a used engine coolant holding tank. DO NOT POUR USED ENGINE COOLANT DOWN A DRAIN! Ethylene glycol antifreeze is a very toxic chemical. Do not dispose of coolant into the sewer system or ground water. This is illegal and ecologically unsound.
| • | If the coolant is discolored, flush the cooling system. Refer to Flushing . |
| • | If the coolant appears normal, continue with the filling procedure. |
Filling Procedure (2.2L) (Without Engine Vent Line)
- Close the radiator drain cock.
- Remove the hose from the radiator drain.
- Install the engine block coolant drain plugs, if these were removed. Use pipe sealer, GM P/N 1052080, on the plugs.
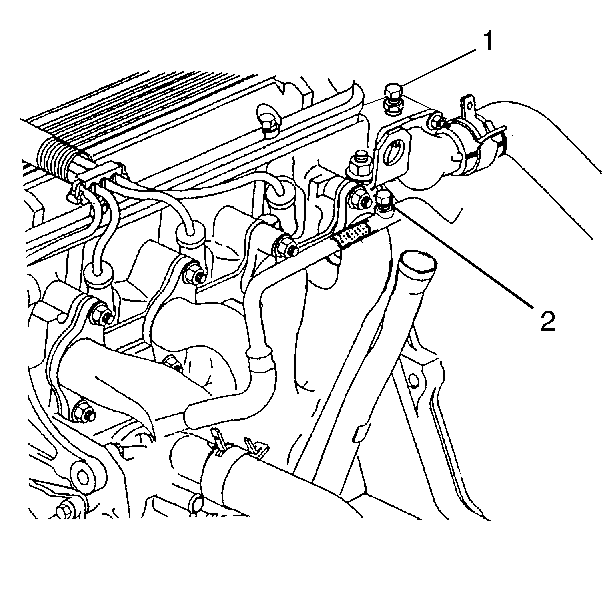
- Open the bleeder valves on the following areas:
- Fill the cooling system through the surge tank until the coolant is expelled out of both of the bleeder valves.
- Close the bleeder valves.
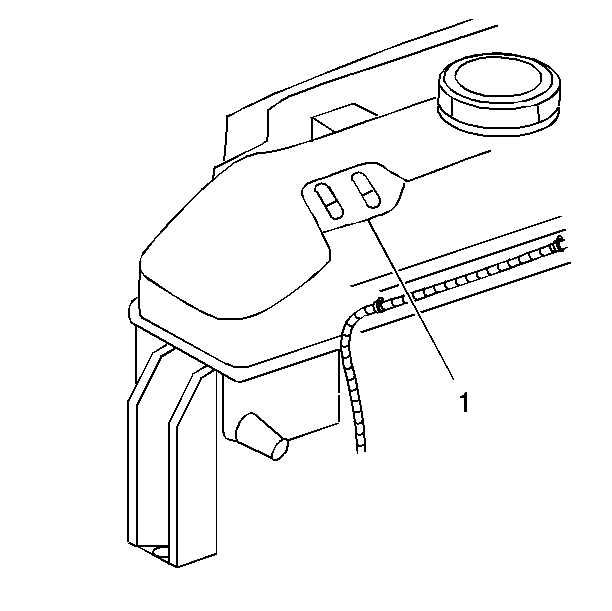
- Top off the coolant level in the surge tank to a level even with the flat horizontal wall (1) below the vent lines, about 25.4 mm (1 in) below the filler neck.
- Start the engine.
- Open the water outlet bleeder valve (1). Leave the valve open until a solid stream of coolant is expelled. Close the valve. Repeat this every 3 minutes until the thermostat opens.
- Top off the coolant, if necessary, to the same level as in step 7.
- Install the surge tank cap.

Important: Do not use mechanical fill equipment.


| • | The heater return pipe (2) |
| • | The water outlet (1) (under the air intake duct) |

Important: Leave the surge tank cap off.

Important:
• The thermostat is considered open when the upper radiator hose
is hot at the radiator connection. • Turn HVAC controls to heater, full hot. Check for warm air during
the first 5 minutes after the engine is started. If no hot air is present,
start the procedure again at step 4.
Filling Procedure (2.2L) (With Engine Vent Line)
- Close the radiator drain cock.
- Remove the hose from the radiator drain.
- Install the engine block coolant drain plugs, if these were removed. Use pipe sealer, GM P/N 1052080, on the plugs.
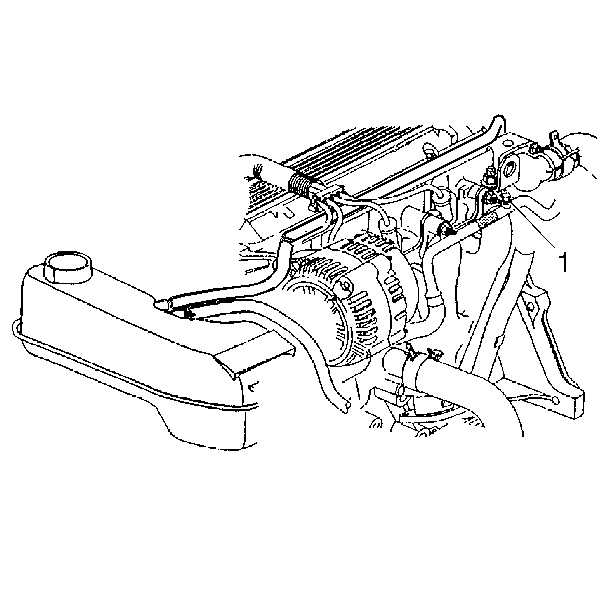
- Open the bleeder valve (1) on the heater return pipe.
- Fill the cooling system through the surge tank until coolant is expelled out of the heater return pipe bleeder valve.
- Close the bleeder valve.
- Top off the coolant level in the surge tank to a level even with the flat horizontal wall below the vent lines, about 25.4 mm (1 in) below the filler neck.
- Start the engine. Warm up the engine until the thermostat opens.
- Top off the coolant, if necessary, to the same level as in step 7.
- Install the surge tank cap.

Important: Do not use mechanical fill equipment.


Important:
• Leave the surge tank cap off. • The thermostat is considered open when the upper radiator hose
is hot at the radiator connection. • Turn HVAC controls to heater, full hot. Check for warm air during
the first 5 minutes after the engine is started. If no hot air is present,
start the procedure again at step 4.
Filling Procedure (2.4L)
- Close the radiator drain cock.
- Remove the hose from the radiator drain.
- Install the engine block drain plugs, if removed.
- Fill the cooling system through the surge tank.
- Install the cap.
- Start the engine. Run the engine until the upper radiator hose is hot.
- Stop the engine. Observe the coolant level. Fill the tank to the Full line, if necessary.


