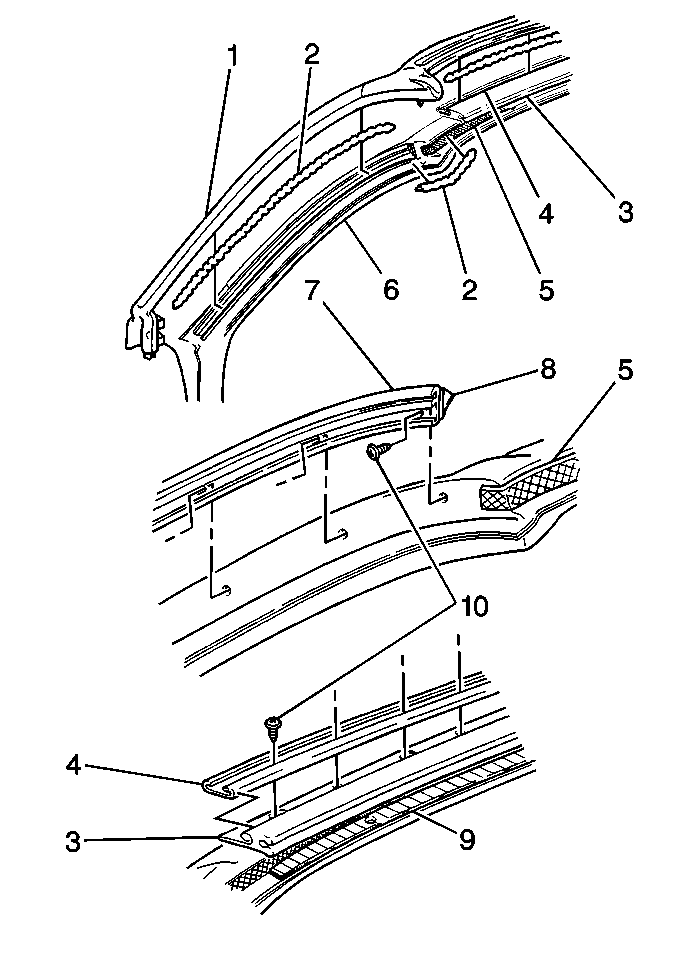
Removal Procedure
- Unlatch the folding top. Refer to Power Folding Top Operation .
- Lower the folding top. Refer to Power Folding Top Operation .
- Remove the windshield garnish molding. Refer to Windshield Pillar Garnish Molding Replacement in Interior Trim.
- Disengage the header weatherstrip push pins.
- Remove the header weatherstrip clips.
- Remove the header weatherstrip (1):
Important: You do not need to remove the weatherstrip retainers if only the weatherstrip needs service.
The header weatherstrip push pins are located at the top of the right and left A-pillars.
The header weatherstrip clips are located at the base of the right and left A-pillars.

| 6.1. | Pull up the weatherstrip. |
| 6.2. | Insert a flat-blade tool between the weatherstrip and retainers in order to break the cement bond. |
| 6.3. | Remove the screws (10) from the A-pillar weatherstrip retainer (7). |
| 6.4. | Remove the screws (10) from the header weatherstrip retainer (4) and the header garnish molding retainer (3). |
Cleaning and Inspection
- Clean the adhesive from the header weatherstrip (1) if you are reusing the weatherstrip.
- Clean the adhesive from the header weatherstrip retainer (4) and the A-pillar weatherstrip retainer (7).
- Clean the foam tape (8) from the A-pillar weatherstrip retainer (7).
- Remove the butyl tape (5) from the header surface.
- Remove the foam tape (9) from the header surface.
- Inspect the surface skin of the header weatherstrip (1) for holes, tears, and breaks.
- Replace the weatherstrip if any of the above conditions exist.

Installation Procedure
- Install the foam tape (10) between the header garnish molding retainer (3) and the header surface.
- Use the retaining screws (10) in order to install the header weatherstrip retainer (4) and the header garnish molding retainer (3).
- Install foam tape (8) to the rear of the A-pillar weatherstrip retainer (7).
- Use the retaining screws (10) in order to install the A-pillar weatherstrip retainer (7).
- Install 1 mm of butyl tape (5) to the header surface.
- Apply a continuous bead of weatherstrip adhesive (2) to the retainers.
- Install the header weatherstrip (1) to the header weatherstrip retainer (4).
- Engage the front header weatherstrip push pins to the holes at the top of the right and left A-pillars.
- Install the header weatherstrip clips to the pinch flange at the base of the right and left A-pillars.
- Install the windshield garnish molding. Refer to Windshield Pillar Garnish Molding Replacement in Interior Trim.
- Clean any weatherstrip adhesive from the header weatherstrip that may contact the folding top or door glass.
- Raise and latch the folding top. Refer to Power Folding Top Operation .
- Inspect the front header weatherstrip alignment to the front rail weatherstrip, and the door glass edge.

Notice: Use the correct fastener in the correct location. Replacement fasteners must be the correct part number for that application. Fasteners requiring replacement or fasteners requiring the use of thread locking compound or sealant are identified in the service procedure. Do not use paints, lubricants, or corrosion inhibitors on fasteners or fastener joint surfaces unless specified. These coatings affect fastener torque and joint clamping force and may damage the fastener. Use the correct tightening sequence and specifications when installing fasteners in order to avoid damage to parts and systems.
Tighten
Tighten the screws to 2 N·m (18 lb in).
Install the tape from the left A-pllar retainer to the right A-pillar retainer.
Important: Seal all components of the weatherstrip with one continuous bead of
weatherstrip adhesive. Apply a bead of adhesive along the inside of each retainer
and across the body contact surfaces.
• Along the inside of each retainer • Across body contact surfaces
Begin installation at the center of the weatherstrip and work outward.
