VISTA VENT SERVICE INFORMATION

VEHICLES AFFECTED: 1984 Pontiac 'T' Styles
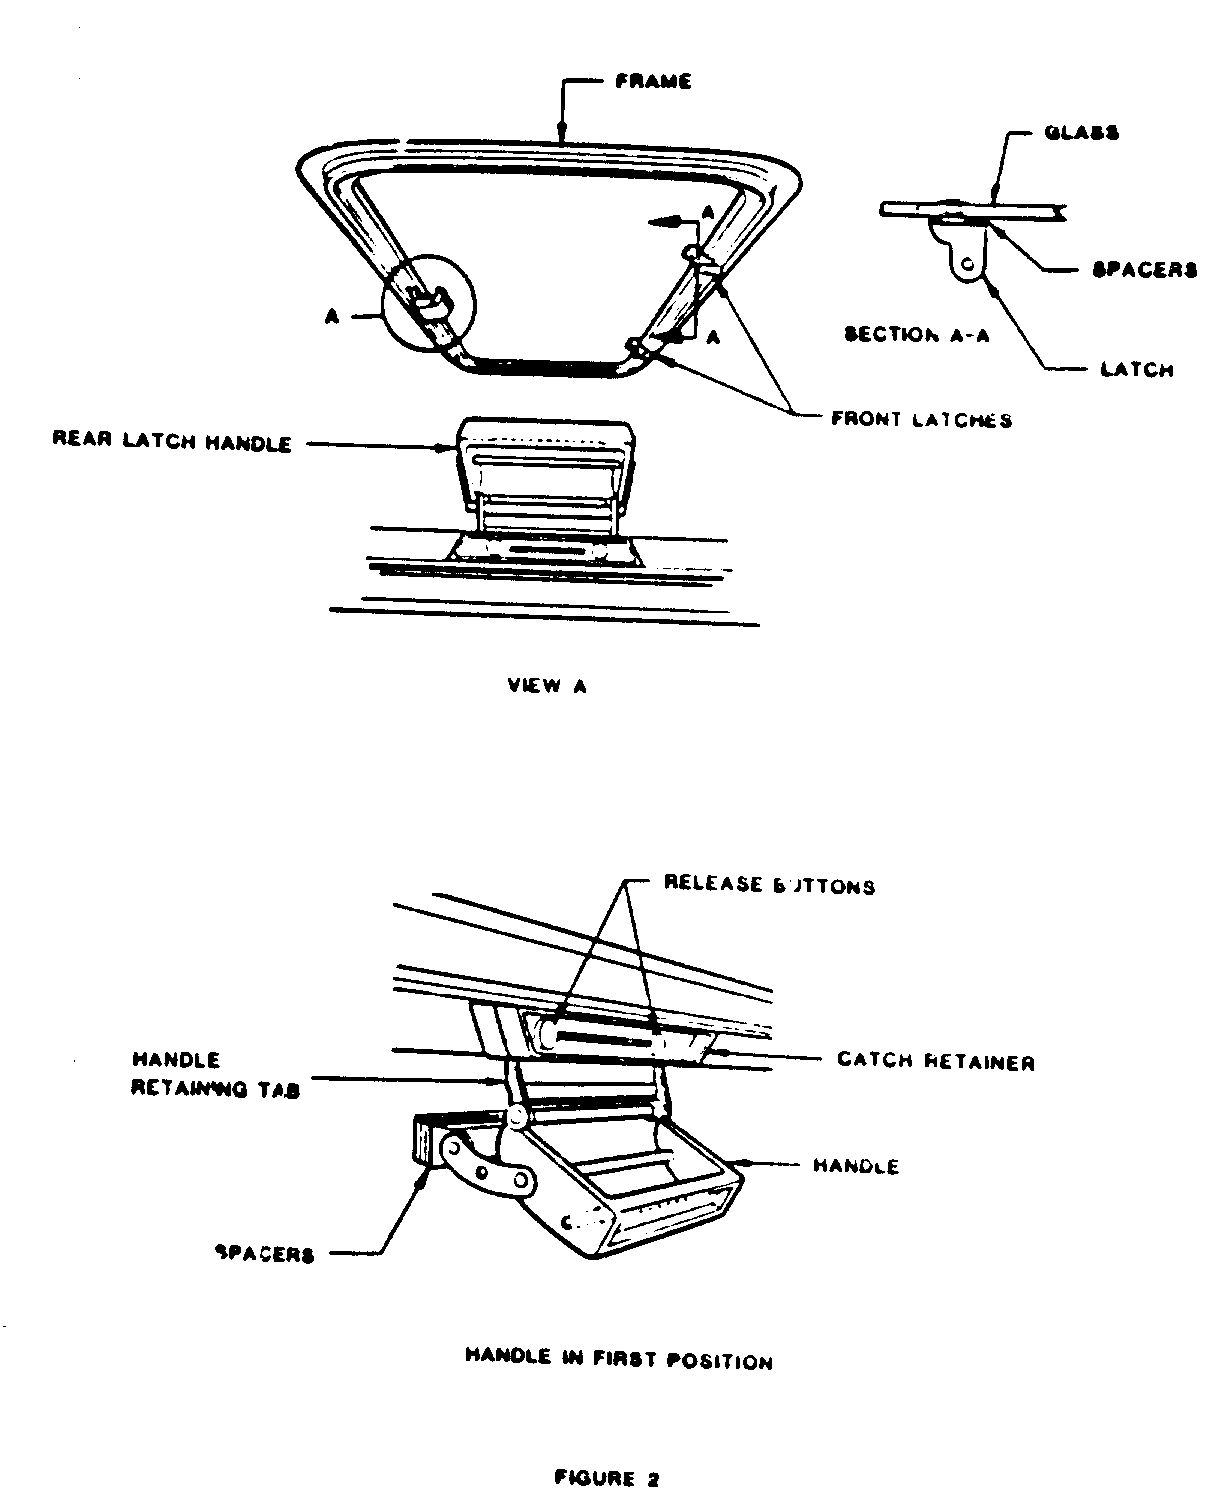
A new vista vent was introduced into 1984 Pontiac production in March of 1984. This vista vent will be installed in the Pontiac T1000 only.
The optional roof mounted vista vent assembly is manually operated. The rear edge of the glass raises about 45 mm (1-3/4 inch) above the roof panel in the full open position. The vent glass is made of tempered glass and closes against a one-piece silicone weatherstrip which is cemented into the aluminum frame (Figure 1). The front and rear latches are attached to the glass with screws which pass through the glass and into special shoulder nuts. The screws and nuts are insulated from the glass with protective busnings (MANY OF THE SCREWS USED HAVE LEFT-HAND THREADS -- USE EXTRA CAUTION).
Glass Storage
The vista vent glass (Figure 1) can be removed and stored in a protective storage bag assembly located in the rear compartment area as follows:
1. Open the vista vent by pulling the rear handle down to the first position. Press the buttons (Figure 2) on the catch retainer and pull the handle retaining tab from the catch retainer.
2. Pull down on both the front latches until the pins release from the retainers on the frame.
3. Remove the glass carefully and store in the protective bag.
4. To install the glass, position the front latch pins into the frame retainers and lower the rear edge of the glass (with handle projecting down). Lock the front latches to the frame retainers by pushing the latch tabs forward, then insert the handle retaining tab into the catch retainer until it locks in place and then push the handle rearward to close the vista vent.
Vista Vent Glass
The glass assembly consists of the front latches, rear handle and glass. Spacers are located between the hardware and the glass for proper adjustment. If the weathrstrip in the frame has been under compressed, turn the latch retaining screws clockwise and remove the latches and one spacer then replace the front latches. Tighten the screws by turning them counter-clockwise.
The same procedure applies to the rear handle. Removing the spacer(s) brings the glass tighter against the weatherstrip to make a water-tight seal.
Handle Assembly
To remove a defective handle, remove the slotted screws that hold the handle to the glass in a clockwise direction. To tighten the screws when installing the new handle to the glass, turn the slotted screws in a counter-clockwise direction. The handle should be mounted as close to the edge of the glass as possible before the screws are tightened completely.
Catch Retainer
To replace the catch retainer:
1. Remove the glass.
2. Lift the weatherstrip gently, directly above the rear retainer. Be careful not to tear the weatherstrip. If torn, repair with Sure Seal Black Silicone Sealer (LAG) or 3M Black Super Silicone Sealant (08662).
3. Remove the two screws that hold the catch retainer to the frame.
4. Position the retainer in place and attach with 2 new screws through the frame and into the retainer.
Front Latch Assembly
To remove a defective latch, turn the slotted screws beneath the glass that hold the latch to the glass in a clockwise direction. To tighten the screws when installing the new latch, turn the slotted screws in a counter-clockwise direction. The latch should be mounted as close to the edge of the glass as possible before the screws are tightened completely.
Vista Vent Frame Assembly
The frame assembly includes the aluminum frame, the weatherstrip, the intergal (2) front latch retainers with the air deflector attached to the eetainers, the rear catch retainer attached to the frame, the sponge tape applied to the underside of the frame to seal the frame from water leaks, (4) metal strips and (4) metal corners with screws are used to attach the frame to the roof panel.
Removal (Figure 1)
1. Remove the glass.
2. Remove the weatherstrip (using a wide screwdriver or similar tool) from the frame for access to the screws that hold the frame to the roof. (Tape around the perimeter of the frame to protect the paint from damage.)
3. Remove the lace that holds the headliner in the frame groove.
4. Remove the dome lamp and carefully remove the headliner material from the frame groove.
5. Remove the frame attaching screws (30).
6. Lower the edge of the headlining and remove the (4) galvanized strips and corners that hold the frame to the roof panel.
7. Remove the frame assembly from the roof.
Installation
1. When installing a new frame, remove the weatherstrip from the frame. It is not glued in. Handle carefully so as not to tear the glued butt joint. This joint is directly above the paper insert in the frame. This insert is to be removed before the weatherstrip is permanently installed.
2. Position the frame in the roof opening in the same position as the old frame.
3. Line up the galvanized strips and corners, one at a time, in the following sequence:
a. side strip unnotched
b. side strip notched (notch straddles butt joint in the frame)
c. front and reat strips
d. corner strips last
Insert the 3/4 inch long screws (furnished with the kit) in the holes located on the vertical wall of the frame. You can visually see the holes in the galvanized strips by looking through the larger holes in the frame. Tighten all the screws and the frame will be drawn securely to the roof panel.
4. Apply a 1/8 inch bead of Sure Seal Black Silicone Sealer (LAG) or 3M Black Supr Silicone sealer (08662) in the upper lip of the frame and also on the base of the frame. The weatherstip can now be placed in the frame (Figure 1).
a. The butt joint should be located between the screws on the end of the driver's side of the frame.
b. Insert the top edge of the weatherstrip first making sure that the tail is tucked firmly into the groove beneath the upper flange.
c. The weatherstrip has been cut to the proper length. If it appears too long, 'load' the corners until it fits flat in the frame.
d. The weatherstrip must be securely tucked inthe undercuts of the frame. This will eliminate leaks between the frame and weatherstrip.
e. Carefully tuck the headliner into the groove on the underside of the frame. Install the lace into the frame groove.
f. Place the air deflector in position to allow the front latches on the glass to drop between the deflector wires. This will enable you to close the front latches and fold the air deflector forward on top of the latches. Make sure the shiny metal pins in the front latches fit in the grooves of the frame retainers before latching. Slide the metal handle tongue into the rear catch retainer until a click is heard, then pull the handle down on to the rear to secure the glass.
Do not remove or vent for 24 hours to allow the adhesive to cure.
Vista Vent Weatherstrip
To replace the weatherstrip proceed as follows:
1. Remove the glass.
2. Apply masking tape to the top surface of the frame as protection.
3. Use a wide screwdriver or similar tool to remove the weatherstrip from the frame. All fragments and adhesive particles must be removed from the upper and lower grooves in the frame.
4. Apply Sure Seal Black Silicone Sealer (LAG) or 3M Black Super Silicone Sealer (08662) in the upper groove of the frame and also the lower base of the frame where the weatherstrip sets.
5. Install the weatherstrip starting in the corners for proper installation with the butt joint located between the screws on the driver's side of the frame.
6. Tuck the upper and then the lower tail portions of the weatherstrip into the grooves of the frame. This will eliminate leaks between the frame and weatherstrip. The weatherstrip has been cut to the proper length. If it appears too long, 'load' the corners until it fits flat in the frame.
7. Replace glass and do not remove or vent for 24 hours to allow the adhesive to cure.
Air Deflector
to replace the air deflector, proceed as follows:
1. Remove the glass.
2. Lift the weatherstrip, gently, directly above the front retainers - be careful not to tear. If you should tear latch weatherstrip, repair with silicone adhesive.
3. Remove the screws that hold the retainers to the frame.
4. To install, position the air deflector and retainers in place and insert the screws through the frame and into the retainers. The screws must be tightened securely.

General Motors bulletins are intended for use by professional technicians, not a "do-it-yourselfer". They are written to inform those technicians of conditions that may occur on some vehicles, or to provide information that could assist in the proper service of a vehicle. Properly trained technicians have the equipment, tools, safety instructions and know-how to do a job properly and safely. If a condition is described, do not assume that the bulletin applies to your vehicle, or that your vehicle will have that condition. See a General Motors dealer servicing your brand of General Motors vehicle for information on whether your vehicle may benefit from the information.
