BROKEN A/C PIPES DUE TO LOOSE MISSING COMPRESSOR MOUNT. BOLT

VEHICLES AFFECTED: 1987-88 A-CAR W/2.5L
Increased A/C compressor vibration, resulting from loose and/or missing compressor mounting fasteners, may cause cracking of the discharge pipe of the coupled hose assembly. The following procedure should be performed whenever a coupled hose assembly is replaced due to cracking:
IMPORTANT: This procedure should not be performed for hose assemblies which have been damaged due to cuts or pinhole leaks.
1. Disconnect battery.
2. Remove accessory drive belt.
3. Raise vehicle.
4. Remove right side splash shield.
5. Disconnect exhaust pipe at manifold.
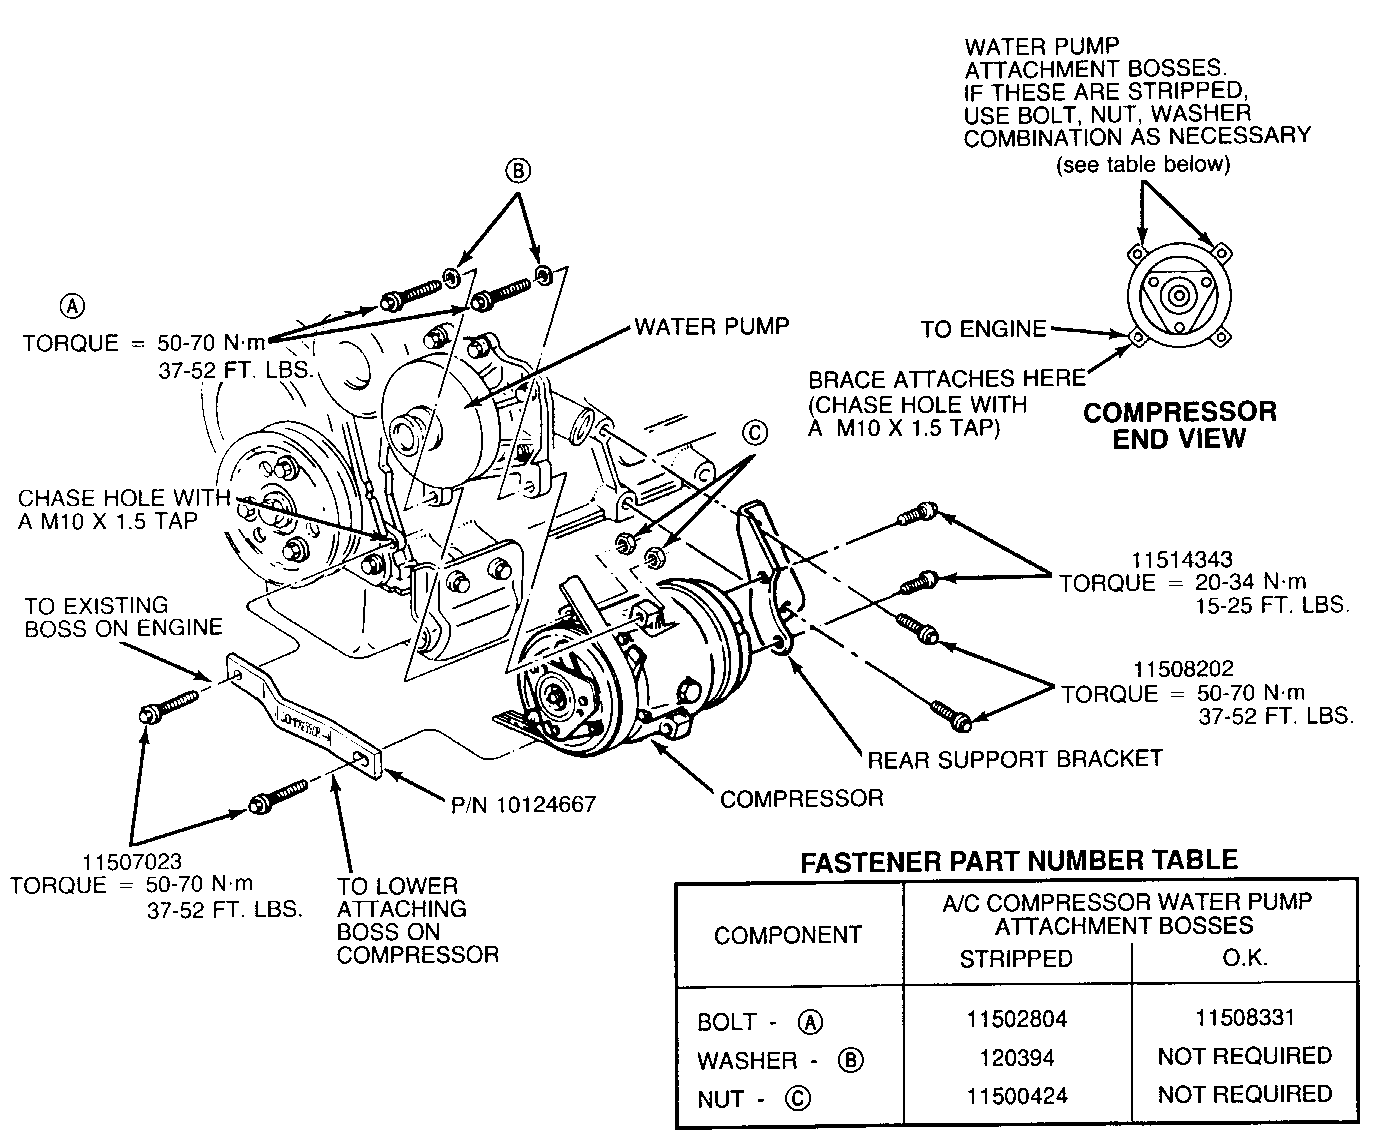
6. Verify that the following six bolts as shown in the Illustration are present:
(2) A/C compressor-to-rear bracket bolts (2) Rear bracket-to-block bolts (2) Water pump-to-A/C compressor bolts
7. Remove each of the above bolts, one at a time to prevent the compressor from "slipping".
IMPORTANT: Remove upper, front compressor bolt after lowering vehicle.
8. Inspect bolts for thread damage and/or wear due to loose operation. A damaged or missing bolt should be replaced with the appropriate part, per the Illustration. Apply Loctite (R) 242 to the bolt threads during reinstallation. Loctite (R) 242 is available from CANSPO as P/N 12345382.
IMPORTANT: Inspect the threads of the A/C compressor's water pump attachment bosses. If damage is evident or if the bolts can not be torqued to the specification given, then the compressor should be fastened to the water pump using the following parts:
(2) Bolts P/N 11502804 (2) Washers P/N 120394 (2) Jam Nuts P/N 11505057
Parts are currently available from CANSPO.
Refer to the Illustration for assembly and torque details.
9. Apply Loctite (R) 242 to the bolt threads and torque to specification per the Illustration.
IMPORTANT: It may be necessary to chase the threads of the two A/C brace attachment bosses to assure clean threads - use a M10 x 1.5 tap (see Illustration).
10. Install the compressor support brace (P/N 10124667) with bolts. (P/N 11507023) as shown in the Illustration. Assure that the brace is installed with the arrow pointing towards the compressor.
Parts are currently available from CANSPO.
11. Connect exhaust pipe to the manifold.
12. Install right side splash shield.
13. Lower vehicle.
14. Remove, clean, and Loctite (R) upper front compressor bolt.
15. Install accessory drive belt.
16. Replace the cracked A/C pipe with a new one.
17. Connect battery.
18. Recharge A/C system per the Service Manual and check for leaks.

General Motors bulletins are intended for use by professional technicians, not a "do-it-yourselfer". They are written to inform those technicians of conditions that may occur on some vehicles, or to provide information that could assist in the proper service of a vehicle. Properly trained technicians have the equipment, tools, safety instructions and know-how to do a job properly and safely. If a condition is described, do not assume that the bulletin applies to your vehicle, or that your vehicle will have that condition. See a General Motors dealer servicing your brand of General Motors vehicle for information on whether your vehicle may benefit from the information.
