Removal Procedure
- Disconnect the battery ground (negative) cable. Refer to
Battery Negative Cable Disconnection and Connection
in Engine Electrical.
- Drain the engine coolant from the cooling system. Refer to
Cooling System Draining and Filling
in Engine Cooling.
- Drain the engine oil. Refer to
Engine Oil and Oil Filter Replacement
.
- Remove the throttle body air inlet duct and the air cleaner assembly.
Refer to Air Cleaner Assembly Replacement
in Engine
Controls - 3.1L.
- Remove the hood panel. Refer to
Hood Replacement
in Body Front End.
- Remove the engine mount struts. Refer to
Engine Mount Strut Replacement
.
- Remove the drive belt. Refer to
Drive Belt Replacement
.
- Raise and suitably support the vehicle as required. Refer to
Lifting and Jacking the Vehicle
in General Information.
Disconnect the electrical harness connectors from the following:
| • | The heated oxygen sensor |
| • | The camshaft position sensor |
| • | The crankshaft position sensor |
| • | The manifold air pressure (MAP) sensor |
| • | The exhaust gas recirculation (EGR) valve |
| • | The evaporative emissions canister purge solenoid valve |
| • | The throttle position (TP) sensor |
| • | The idle air control (IAC) valve |
| • | The wiring harness grounds |
| • | The two body wiring harness-to-engine harness connectors |
- Raise and suitably support the vehicle. Refer to
Lifting and Jacking the Vehicle
in General Information.
- Remove the oil filter.
- Remove the three-way catalytic converter pipe from the right (rear)
exhaust manifold. Refer to
Catalytic Converter Replacement
in Engine Exhaust.
- Remove the engine mount lower nuts. Refer to
Engine Mount Replacement
.
- Remove the torque converter cover. Refer to
Torque Converter Cover Replacement
in Automatic Transaxle-4T60-E.
- Remove the starter motor. Refer to
Starter Motor Replacement
in Engine Electrical.
- Remove the A/C compressor. Refer to Compressor
Replacement (3.1L)
in HVAC. Suitably support the compressor.
- Remove the torque converter bolts. Refer to
Flywheel to Torque Converter Bolt Replacement
in Automatic Transaxle-4T60-E.
- Remove the right engine splash shield. Refer to
Engine Splash Shield Replacement
in Body Front End.
- Remove the transaxle brace. Refer to
Transmission Brace Replacement
in Automatic Transaxle-4T60-E.
- Disconnect the radiator outlet hose from the engine. Refer to
Radiator Outlet Hose Replacement
in Engine Cooling.
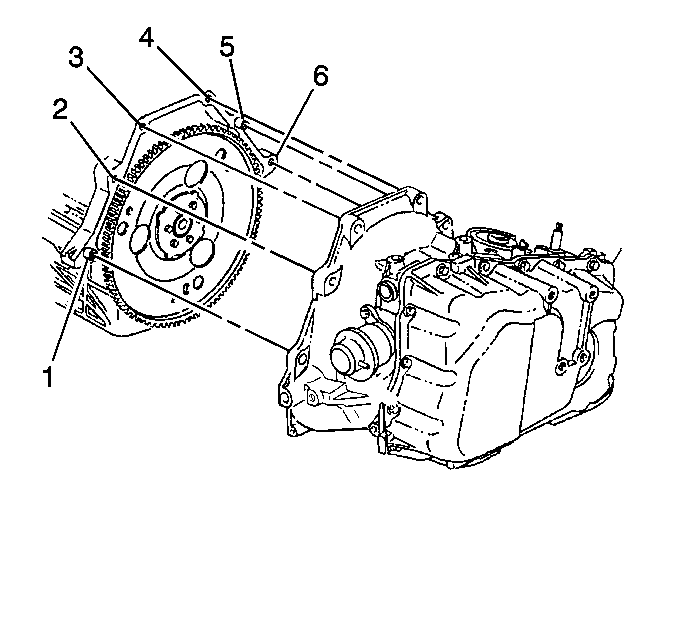
- Remove the lower transaxle-to-engine bolt (6) and stud (1).
- Lower the vehicle.
Caution: In order to avoid possible injury or vehicle damage, always replace
the accelerator control cable with a NEW cable whenever you remove the engine
from the vehicle.
In order to avoid cruise control cable damage, position the cable out
of the way while you remove or install the engine. Do not pry
or lean against the cruise control cable and do not kink the cable. You must
replace a damaged cable.
- Disconnect the accelerator control and cruise control servo cable from
the throttle body and the cable bracket. Refer to
Accelerator Control Cable Replacement
in Engine Controls -
3.1L and
Cruise Control Cable Replacement
in Cruise Control.
- Disconnect the vacuum hoses from the upper intake manifold.
- Disconnect the power brake booster vacuum hose from the upper
intake manifold. Refer to
Vacuum Brake Booster Hose Replacement
in Hydraulic Brakes.
- Disconnect the fuel feed and return hoses.
- Remove the power steering lines from the power steering pump.
Refer to
Power Steering Hoses Replacement
in Power Steering System.
- Remove the power steering pump and reposition. Refer to
Power Steering Pump Replacement
in Power Steering
System.
- Disconnect the heater outlet and inlet hoses from the engine.
Refer to Heater Hoses Replacement (3.1L)
in HVAC.
- Disconnect the radiator inlet hose from the engine. Refer to
Radiator Inlet Hose Replacement
in Engine Cooling.
- Attach the engine lifting device.
- Remove the upper transaxle-to-engine bolts (3, 4 and 5) and stud (2).
- Remove the engine from the vehicle.
- Remove the flywheel. Refer to
Engine Flywheel Replacement
.
- Install the engine to the engine stand.
- Remove generator and generator bracket. Refer to
Generator Replacement
in Engine Electrical.
- Remove the engine mount bracket. Refer to
Engine Mount Bracket Replacement
.
- Remove the drive belt tensioner. Refer to
Drive Belt Tensioner Replacement
.
- Remove the ignition control module. Refer to
Ignition Control Module Replacement
in Engine Controls -
3.1L.
Installation Procedure
- Install the ignition control module. Refer to
Ignition Control Module Replacement
in Engine Controls -
3.1L.
- install the drive belt tensioner. Refer to
Drive Belt Tensioner Replacement
.
- install the engine mount bracket. Refer to
Engine Mount Bracket Replacement
.
- Install the generator and the generator bracket. Refer to
Generator Replacement
in Engine Electrical.
- Remove the engine from the engine stand.
- Install the engine to the vehicle.
Notice: Use the correct fastener in the correct location. Replacement fasteners
must be the correct part number for that application. Fasteners requiring
replacement or fasteners requiring the use of thread locking compound or sealant
are identified in the service procedure. Do not use paints, lubricants, or
corrosion inhibitors on fasteners or fastener joint surfaces unless specified.
These coatings affect fastener torque and joint clamping force and may damage
the fastener. Use the correct tightening sequence and specifications when
installing fasteners in order to avoid damage to parts and systems.
- Install the upper
transaxle-to-engine bolts (3, 4 and 5) and stud (2).
Tighten
Tighten the upper transaxle-to-engine bolts (3, 4 and 5) and stud (2)
to 75 N·m (55 lb ft).
- Remove the engine lifting device.
- Install the power steering pump. Refer to
Power Steering Pump Replacement
in Power Steering System.
- Install the power steering lines to the power steering pump. Refer
to
Power Steering Hoses Replacement
in Power Steering System.
- Connect the radiator inlet hose from the engine. Refer to
Radiator Inlet Hose Replacement
in Engine Cooling.
- Connect the heater outlet and inlet hoses to the engine. Refer
to Heater Hoses Replacement (3.1L)
in HVAC.
- Connect the fuel feed and return hoses.
- Connect the power brake booster vacuum hose to the upper intake
manifold. Refer to
Vacuum Brake Booster Hose Replacement
in Hydraulic Brakes.
- Connect the vacuum hoses to the upper intake manifold.
Caution: In order to avoid possible injury or vehicle damage, always replace
the accelerator control cable with a NEW cable whenever you remove the engine
from the vehicle.
In order to avoid cruise control cable damage, position the cable out
of the way while you remove or install the engine. Do not pry
or lean against the cruise control cable and do not kink the cable. You must
replace a damaged cable.
- Connect the accelerator control and cruise control servo cable to the
cable bracket and the throttle body. Refer to
Accelerator Control Cable Replacement
in Engine Controls -
3.1L and
Cruise Control Cable Replacement
in Cruise Control.
- Raise and suitably support the vehicle. Refer to
Lifting and Jacking the Vehicle
in General Information.
- Connect the radiator outlet hose to the engine. Refer to
Radiator Outlet Hose Replacement
in Engine Cooling.
- Install the lower transaxle-to-engine bolt (6) and stud (1).
Tighten
Tighten the upper transaxle-to-engine bolt (6) and stud (1) to 75 N·m
(55 lb ft).
- Install the transaxle brace. Refer to
Transmission Brace Replacement
in Automatic Transaxle-4T60-E.
- Install the right engine splash shield. Refer to
Engine Splash Shield Replacement
in Body Front End.
- Install the torque converter bolts. Refer to
Flywheel to Torque Converter Bolt Replacement
in Automatic Transaxle-4T60-E.
- Install the A/C compressor. Refer to Compressor
Replacement (3.1L)
in HVAC.
- Install the starter motor. Refer to
Starter Motor Replacement
in Engine Electrical.
- Install the torque converter cover. Refer to
Torque Converter Cover Replacement
in Automatic Transaxle-4T60-E.
- Install the engine mount lower nuts. Refer to
Engine Mount Replacement
.
- Install the three-way catalytic converter pipe to the right (rear)
exhaust manifold. Refer to
Catalytic Converter Replacement
in Engine Exhaust.
- Install the oil filter. Refer to
Engine Oil and Oil Filter Replacement
.
- Connect electrical harness connectors to the following:
| • | The heated oxygen sensor |
| • | The camshaft position sensor |
| • | The crankshaft position sensor |
| • | The manifold air pressure (MAP) sensor |
| • | The exhaust gas recirculation (EGR) valve |
| • | The evaporative emissions canister purge solenoid valve |
| • | The throttle position (TP) sensor |
| • | The idle air control (IAC) valve |
| • | The wiring harness grounds |
| • | The two body wiring harness-to-engine harness connectors |
- Lower the vehicle.
- Install the drive belt. Refer to
Drive Belt Replacement
.
- Install the engine mount struts. Refer to
Engine Mount Strut Replacement
.
- Install the hood panel. Refer to
Hood Replacement
in Body Front End.
- Install the throttle body air inlet duct and the air cleaner assembly.
Refer to Air Cleaner Assembly Replacement
in Engine
Controls - 3.1L.
- Connect the battery ground (negative) cable. Refer to
Battery Negative Cable Disconnection and Connection
in Engine Electrical.
- Fill the with new engine oil. Refer to Refer to
Engine Oil and Oil Filter Replacement
.
- Fill with cooling system with engine coolant. Refer to
Cooling System Draining and Filling
in Engine
Cooling.
- Fill the power steering system with power steering fluid. Refer
to
Refilling the Power Steering System
in Power Steering System.
- Check for leaks.
