| Table 1: | Electric Cooling Fan Functional Check |
| Table 2: | Electric Cooling Fan Table #1 |
| Table 3: | Electric Cooling Fan Table #2 |
| Table 4: | Electric Cooling Fan Table #3 |
Refer to Engine Controls Schematics
Cell 20: Coolant Fans
.
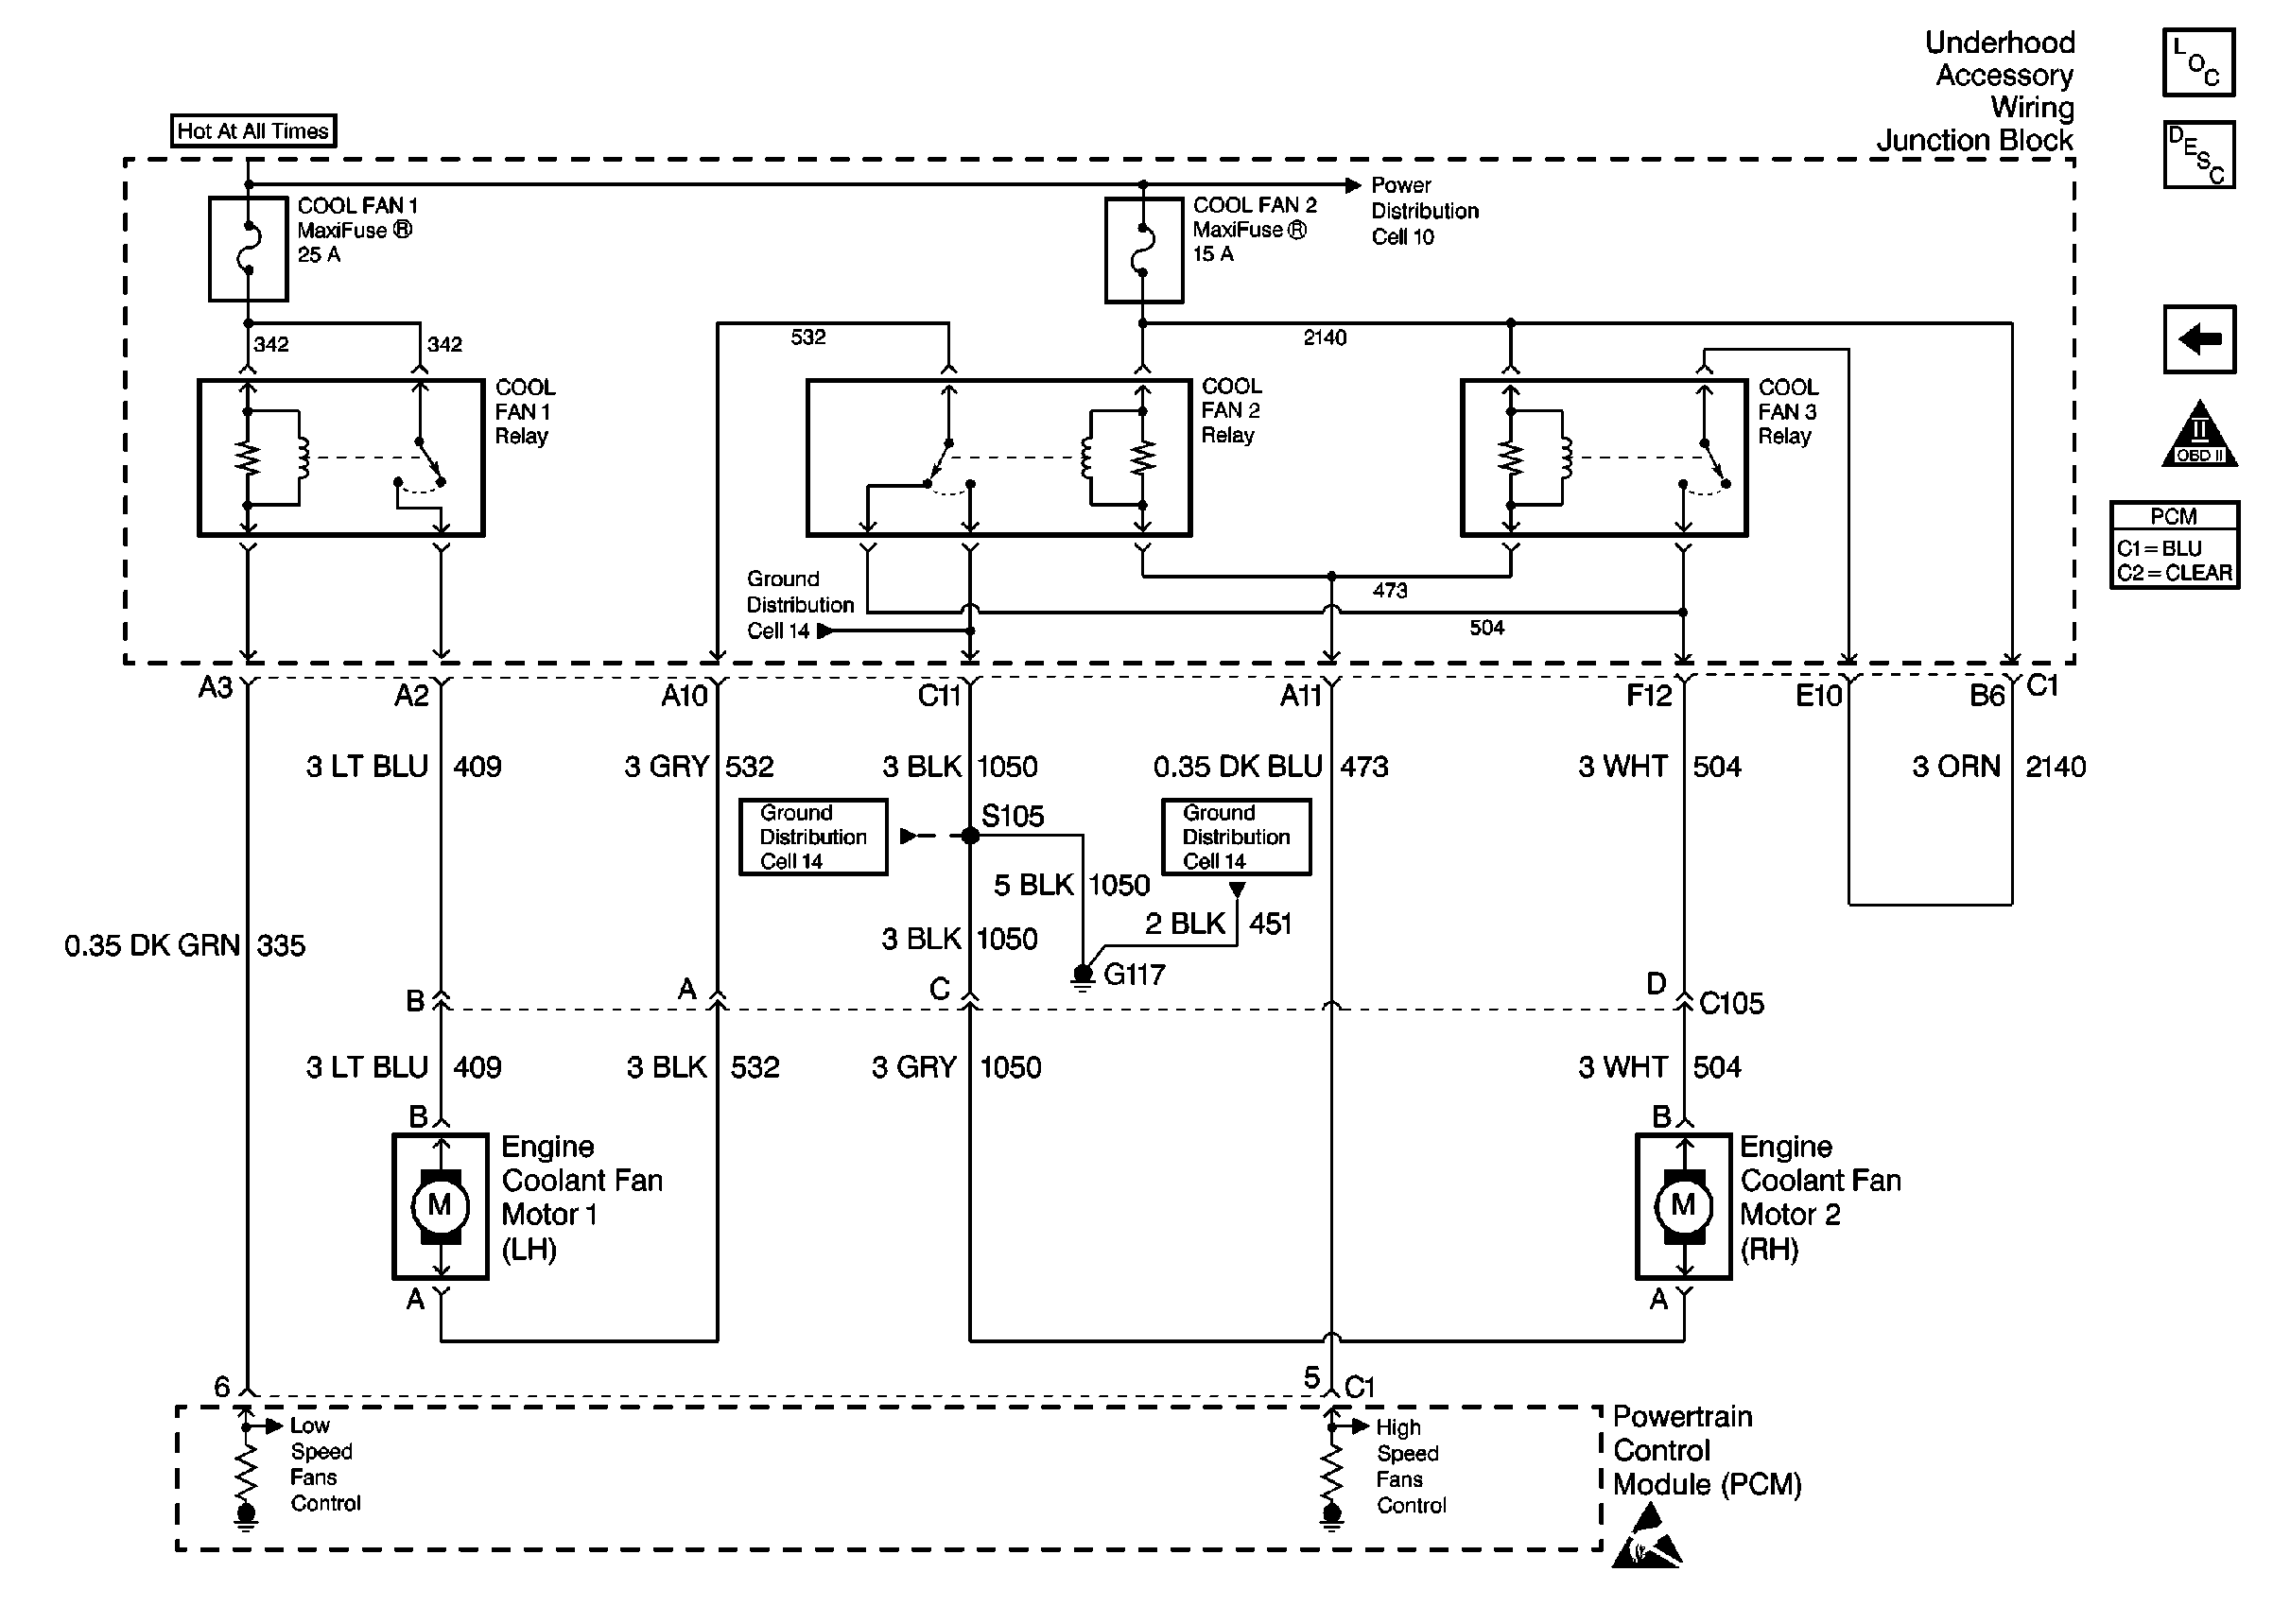
Circuit Description
Power for the fan motors is supplied through the
Underhood Accessory Wiring Junction Block (RPO L82)
.
The cooling fan relays are energized when current flows from the Cool Fan
1MaxiFuse® in the
Underhood Accessory Wiring Junction Block (RPO L82)
and Cool Fan 2 MaxiFuse® in the
Underhood Accessory Wiring Junction Block (RPO L82)
through the relay coils to ground through the PCM. The Low
Speed Fans Control circuit is grounded for low speed fans operation. The
Low Speed Fans Control circuit and the High Speed Fans Control circuits
are all grounded for high speed fans operation.
During low speed fans operation the PCM supplies a ground path for
the Cool Fan 1 Relay. This closes Cool Fan 1 Relay contacts, allowing current
to flow from the
Underhood Accessory Wiring Junction Block (RPO L82)
through the relay contacts
to the leftt hand cooling fan motor. During low speed operation, the ground
path for the right hand cooling fan motor is through the Cool Fan 2 Relay
and the left hand engine cooling fan motor. The result is a series circuit
with both cooling fans running at low speed.
During high speed cooling fan operation the PCM supplies a ground path
for the Cool Fan 1 Relay. The PCM also supplies a ground path for Cool Fan
2 and Cool Fan 3 Relay. This closes all three cooling fan relays. During
high speed fans operation, both the right and the left hand engine cooling
fans are supplied current from the
Underhood Accessory Wiring Junction Block (RPO L82)
and each cooling fan has
its own ground path.
Diagnostic Aids
If the owner complained of an overheating problem, determine if the complaint was due to an actual boil over, or the warning indicator illuminated, or the engine coolant temperature gauge indicated overheating. The gauge accuracy can also be checked by comparing the ECT Sensor reading using a scan tool and comparing its reading with the gauge reading. If the engine is actually overheating and the gauge indicated overheating, but the cooling fan(s) are turning on, the ECT sensor may have shifted out of calibration and should be replaced. If the engine is overheating and the cooling fans are on, the cooling system is suspect and should be checked. Refer to Engine Overheating in Engine Cooling.
Check for the following conditions:
Important: : Remove any debris from the connector surfaces before servicing a component. Inspect the connector gaskets when diagnosing or replacing a component. Ensure that the gaskets are installed correctly. The gaskets prevent contaminate intrusion.
| • | Poor terminal connection. |
| Inspect the harness connectors for backed out terminals, improper mating, broken locks, improperly formed or damaged terminals, and faulty terminal to wire connection. Use a corresponding mating terminal to test for proper tension. Refer to Intermittents and Poor Connections Diagnosis , and Connector Repairs Wiring Systems. |
| • | Damaged harness. |
| Inspect the wiring harness for damage. If the harness appears to be OK, observe the sensor display on the scan tool while moving connectors and wiring harnesses related to the sensor. A change in the sensor display may indicate the location of the fault. Refer to Wiring Repairs in Wiring Systems. |
| • | Inspect the PCM and the engine grounds for clean and secure connections. |
If the DTC is determined to be intermittent, reviewing the Fail Records can be useful in determining when the DTC was last set.
Test Description
The numbers below refer to numbers on the diagnostic table:
-
The PCM will enable the engine cooling fans when certain Diagnostic Trouble Codes are set. Go to applicable DTC Table first before proceeding with this table.
-
Allow engine coolant temperature to cool below 100°C (212°F) before proceeding with diagnosis.
Step | Action | Value(s) | Yes | No |
|---|---|---|---|---|
1 | Did you perform the Powertrain On-Board Diagnostic (OBD) System Check? | -- | ||
Are any DTCs set? | -- | Go to applicable DTCs | ||
Are the cooling fans off? | 100°C (212°F) | Go to Cooling Fan table #1 | ||
4 | With a scan tool, command Low Speed Fans on. Are both cooling fans on? | -- | Go to Cooling Fan table #2 | |
5 |
Important: : Allow a 3-5 second delay before determining if the fans have switched from low to high speed. With a scan tool, command High Speed Fans on. Do both cooling fans switch to high speed? | -- | Go to Cooling Fan table #3 | |
6 |
Are the cooling fans on? | -- | ||
7 | Turn on the A/C. Are the cooling fans on? | -- | System OK | |
8 | Does the scan tool display A/C request as YES? | -- | Go to VDOT A/C System Diagnosis for further diagnosis of the A/C system | |
9 | Does the scan tool display A/C request as YES? | -- | Go to VDOT A/C System Diagnosis for further diagnosis of the A/C Refrigerant Pressure Sensor | Go to VDOT A/C System Diagnosis for further diagnosis of the A/C system. |
10 |
Important: : Program the replacement PCM. Replace the PCM. Refer to Powertrain Control Module Replacement/Programming .Is the action complete? | -- | System OK | -- |
Step | Action | Values | Yes | No |
|---|---|---|---|---|
1 | Did you perform the Cooling Fan Functional Check? | -- | Go to Cooling Fan Functional Check | |
2 | Disconnect Cool Fan 1 Relay. Are both fans off? | -- | ||
3 | Disconnect Cool Fan 3 Relay. Are both fans off? | -- | ||
4 |
Does the J 35616-200 test lamp illuminate? | -- | ||
5 | Probe terminal A of the right fan connector using a J 35616-200 test lamp that is connected to a known good ground. Does the J 35616-200 test lamp illuminate? | -- | ||
6 | Probe the High Speed Fans control
circuit (473) at the Cool Fan 3 Relay connector in the
Does the J 35616-200 test lamp illuminate? | -- | ||
7 |
Is the J 35616-200 test lamp still illuminated? | -- | ||
8 | Probe the Low Speed Fans Control circuit (335) at the Cool Fan 1 Relay connector using the J 35616-200 test lamp that is connected to battery positive voltage. Does the J 35616-200 test lamp illuminate? | -- | ||
9 |
Is the J 35616-200 test lamp still illuminated? | -- | ||
10 | Repair the LH fan feed circuit (504) for a short to voltage. Refer to Wiring Repairs in Wiring Systems. Did you find and correct the condition? | -- | Go to Cooling Fan Functional Check | |
11 | Repair the RH fan feed circuit (409) for a short to voltage. Refer to Wiring Repairs in Wiring Systems. Is the action complete? | -- | Go to Cooling Fan Functional Check | -- |
12 | Repair the short to voltage in the Cool Fan 2 Relay feed circuit (532). Refer to Wiring Repairs in Wiring Systems. Is the action complete? | -- | Go to Cooling Fan Functional Check | -- |
13 | Replace the Cool Fan 1 Relay. Is the action complete? | -- | Go to Cooling Fan Functional Check | -- |
14 | Repair the High Speed Fans Control circuit (473) or the Low Speed Fans Control circuit (335) for a short to ground. Refer to Wiring Repairs in Wiring Systems. Is the action complete? | -- | Go to Cooling Fan Functional Check | -- |
15 | Replace the Cool Fan 2 Relay. Is the action complete? | -- | Go to Cooling Fan Functional Check | -- |
16 |
Important: : Program the replacement PCM. Replace the PCM. Refer to Powertrain Control Module Replacement/Programming . Is the action complete? | -- | Go to Cooling Fan Functional Check | -- |
Step | Action | Values | Yes | No |
|---|---|---|---|---|
1 | Did you perform the Cooling Fan Functional Check? | -- | Go to Cooling Fan Functional Check | |
2 | Did either fan turn on when Cool Fan 1 Relay was commanded on? | -- | ||
3 |
Did the other fan turn off? | -- | ||
4 | Disconnect Cool Fan 2 Relay. Did the fan turn off? | -- | ||
5 |
Does the J 35616-200 test lamp illuminate? | -- | ||
6 | Probe both feed circuits (342) at the Cool Fan 1 Relay Connector locations using a J 35616-200 test lamp that is connected to ground. Does J 35616-200 test lamp illuminate for both circuits? | -- | ||
7 |
Important: : Leave jumper in place for remainder of this table. Connect a fused jumper wire between the switch feed circuit (342) and the RH fan feed circuit (409) at the Cool Fan 1 Relay Connector locations. Do both fans turn on? | -- | ||
8 |
Does the J 35616-200 test lamp illuminate? | -- | ||
9 | Connect a second fused jumper wire between the right fan harness connector terminals. Is the left fan on? | -- | ||
10 |
Does the J 35616-200 test lamp illuminate? | -- | ||
11 | Using the second jumper wire, jumper the switch feed circuit (532) and the LH fan feed circuit (504) together at Cool Fan 2 Relay connector. Do the fans come on? | -- | ||
12 |
Is the right fan on? | -- | ||
13 |
Is the J 35616-200 test lamp on? | -- | ||
14 | Inspect the PCM connections. Repair faulty connections as necessary. Refer to Intermittents and Poor Connections Diagnosis and Connector Repairs in Wiring Systems. Did you find a problem and correct the problem? | -- | Go to Cooling Fan Functional Check | |
15 | Repair the Low Speed Fans Control circuit (335) for an open or shorted to battery positive voltage. Refer to Wiring Repairs in Wiring Systems. Is the action complete? | -- | Go to Cooling Fan Functional Check | -- |
16 | Inspect the fan motor ground circuit for a open or the left fan motor connections and repair as necessary. Refer to Intermittents and Poor Connections Diagnosis and Connector Repairs or Wiring Repairs in Wiring Systems. Did you find and correct the condition? | -- | Go to Cooling Fan Functional Check | |
17 | Replace the left fan motor. Is the action complete? | -- | Go to Cooling Fan Functional Check | -- |
18 | Repair the RH fan feed circuit (504) for an open. Refer to Wiring Repairs in Wiring Systems. Is the action complete? | -- | Go to Cooling Fan Functional Check | -- |
19 | Replace the fan which was not operating. Is the action complete? | -- | Go to Cooling Fan Functional Check | -- |
20 | Replace Cool Fan 3 Relay. Is the action complete? | -- | Go to Cooling Fan Functional Check | -- |
21 | Repair the Cool Fan 2 Relay feed circuit (532) for a short to ground. Refer to Wiring Repairs in Wiring Systems. Did you find and correct the condition? | -- | Go to Cooling Fan Functional Check | |
22 | Repair the open or the grounded circuit for the circuit that did not light. Refer to Wiring Repairs in Wiring Systems. Is the action complete? | -- | Go to Cooling Fan Functional Check | -- |
23 | Replace Cool Fan 1 Relay. Is the action complete? | -- | Go to Cooling Fan Functional Check | -- |
24 | Repair the LH fan feed circuit (409) for a open. Refer to Wiring Repairs in Wiring Systems. Is the action complete? | -- | Go to Cooling Fan Functional Check | -- |
25 | Repair the Cool Fan 2 Relay feed circuit (532) for a open. Refer to Wiring Repairs in Wiring Systems. Is the action complete? | -- | Go to Cooling Fan Functional Check | -- |
26 | Replace Cool Fan 2 Relay . Is the action complete? | -- | Go to Cooling Fan Functional Check | -- |
27 |
Important: : Program the replacement PCM. Replace the PCM. Refer to Powertrain Control Module Replacement/Programming . Is the action complete? | -- | Go to Cooling Fan Functional Check | -- |
Step | Action | Values | Yes | No |
|---|---|---|---|---|
1 | Did you perform the Cooling Fan Functional Check? | -- | Go to Cooling Fan Functional Check | |
2 |
Did both fans operate with no change? | -- | ||
3 | Did the left fan stop operating? | -- | ||
4 |
Does the J 35616-200 test lamp illuminate after several seconds? | -- | ||
5 | Probe the coil feed circuit (2140) at Cool Fan Relay connector using a J 35616-200 test lamp that is connected to a known good ground. Does the J 35616-200 test lamp illuminate? | -- | ||
6 | Probe the switch feed circuit (2140) at the Cool Fan 3 Relay connector using a J 35616-200 test lamp that is connected to a good ground. Does the J 35616-200 test lamp illuminate? | -- | ||
7 | Jumper the switch feed circuit (2140) and the LH fan feed circuit (504) together at the Cool Fan 3 Relay connector. Is the left fan on? | -- | ||
8 |
Do the fans switch from low to high speed? | -- | ||
9 |
Does the J 35616-200 test lamp illuminate? | -- | ||
10 | Probe the ground circuit (1050) at the Cool Fan 2 Relay connector using a J 35616-200 test lamp that is connected to battery positive voltage. Does the J 35616-200 test lamp illuminate? | -- | ||
11 | Probe the coil feed circuit (2140) at the Cool Fan 2 Relay connector using a J 35616-200 test lamp that is connected to a known good ground. Does the J 35616-200 test lamp illuminate? | -- | ||
12 | Repair the High Speed Fans Control circuit (473) for an open between Cool Fan 3 Relay and the splice. Refer to Wiring Repairs in Wiring Systems. Is the action complete? | -- | Go to Cooling Fan Functional Check | -- |
13 | Repair the open in the Cool Fan 3 Relay coil feed circuit (2140). Refer to Wiring Repairs in Wiring Systems. Is the action complete? | -- | Go to Cooling Fan Functional Check | -- |
14 | Repair the open in the Cool Fan 3 Relay switch feed circuit (2140). Refer to Wiring Repairs in Wiring Systems. Is the action complete? | -- | Go to Cooling Fan Functional Check | -- |
15 | Replace Cool Fan 3 Relay. Is the action complete? | -- | Go to Cooling Fan Functional Check | -- |
16 | Repair the open in the LH fan feed circuit (504) between Cool Fan 3 Relay and the splice. Refer to Wiring Repairs in Wiring Systems. Is the action complete? | -- | Go to Cooling Fan Functional Check | -- |
17 | Repair the High Speed Fans Control circuit (473) for an open or for a short to battery positive voltage. Refer to Wiring Repairs in Wiring Systems. Is the action complete? | -- | Go to Cooling Fan Functional Check | -- |
18 | Repair the open in the High Speed Fans Control circuit (473) between Cool Fan 2 Relay and the splice. Refer to Wiring Repairs in Wiring Systems. Is the action complete? | -- | Go to Cooling Fan Functional Check | -- |
19 | Repair the open in the ground circuit (1050). Refer to Wiring Repairs in Wiring Systems. Is the action complete? | -- | Go to Cooling Fan Functional Check | -- |
20 | Replace the Cool Fan 2 relay. Is the action complete? | -- | Go to Cooling Fan Functional Check | -- |
21 | Repair the open in Cool fan 2 Relay coil feed circuit (2140). Refer to Wiring Repairs in Wiring Systems. Is the action complete? | -- | Go to Cooling Fan Functional Check | -- |
22 |
Did you find and correct the condition? | -- | Go to Cooling Fan Functional Check | |
23 |
Important: : Program the replacement PCM. Replace the PCM. Refer to Powertrain Control Module Replacement/Programming . Is the action complete? | -- | Go to Cooling Fan Functional Check | -- |
