Circuit Description
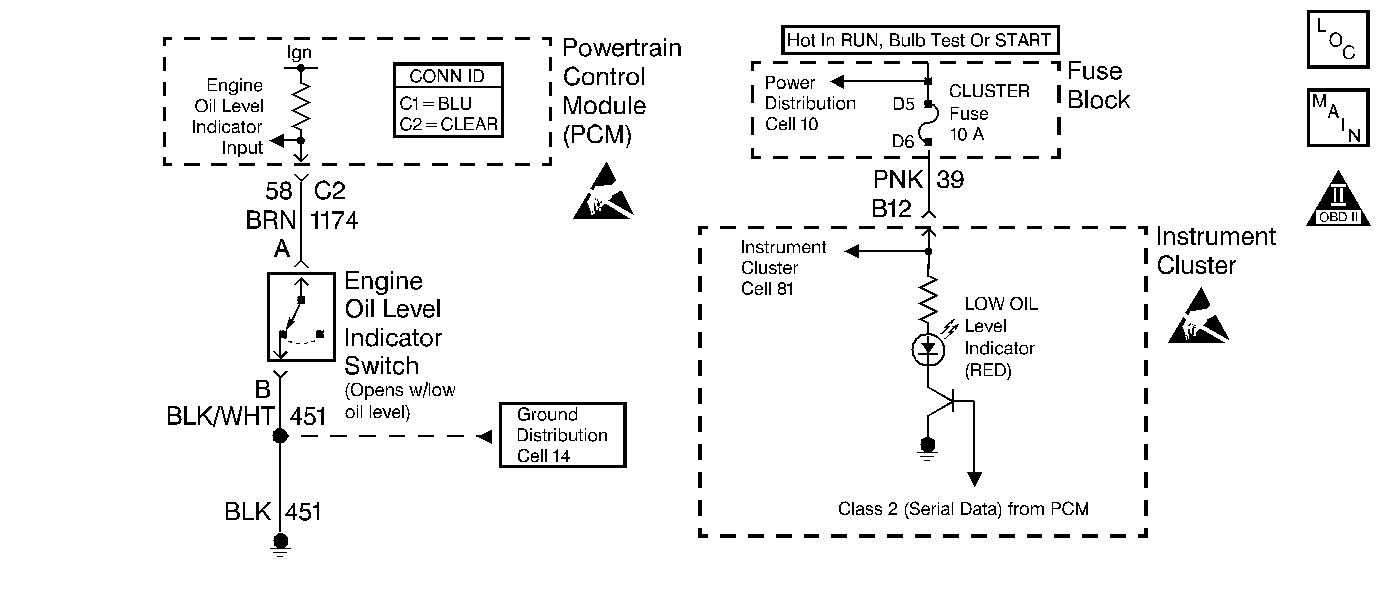
The Engine Oil Level Switch is a simple float switch that is grounded when the engine oil level is OK. The PCM checks the Engine Oil Level switch circuit at startup. Before checking the state of the Engine Oil Level switch, the PCM performs a test routine based on time and engine coolant temperature to ensure that the engine oil has drained back into the sump. To test for low oil level at start-up, one of the following conditions must be present:
| • | The engine coolant temperature must be greater than 15°C (59°F). |
| • | The engine coolant temperature at key ON must be at least 12°C (22°F) cooler than the engine coolant temperature at the last key OFF. |
The Low Oil Level Lamp will be illuminated for about a minute when the PCM checks for low oil level and the Engine Oil Level switch indicates that a low oil level condition exists (Engine Oil Level switch circuit not grounded). When the ignition is first turned ON, the IPC commands the Low Oil Level lamp ON for a brief period of time to test the bulb.
Diagnostic Aids
For diagnosis of the instrument panel, perform Diagnostic System Check - Instrument Cluster .
Check for the following conditions:
Important: : Remove any debris from the connector surfaces before servicing a component. Inspect the connector gaskets when diagnosing or replacing a component. Ensure that the gaskets are installed correctly. The gaskets prevent contaminate intrusion.
| • | Poor terminal connection. |
| Inspect the harness connectors for backed out terminals, improper mating, broken locks, improperly formed or damaged terminals, and faulty terminal to wire connection. Use a corresponding mating terminal to test for proper tension. Refer to Intermittents and Poor Connections Diagnosis , and Connector Repairs Wiring Systems. |
| • | Damaged harness. |
| Inspect the wiring harness for damage. If the harness appears to be OK, observe the sensor display on the scan tool while moving connectors and wiring harnesses related to the sensor. A change in the sensor display may indicate the location of the fault. Refer to Wiring Repairs in Wiring Systems. |
| • | Inspect the PCM and the engine grounds for clean and secure connections. |
If the DTC is determined to be intermittent, reviewing the Fail Records can be useful in determining when the DTC was last set.
Test Description
Number(s) below refer to the step number(s) on the Diagnostic Table:
-
This vehicle is equipped with a PCM which utilizes an Electrically Erasable Programmable Read only Memory (EEPROM). When the PCM is being replaced, the new PCM must be programmed.
-
For the PCM to test engine oil level, start-up engine coolant temperature must be at least 12° C (22° F) cooler than the engine coolant temperature was last time the ignition was turned off. Allowing the engine to warm and then cool ensures that the PCM checks the engine oil level switch and that the information displayed on the scan tool is current.
Step | Action | Value(s) | Yes | No |
|---|---|---|---|---|
1 |
Important: : Ensure that engine oil level is not low, before continuing diagnosis. Was the Powertrain OBD System Check performed? | -- | ||
2 | Observe Oil Level display on the scan tool. Does Oil Level display OK? | -- | Go to Diagnostic Aids | |
3 |
Is the J 35616-200 test lamp on? | -- | ||
4 |
Does the J 39200 DMM display voltage near the specified value? | B+ | ||
5 | Connect the J 39200 DMM between the Oil Level Switch signal circuit and chassis ground. Does the J 39200 DMM display a voltage near the specified value? | B+ | ||
6 |
Was a problem found? | -- | Go to Diagnostic Aids | |
7 |
Was a problem found? | -- | ||
8 |
Was a problem found? | -- | ||
9 | Locate and repair open in the Oil Level Switch ground circuit. Refer to Wiring Repairs . Is the action complete?. | -- | -- | |
10 | Replace the Oil Level Switch. Refer to Engine Oil Level Sensor and/or Switch Replacement . Is the action complete? | -- | -- | |
|
Important: : Replacement PCM must be programmed. Replace the PCM. Refer to Powertrain Control Module Replacement/Programming . Is the action complete? | -- | -- | ||
12 |
Does Oil Level display OK? | -- | System OK |
