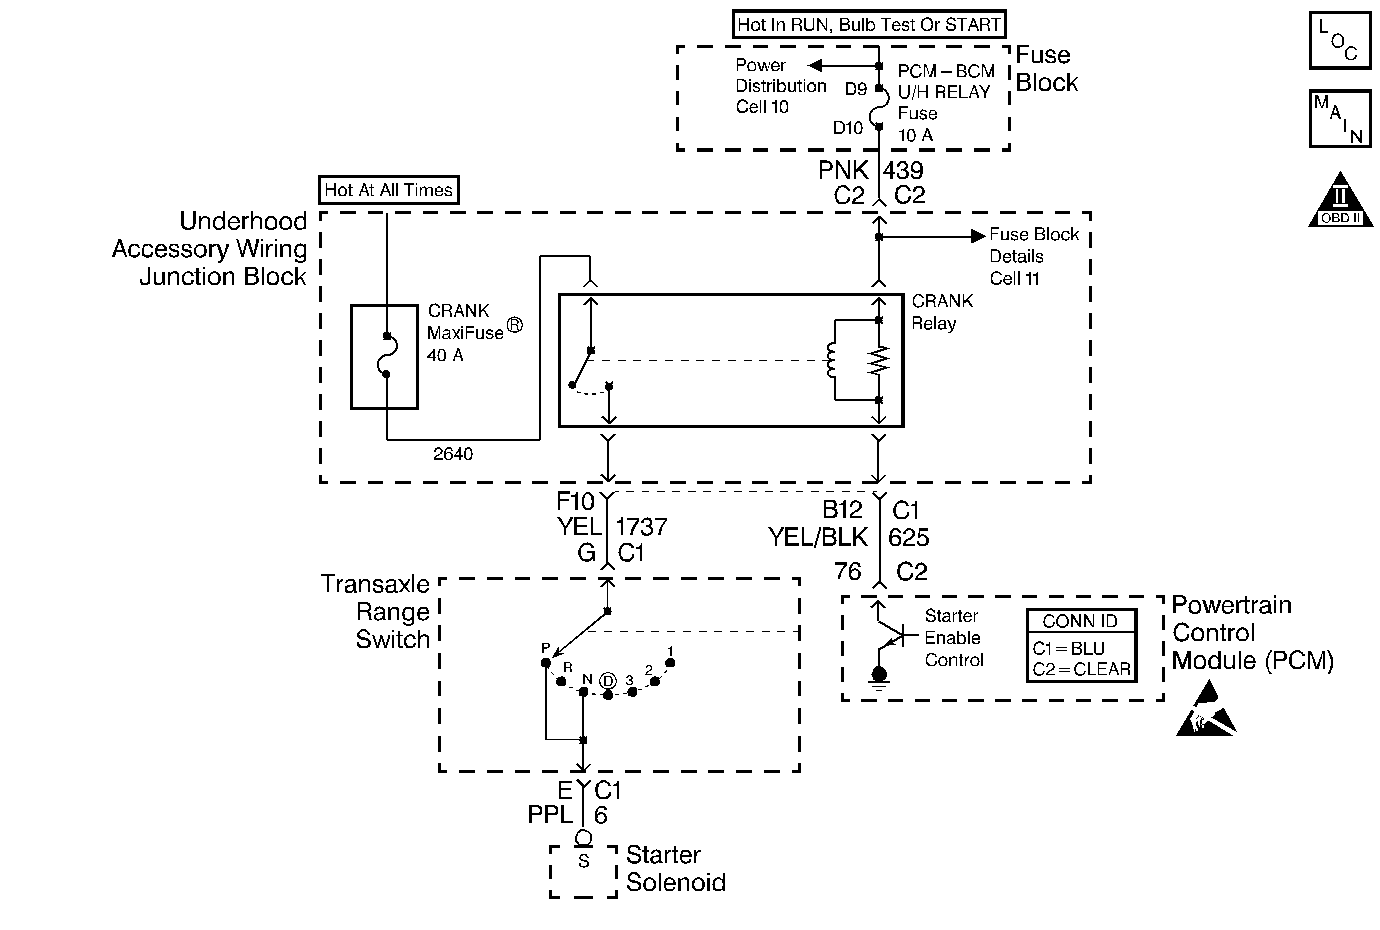
Circuit Description
The PCM has the ability to disable starter operation if conditions inappropriate for starter operation exist. The PCM disables the starter if the engine is running, if a correct theft deterrent password is not received or if the vehicle operator attempts to engage the starter for an extended period of time.
The PCM controlled starter system consists of the following components:
| • | Crank relay. |
| • | The Transaxle Range / Park Neutral Position switch. |
| • | The ignition switch. |
| • | The starter solenoid. |
| • | The PCM. |
Diagnostic Aids
The PCM Controlled Starter Diagnosis table is intended to identify electrical malfunctions that can occur with the system. For additional system diagnosis, refer to A Diagnostic System Check - Starting and Charging .
Either of the following conditions can cause the PCM to disable starter operation:
| • | The engine has been running for longer than 10 seconds. |
| • | The starter has been continuously engaged for longer than 15 seconds. |
| • | A correct theft deterrent password has not been received. |
Check for the following conditions:
Important: : Remove any debris from the connector surfaces before servicing a component. Inspect the connector gaskets when diagnosing or replacing a component. Ensure that the gaskets are installed correctly. The gaskets prevent contaminate intrusion.
| • | Poor terminal connection. |
| Inspect the harness connectors for backed out terminals, improper mating, broken locks, improperly formed or damaged terminals, and faulty terminal to wire connection. Use a corresponding mating terminal to test for proper tension. Refer to Intermittents and Poor Connections Diagnosis , and Connector Repairs Wiring Systems. |
| • | Damaged harness. |
| Inspect the wiring harness for damage. If the harness appears to be OK, observe the sensor display on the scan tool while moving connectors and wiring harnesses related to the sensor. A change in the sensor display may indicate the location of the fault. Refer to Wiring Repairs in Wiring Systems. |
| • | Inspect the PCM and the engine grounds for clean and secure connections. |
If the DTC is determined to be intermittent, reviewing the Fail Records can be useful in determining when the DTC was last set.
Test Description
Number(s) below refer to step number(s) in the diagnostic table:
-
If the engine cranks with the vehicle ignition switch in the off position, there are three possible malfunction areas: malfunction Crank Relay, a short to voltage in the starter feed circuit, or a short to voltage in the starter enable circuit.
-
Determines if the starter feed or the starter enable control circuit is shorted to voltage. If the engine does not crank with the relay removed, then the relay or the starter enable circuit is suspect.
-
Checks for proper ignition positive voltage on the starter enable control circuit.
-
Checks for proper current draw through teh relay. Excess current will cause an inoperative PCM driver circuit.
-
This vehicle is equipped with a PCM which utilizes an Electrically Erasable Read only Memory (EEPROM). When the PCM is being replaced, the new PCM must be programmed.
Step | Action | Value(s) | Yes | No | ||||||
|---|---|---|---|---|---|---|---|---|---|---|
1 | Was the Powertrain OBD System Check performed? | -- | ||||||||
Does the engine crank with the ignition switch in the off position? | -- | |||||||||
3 | Does the engine crank with the ignition switch in the run position? | -- | ||||||||
Does the engine continue to crank with the ignition switch in the off position? | -- | |||||||||
5 |
Is the action complete? | -- | -- | |||||||
6 | Test for a short to battery positive voltage in the starter enable control circuit. If a problem is found repair as necessary. Refer to Wiring Repairs . Was a problem found? | -- | ||||||||
7 |
Important: : If any of the following DTCs are set, diagnose the DTCs first: Attempt to start the engine. Does the engine crank? | -- | Go to Diagnostic Aids | |||||||
8 |
Does the engine crank? | -- | ||||||||
9 | Inspect the battery positive feed 40A Crank MaxiFuse®. Is the fuse blown? | -- | ||||||||
10 |
Is the J 35616-200 test light on? | -- | ||||||||
11 |
Is the J 35616-200 test lamp on? | -- | ||||||||
12 |
Is the J 35616-200 test lamp on? | -- | ||||||||
13 |
Was a problem found? | -- | ||||||||
14 |
Does the engine crank? | -- | ||||||||
15 |
Was a problem found? | -- | ||||||||
Does the J 39200 DMM display a a voltage near the specified value? | B+ | |||||||||
Does the J 39200 DMM display a current reading within the specified value? | 0.05-1.5A | |||||||||
18 | Test for a blown ignition positive feed fuse. Is the fuse blown? | -- | ||||||||
19 |
Was a problem found? | -- | ||||||||
20 |
Does the engine crank? | -- | ||||||||
21 | Test for a short to ground in the starter enable control circuit. If a problem is found repair as necessary. Refer to Wiring Repairs . Was a problem found? | -- | ||||||||
22 |
Is the action complete? | -- | -- | |||||||
23 | Locate and repair the short to ground in the starter feed circuit. Refer to Wiring Repairs . Is the action complete? | -- | -- | |||||||
24 | Test for the following circuit condition(s):
Was a problem found? | -- | ||||||||
25 |
Is the action complete? | -- | -- | |||||||
26 |
Is the action complete? | -- | -- | |||||||
27 |
Is the action complete? | -- | -- | |||||||
28 |
Is the action complete? | -- | -- | |||||||
29 |
Was a problem found? | -- | ||||||||
|
Important: : The replacement PCM must be programmed. Replace the PCM. Refer to Powertrain Control Module Replacement/Programming .Is the action complete? | -- | -- | ||||||||
31 |
Does the engine crank? | -- | System OK |
