Cylinder Head Replacement Left
Special Tools
J 36660-A Electronic Torque Angle Meter
Removal Procedure
Notice: Modifications made to the engine or its individual components can effect the vehicle's emission controls and may cause the Malfunction Indicator Lamp (MIL), Check Engine, or Service Engine Soon lamp to illuminate. Modifications may also cause the vehicle to fail a required Emission Inspection/Maintenance test.
- Raise and suitably support the vehicle. Refer to Lifting and Jacking the Vehicle .
- Drain the engine coolant from the cooling system. Refer to Cooling System Draining and Filling .
- Drain the engine oil. Refer to Engine Oil and Oil Filter Replacement .
- Lower the vehicle.
- Remove the upper intake manifold. Refer to Intake Manifold Replacement .
- Remove the lower intake manifold. Refer to Intake Manifold Replacement .
- Remove the valve rocker arms and pushrods. Refer to Valve Rocker Arm and Push Rod Replacement .
- Remove the exhaust crossover pipe. Refer to Exhaust Crossover Replacement .
- Remove the right engine mount strut bracket. Refer to Engine Mount Strut Bracket Replacement .
- Remove the oil level indicator tube. Refer to Oil Level Indicator and Tube Replacement .
- Remove the left (front) spark plug wires from the spark plugs. Refer to Spark Plug Wire Harness Replacement .
- Remove the left (front) spark plugs. Refer to Spark Plug Replacement .
- Remove the left (front) exhaust manifold. Refer to Exhaust Manifold Replacement .
- Remove and discard the left (front) cylinder head bolts.
- Remove the left (front) cylinder head.
- Remove the left (front) cylinder head gasket.
- Clean the following areas:
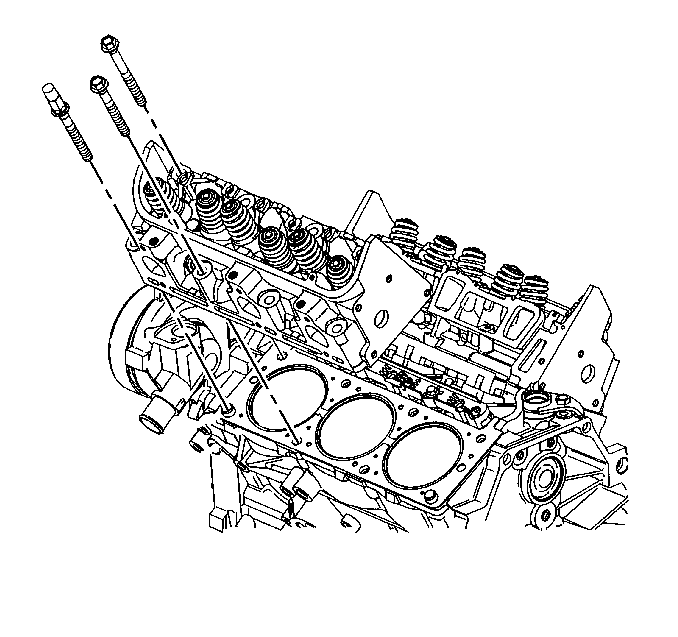
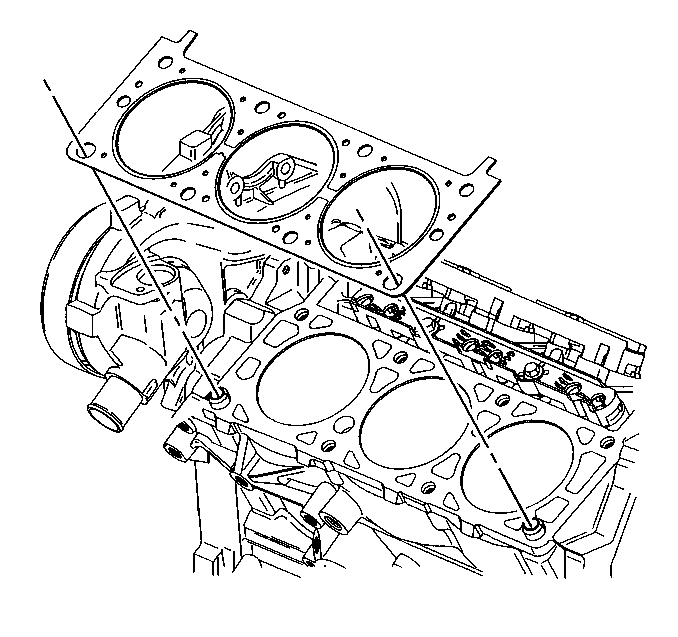
| • | The gasket sealing surfaces on the cylinder head, cylinder block, and intake manifolds. |
| • | The cylinder block bolt threads. |
Installation Procedure
Notice: Modifications made to the engine or its individual components can effect the vehicle's emission controls and may cause the Malfunction Indicator Lamp (MIL), Check Engine, or Service Engine Soon lamp to illuminate. Modifications may also cause the vehicle to fail a required Emission Inspection/Maintenance test.
- Install a new left (front) cylinder head gasket.
- Install the left (front) cylinder head over the locator pins and over the gasket.
- Tighten the left (front) cylinder head bolts (1-8) in sequence.
- Install the left (front) exhaust manifold. Refer to Exhaust Manifold Replacement .
- Install the left (front) spark plugs. Refer to Spark Plug Replacement .
- Install the left (front) spark plug wires to the spark plugs. Refer to Spark Plug Wire Harness Replacement .
- Install the oil level indicator tube. Refer to Oil Level Indicator and Tube Replacement .
- Install the right engine mount strut bracket. Refer to Engine Mount Strut Bracket Replacement .
- Install the exhaust crossover pipe. Refer to Exhaust Crossover Replacement .
- Install the valve rocker arms and pushrods. Refer to Valve Rocker Arm and Push Rod Replacement .
- Install the lower intake manifold. Refer to Intake Manifold Replacement .
- Install the upper intake manifold. Refer to Intake Manifold Replacement .
- Fill the engine with new engine oil. Refer to Engine Oil and Oil Filter Replacement .
- Fill the cooling system with engine coolant. Refer to Cooling System Draining and Filling .


Notice: Refer to Fastener Notice in the Preface section.
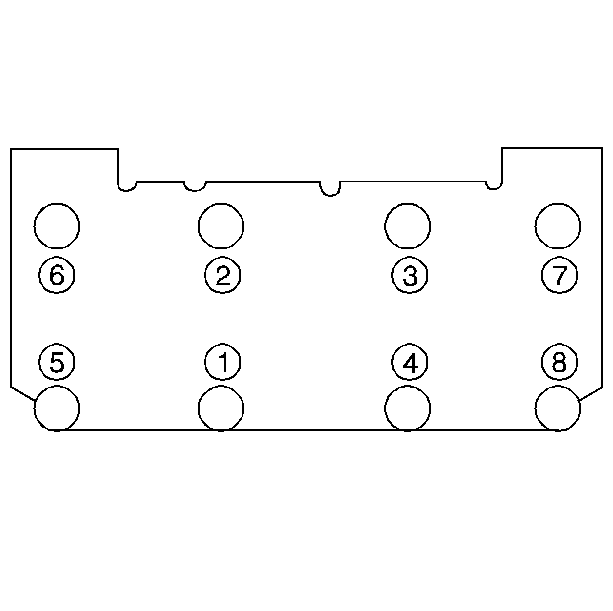
Notice: This component uses torque-to-yield bolts. When servicing this component do not reuse the bolts, New torque-to-yield bolts must be installed. Reusing used torque-to-yield bolts will not provide proper bolt torque and clamp load. Failure to install NEW torque-to-yield bolts may lead to engine damage.
Tighten
| • | Tighten the cylinder head bolts (1-8) in sequence to 60 N·m (44 lb ft). |
| • | Use the J 36660-A in order to turn the cylinder head bolts (1-8) in sequence an additional 95 degrees. |
Cylinder Head Replacement Right
Special Tools
J 36660-A Electronic Torque Angle Meter
Removal Procedure
Notice: Modifications made to the engine or its individual components can effect the vehicle's emission controls and may cause the Malfunction Indicator Lamp (MIL), Check Engine, or Service Engine Soon lamp to illuminate. Modifications may also cause the vehicle to fail a required Emission Inspection/Maintenance test.
- Raise and suitably support the vehicle. Refer to Lifting and Jacking the Vehicle .
- Drain the engine coolant from the cooling system. Refer to Cooling System Draining and Filling .
- Drain the engine oil. Refer to Engine Oil and Oil Filter Replacement .
- Lower the vehicle.
- Remove the upper intake manifold. Refer to Intake Manifold Replacement .
- Remove the lower intake manifold. Refer to Intake Manifold Replacement .
- Remove the valve rocker arms and pushrods. Refer to Valve Rocker Arm and Push Rod Replacement .
- Remove the exhaust crossover pipe. Refer to Exhaust Crossover Replacement .
- Remove the right (rear) spark plug wires from the spark plugs. Refer to Spark Plug Wire Harness Replacement .
- Remove the fuel line bracket.
- Remove the generator . Refer to Generator Replacement .
- Remove the generator bracket. Refer to Generator Bracket Replacement .
- Remove the right (rear) spark plugs. Refer to Spark Plug Replacement .
- Remove the right (rear) exhaust manifold. Refer to Exhaust Manifold Replacement .
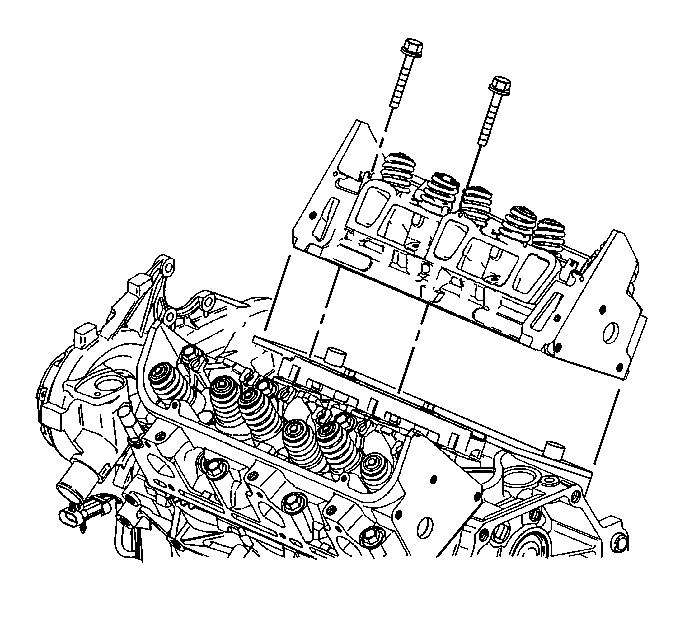
- Remove and discard the right (rear) cylinder head bolts.
- Remove the right (rear) cylinder head.
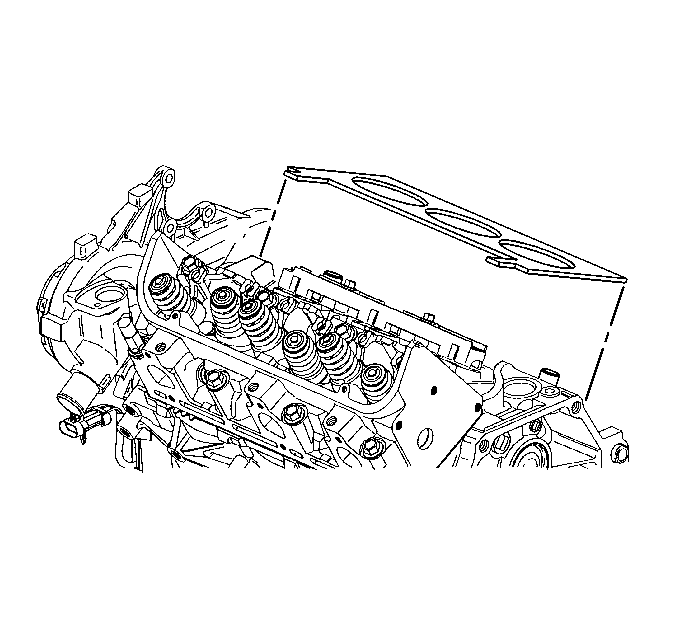
- Remove the right (rear) cylinder head gasket.
- Clean the following areas:
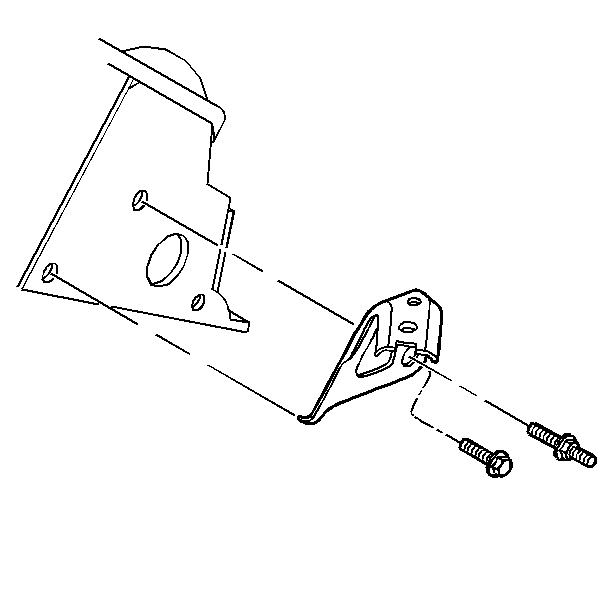
| • | The gasket sealing surfaces on the cylinder head, cylinder block, and intake manifolds. |
| • | The cylinder block bolt threads. |
Installation Procedure
Notice: Modifications made to the engine or its individual components can effect the vehicle's emission controls and may cause the Malfunction Indicator Lamp (MIL), Check Engine, or Service Engine Soon lamp to illuminate. Modifications may also cause the vehicle to fail a required Emission Inspection/Maintenance test.
- Install a new right (rear) cylinder head gasket.
- Install the right (rear) cylinder head over the locator pins and over the gasket.
- Tighten the right (rear) cylinder head bolts (1-8) in sequence.
- Install the right (rear) exhaust manifold. Refer to Exhaust Manifold Replacement .
- Install the right (rear) spark plugs. Refer to Spark Plug Replacement .
- Install the right (rear) spark plug wires to the spark plugs. Refer to Spark Plug Wire Harness Replacement .
- Install the generator bracket. Refer to Generator Bracket Replacement .
- Install the generator. Refer to Generator Replacement .
- Install the fuel line bracket.
- Install the exhaust crossover pipe. Refer to Exhaust Crossover Replacement .
- Install the pushrods and valve rocker arms. Refer to Valve Rocker Arm and Push Rod Replacement .
- Install the lower intake manifold. Refer to Intake Manifold Replacement .
- Install the upper intake manifold. Refer to Intake Manifold Replacement .
- Fill the engine with new engine oil. Refer to Engine Oil and Oil Filter Replacement .
- Fill the cooling system with engine coolant. Refer to Cooling System Draining and Filling .


Notice: Refer to Fastener Notice in the Preface section.

Notice: This component uses torque-to-yield bolts. When servicing this component do not reuse the bolts, New torque-to-yield bolts must be installed. Reusing used torque-to-yield bolts will not provide proper bolt torque and clamp load. Failure to install NEW torque-to-yield bolts may lead to engine damage.
Tighten
| • | Tighten the cylinder head bolts (1-8) in sequence to 60 N·m (44 lb ft). |
| • | Use the J 36660-A in order to turn the cylinder head bolts (1-8) in sequence an additional 95 degrees. |

