Removal Procedure
- Recover the refrigerant. Refer to
Refrigerant Recovery and Recharging
.
- Remove the air cleaner and duct assembly. Refer to
Air Cleaner Assembly Replacement
in 3.1L Engine Controls or
Air Cleaner Assembly Replacement
in 3.8L Engine Controls.
- Remove the cross vehicle brace if equipped. Refer to
Cross Vehicle Brace Replacement
in Body Front
End.
- Remove the vacuum brake booster. Refer to
Power Vacuum Brake Booster Replacement
in Hydraulic Brakes.
- Remove the condenser tube. Refer to
Condenser Tube Replacement
.
- Remove the expansion (orifice) tube:
| 6.1. | Use needle-nose pliers in order to grip the orifice tube. |
| 6.2. | Use a turning motion along with a push-pull motion in order to
loosen the impacted orifice tube. |
| 6.3. | Remove the orifice tube. |

Important: DO NOT use any solvents or chemicals to clean the expansion (orifice)
tube porous plastic inlet filter.
- Inspect the expansion (orifice) tube for the following conditions and
clean or replace with a new tube as indicated:
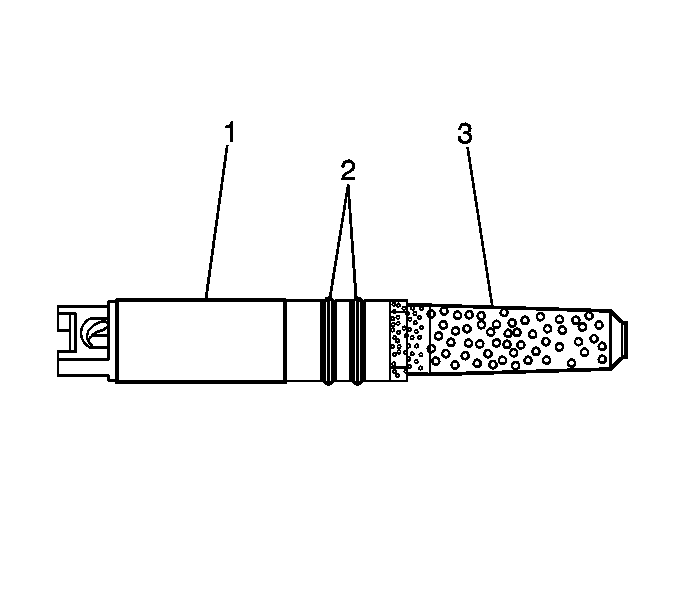
| • | Broken plastic frame (1) ; replace tube. |
| • | Inlet filter (3) damaged or plugged with fine gritty material;
replace tube. |
| • | Inlet filter (3) coated with metal chips, flakes, or slivers;
coating may be removed with low pressure shop air ONLY and reused if cleaned
satisfactorily. |
| • | If reusing the tube, discard the O-ring seals (2). |
Installation Procedure

Important: Lubricate the new O-ring seals (2) with mineral base 525 viscosity
refrigerant oil.
- Install the new O-ring seals (2), if reusing the orifice tube.
- CAREFULLY grasp the edge of the expansion (orifice) tube (1) without
touching the inlet filter (porous plastic) (3) and insert into the condenser
tube until fully seated.
- Install the condenser tube. Refer to
Condenser Tube Replacement
.
- Install the cross vehicle brace if equipped. Refer to
Cross Vehicle Brace Replacement
in Body Front
End.
- Install the air cleaner and duct assembly. Refer to
Air Cleaner Assembly Replacement
in 3.1L Engine Controls or
Air Cleaner Assembly Replacement
in 3.8L Engine
Controls.
- Evacuate and charge the A/C system. Refer to
Refrigerant Recovery and Recharging
.
- Leak test the filling(s) of the repaired or the reinstalled component
using J 39400
.


