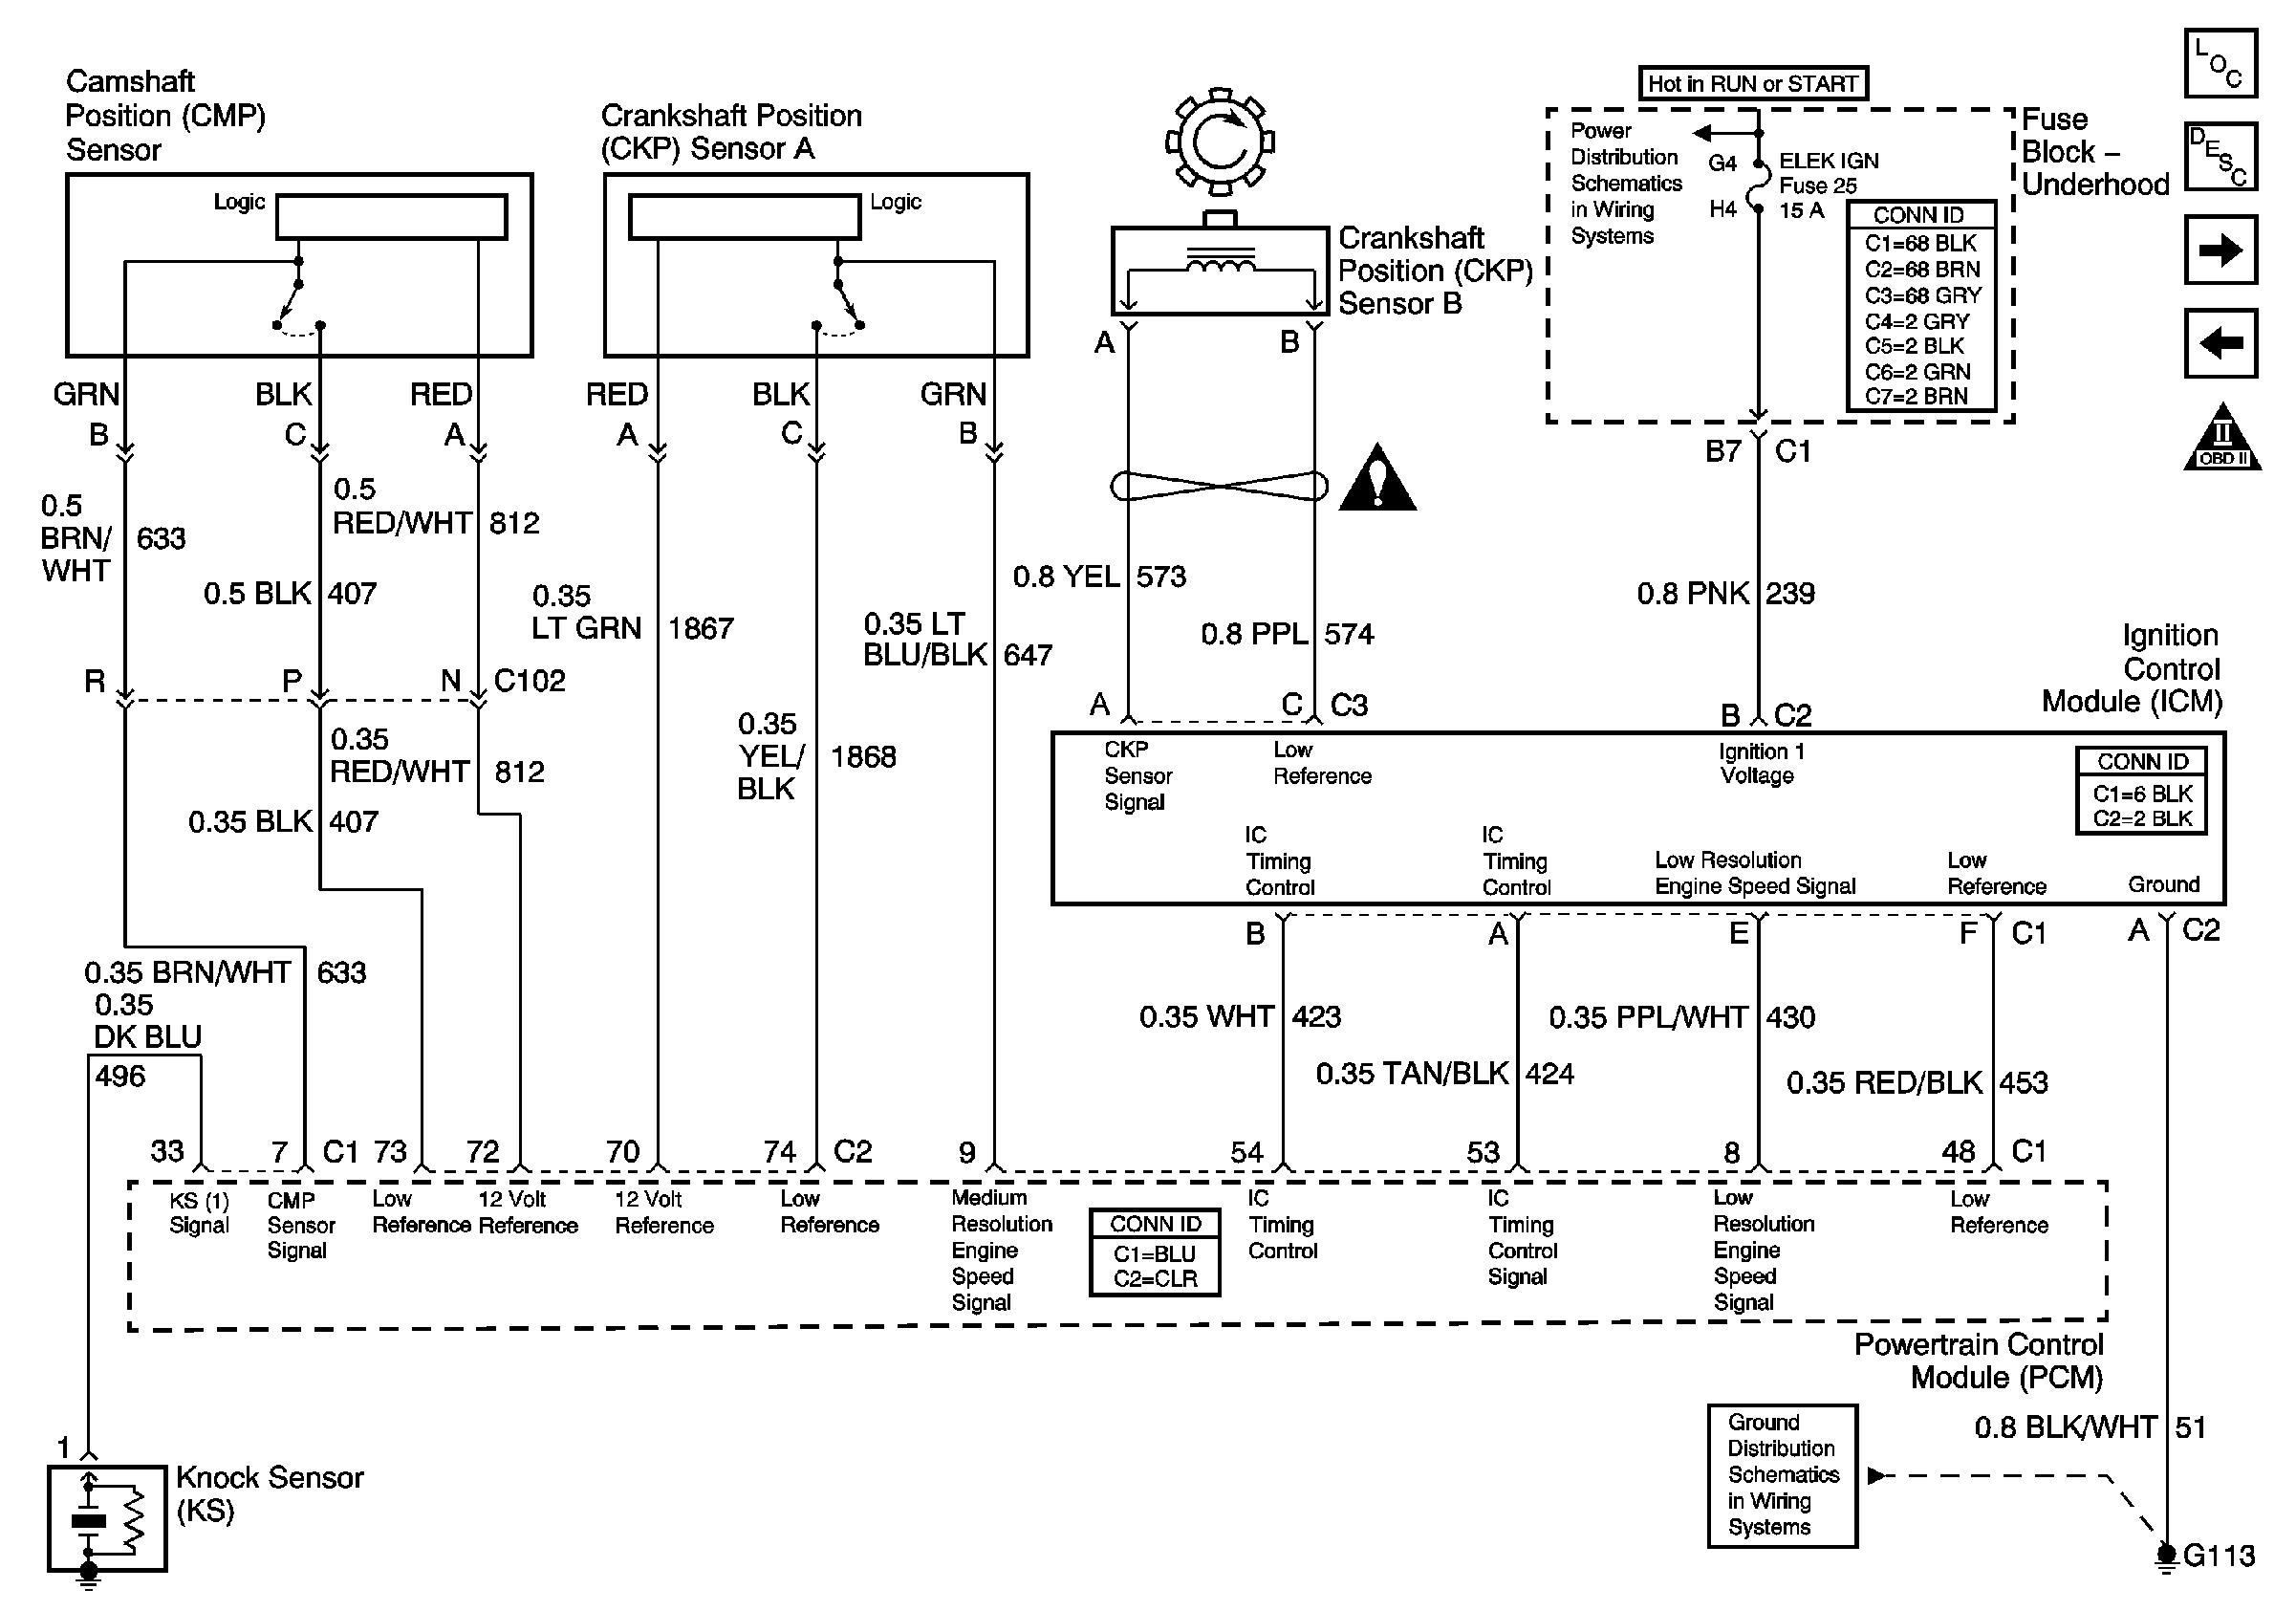
Circuit Description
The ignition control (IC) module has independent power and ground circuits. The circuits between the IC module and the powertrain control module (PCM) consist of the following circuits:
| • | The IC timing signal |
| • | The IC timing control |
| • | The low-resolution engine speed signal |
| • | A low reference signal |
The ignition control (IC) module sends 3x signals to the powertrain control module (PCM). The IC module controls the timing advance during engine cranking. The timing advance changes to PCM control after the following actions:
| • | The PCM receives the second 3x signal. |
| • | The PCM applies 5 volts to the IC timing signal circuit. |
| • | The timing advance switches to PCM control. |
Test Description
The numbers below refer to the step numbers on the diagnostic table.
-
The spark tester presents a more difficult load on the secondary ignition than a normal spark plug. If a miss, stumble, or hesitation is being caused by a spark plug not firing, the spark tester should also not fire.
-
Use a 5 percent saltwater solution in a spray bottle to induce voltage arching to ground through faulty insulation of spark plug wires.
-
If the no spark condition follows the suspected coil, that coil is faulty. Otherwise, the ignition module is the cause of no spark. This test could also be performed by substituting a known good coil for the one causing the no spark condition.
Step | Action | Values | Yes | No | ||||
|---|---|---|---|---|---|---|---|---|
Schematic Reference:
| ||||||||
1 | Did you perform the Diagnostic System Check-Engine Controls? | -- | Go to Step 2 | |||||
Does the DTC fail this ignition? | -- | Go to Step 3 | Go to Intermittent Conditions | |||||
Does the scan tool indicate 3X crank sensor signal present? | -- | Go to Step 4 | Go to Step 11 | |||||
Did you observe any non-sparking cylinders? | -- | Go to Step 5 | Go to Step 8 | |||||
5 | Inspect and test the affected cylinder spark plug wires, ignition coils, and spark plugs for a short to ground or arching to ground. If carbon tracking or corrosion is present, replace both components affected. Refer to Spark Plug Wire Replacement , Ignition Coil Replacement , Spark Plug Replacement . Did you find and correct the condition? | -- | Go to Step 23 | Go to Step 6 | ||||
Did you find and correct the condition? | 3000 ohms per ft | Go to Step 23 | Go to Step 7 | |||||
7 |
Did you find and correct the condition? | -- | Go to Step 23 | Go to Step 15 | ||||
8 |
Did you find and correct the condition? | -- | Go to Step 23 | Go to Step 9 | ||||
9 | With a DMM, test spark plugs for internal short to ground. Replace any grounded spark plugs found. Refer to Spark Plug Replacement . Did you find and correct the condition? | -- | Go to Step 23 | Go to Step 10 | ||||
10 |
Did you complete the replacement? | -- | Go to Step 23 | -- | ||||
11 |
Does the test lamp illuminate? | -- | Go to Step 12 | Go to Step 17 | ||||
12 | Connect a test lamp between the IC module ignition 1 voltage circuit and IC module ground circuit. Does the test lamp illuminate? | -- | Go to Step 13 | Go to Step 20 | ||||
13 |
Does the test lamp illuminate when probing either circuits? | -- | Go to Step 18 | Go to Step 14 | ||||
14 |
Does the test lamp illuminate when probing either circuits? | -- | Go to Step 19 | Go to Step 15 | ||||
15 |
Does the DMM indicate AC duty cycle present? | -- | Go to Step 21 | Go to Step 16 | ||||
16 |
Did you find and correct the condition? | -- | Go to Step 23 | Go to Step 22 | ||||
17 |
Did you complete the repair? | -- | Go to Step 23 | -- | ||||
18 | Repair the short to ground in the 7X Reference circuit which illuminated the test lamp. Refer to Wiring Repairs in Wiring Systems. Did you complete the repair? | -- | Go to Step 23 | -- | ||||
19 | Repair the short to voltage in the 7X Reference circuit which illuminated the test lamp. Refer to Wiring Repairs in Wiring Systems. Did you complete the repair? | -- | Go to Step 23 | -- | ||||
20 | Repair the open in the IC module ground circuit. Refer to Wiring Repairs in Wiring Systems. Did you complete the repair? | -- | Go to Step 23 | -- | ||||
21 | Replace the IC module. Refer to Ignition Control Module Replacement . Did you complete the replacement? | -- | Go to Step 23 | -- | ||||
22 | Replace the 7X crank sensor. Refer to Crankshaft Position Sensor Replacement . Did you complete the replacement? | -- | Go to Step 23 | -- | ||||
23 |
Does the vehicle operate normally, with no MIL illumination and no stored DTCs? | -- | System OK | |||||