GM Service Manual Online
For 1990-2009 cars only

Refer to

HVAC and A/C Compressor Clutch Coil
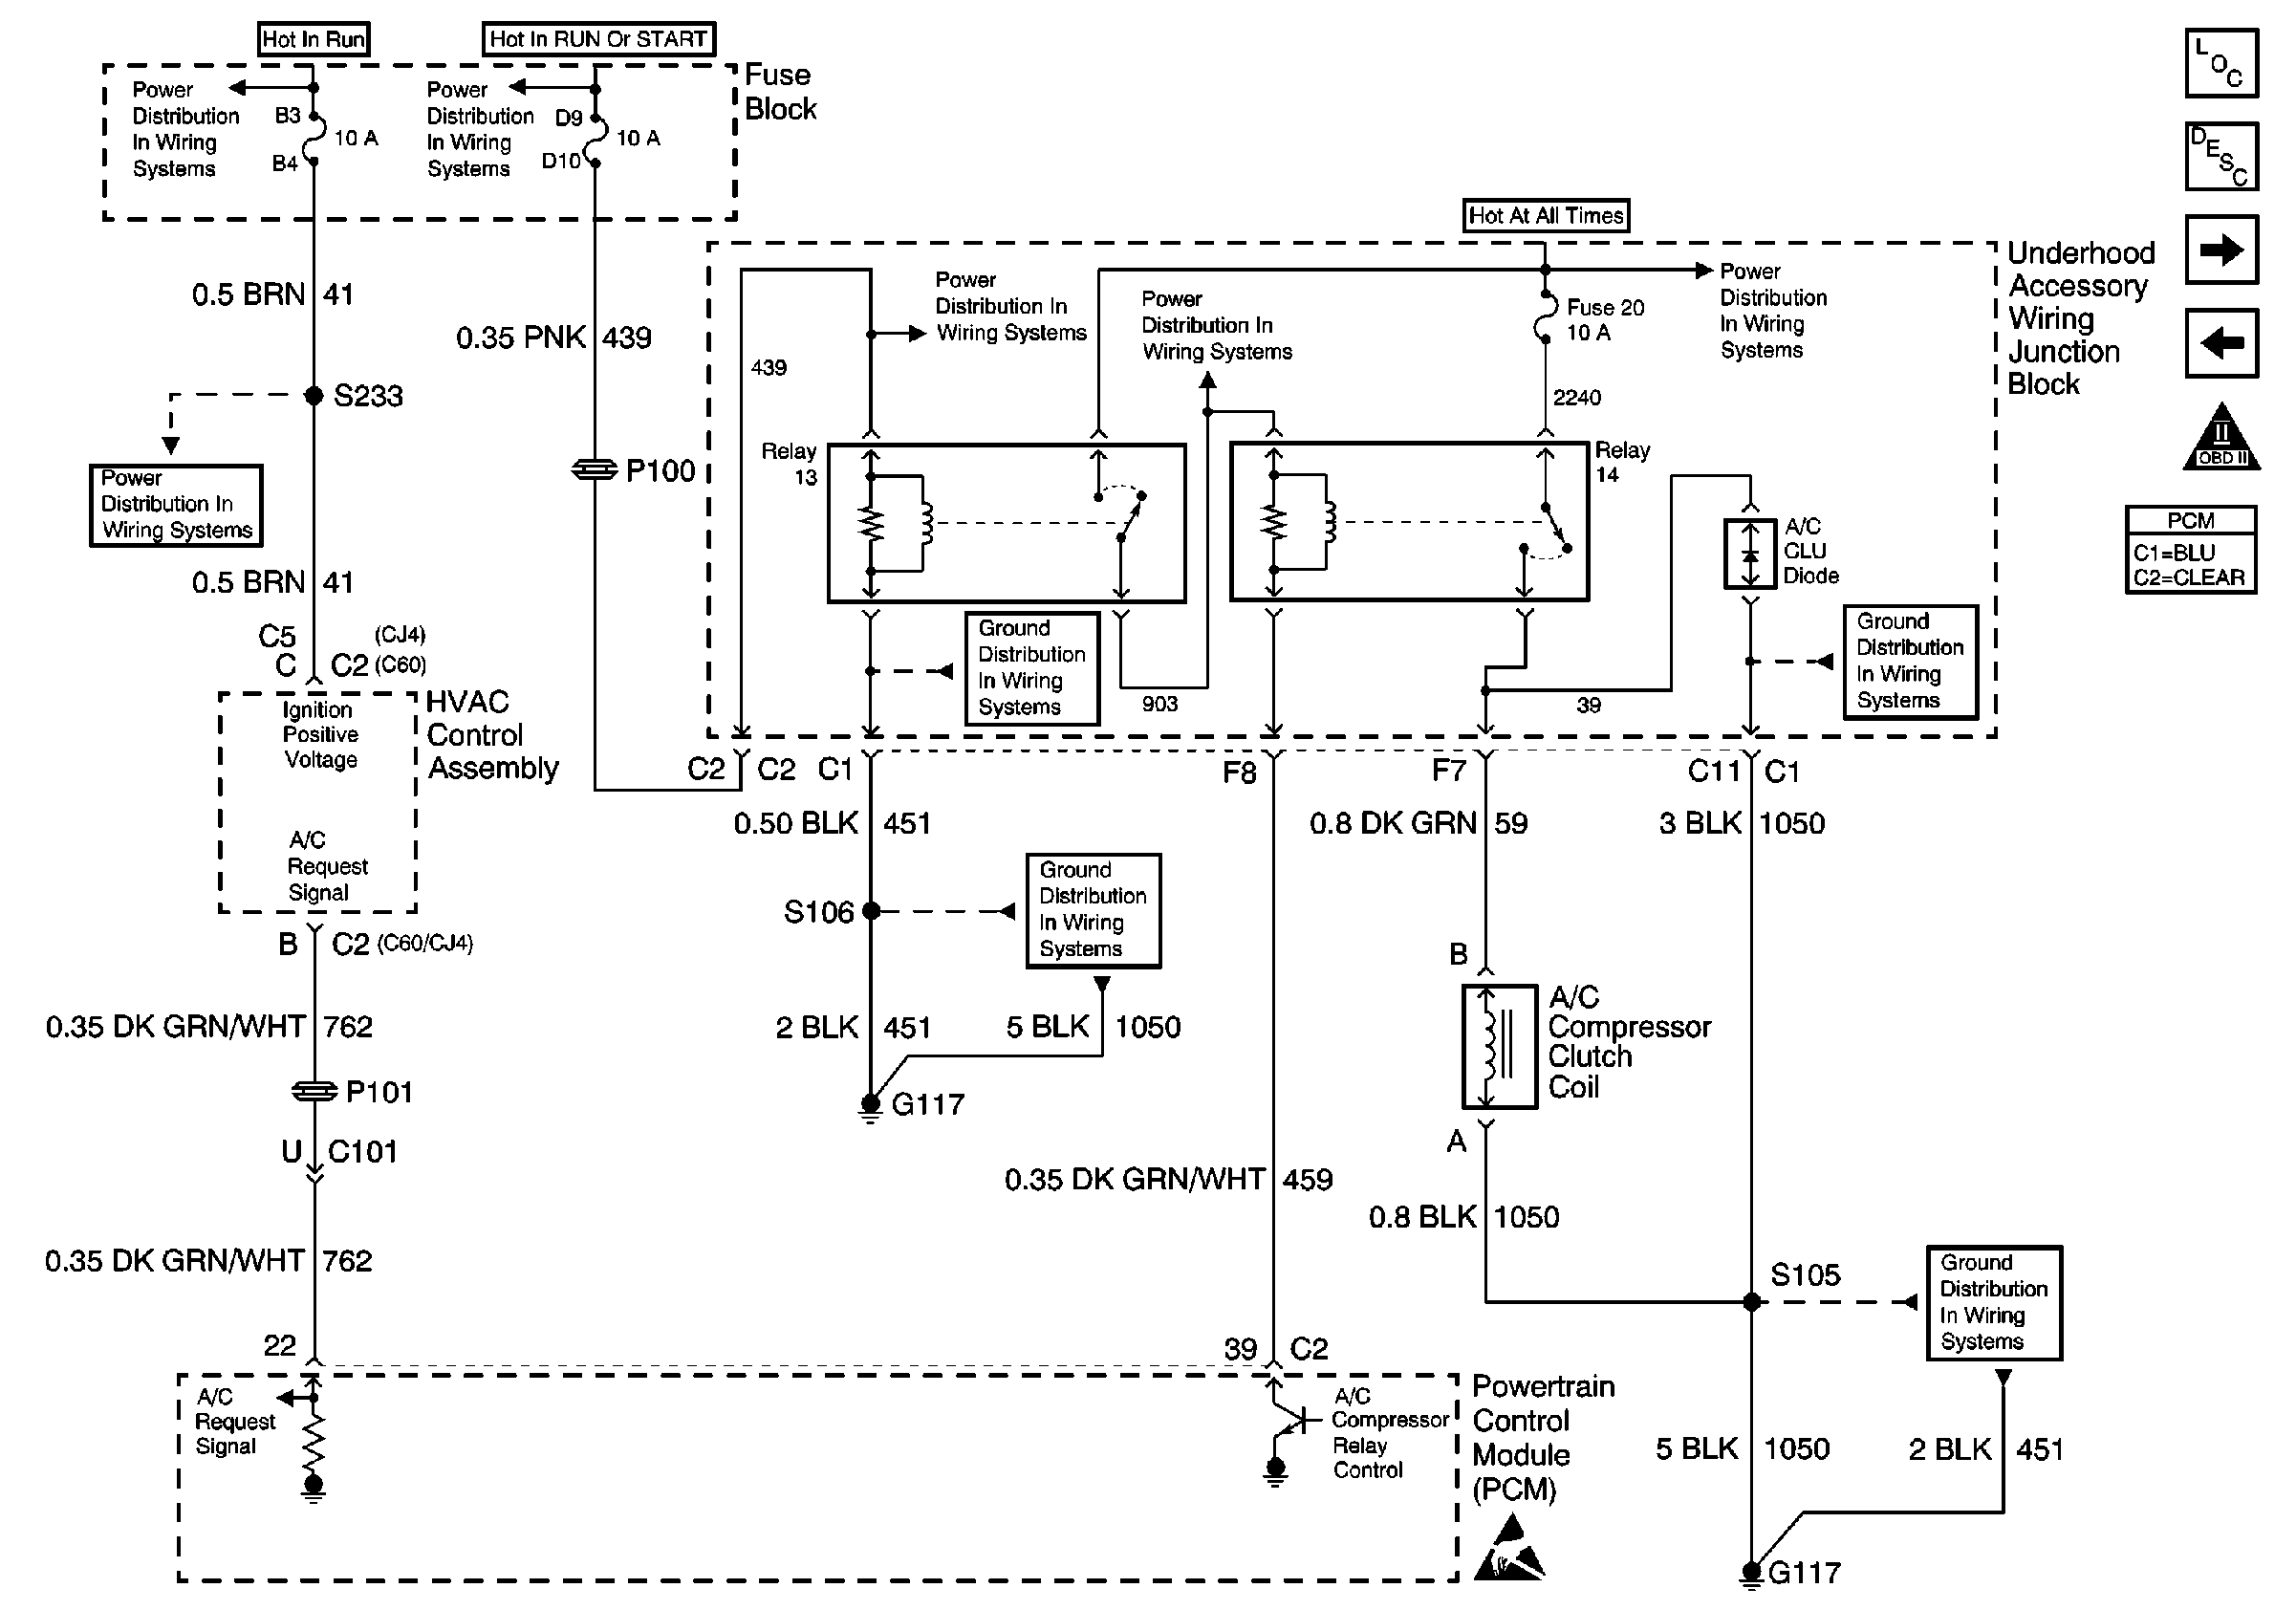

Object Number: 482886  Size: FS
.

Circuit Description

When A/C is selected through the A/C control head a signal is supplied to the PCM through the Class ll serial data circuit. The A/C compressor clutch relay is controlled through the PCM. The PCM monitors the A/C refrigerant pressure. If the A/C refrigerant pressure, and engine operating conditions are within a specific calibrated acceptable ranges the PCM will enable the A/C compressor relay. This is accomplished by providing a ground path for the A/C relay coil within the PCM. When the A/C compressor relay is enabled battery voltage is supplied to the compressor clutch coil.

The PCM will enable the A/C compressor clutch whenever the engine is running and the A/C has been requested, unless any of the following conditions are met:

    •  Throttle greater than 96%.
    •  A/C head pressure greater than 440 psi (4.6 volts) or less than 35 psi (0.35 volt) (as determined by the A/C refrigerant pressure sensor).
    •  Ignition voltage below 10 volts.
    •  Engine speed greater than 4700 RPM.
    •  ECT greater than 124°C (255°F).
    •  IAT less than 5°C (41°F).

Step

Action

Value(s)

Yes

No

1

Was the Powerrtrain OBD System Test performed?

--

Go to Step 2

Go to Powertrain On Board Diagnostic (OBD) System Check

2

Are any PCM or HVAC DTCs stored?

--

Diagnose the applicable DTCs

Go to Step 3

3

Important: :  The following conditions must be met before continuing with this step:

   •  Ambient air temperature must be above 5°C (41°F).
   •  A/C Pressure must be above 35 PSI (0.4 volts).
   •  Coolant temperature must be below 121°C (250°F).

  1. Turn the A/C Selector Switch to the off position.
  2. Turn the ignition switch to the on position (engine off).
  3. Test for the engagement of the A/C clutch.

Is the A/C Clutch engaged?

--

Go to Step 13

Go to Step 4

4

  1. Start and operate the engine at 1000 - 1500 RPM.
  2. Turn the A/C selector switch to an A/C mode.
  3. Observe A/C clutch.

Is the A/C clutch engaged?

--

Refer to Diagnostic Aids

Go to Step 5

5

  1. Leave the A/C selector switch turned to an A/C mode.
  2. Observe the A/C Request display on the scan tool.

Does the A/C Request display YES?

--

Go to Step 8

Go to Step 6

6

Observe the A/C pressure sensor display on the scan tool.

Does the A/C pressure sensor indicate a voltage between the specified values?

0.4V - 4.6V

Go to Functional Check

Go to Step 7

7

  1. Connect a J 39500-B Refrigerant Recovery, Recycling, and Recharging (ACR4) to monitor high side refrigerant pressure.
  2. Observe high side refrigerant pressure on the J 39500-B Refrigerant Recovery, Recycling, and Recharging (ACR4) gauge.

Is high side refrigerant pressure within the specified values?

35 psi - 440 psi

Go to VDOT Air Conditioning (A/C) System Diagnosis

Go to DTC P0530 Air Conditioning (A/C) Refrigerant Pressure Sensor Circuit

8

Inspect the A/C clutch fuse.

Is the A/C cutch fuse blown?

--

Go to Step 9

Go to Step 10

9

  1. Remove the A/C clutch fuse.
  2. Remove the A/C Relay.
  3. Test for the following circuit condition(s):
  4. •  Short to ground in the battery positive feed to the A/C relay
    •  Short to ground in the battery positive feed to the A/C clutch
    •  Shorted diode
  5. If a problem is found, repair as necessary. Refer to Repair Procedures in Wiring Repairs .

Was a problem found?

--

Go to Step 18

Go to Step 15

10

  1. Remove the A/C relay.
  2. Connect a 10A fused jumper between the battery positive and A/C clutch coil feed cavities in the A/C relay connector.

Is the A/C clutch engaged?

--

Go to Step 12

Go to Step 11

11

  1. Test for the following circuit condition(s):
  2. •  Open in the battery positive feed circuit to the A/C relay
    •  Open in the battery positive feed circuit to the A/C clutch
    •  Open in the A/C clutch ground circuit
    •  Poor terminal connections in the A/C clutch coil connector
  3. If a problem is found, repair as necessary. Refer to Repair Procedures in Testing for Continuity , Intermittents and Poor Connections Diagnosis , Repairing Connector Terminals , Connector Repairs , and Wiring Repairs .

Was a problem found?

--

Go to Step 18

Go to Step 15

12

  1. Test for poor terminal connections in the A/C Relay in the

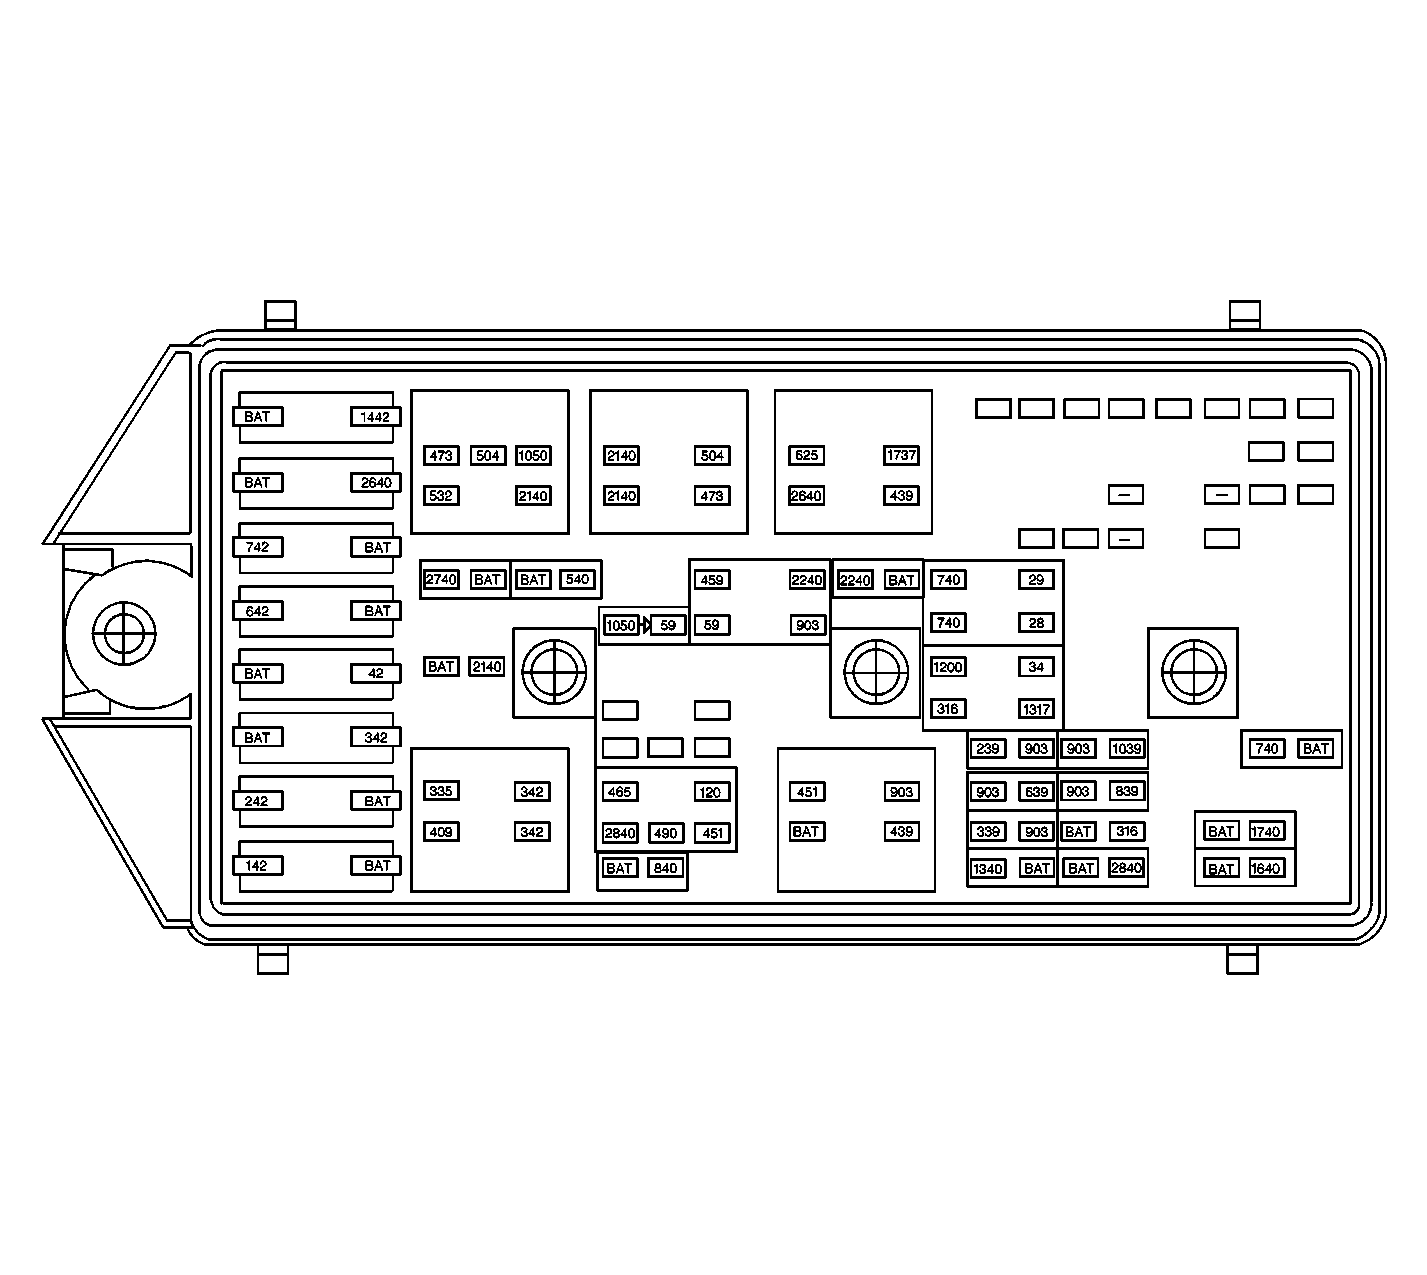
    Underhood Accessory Wiring Junction Block (RPO L82)


    Object Number: 358519  Size: LF
    .
  2. If a problem is found, repair as necessary. Refer to Repair Procedures in Testing for Continuity , Intermittents and Poor Connections Diagnosis , Repairing Connector Terminals , Connector Repairs , and Wiring Repairs .

Was a problem found?

--

Go to Step 18

Go to Step 16

13

  1. Turn the ignition switch to the off position.
  2. Remove the A/C relay.
  3. Turn the ignition switch to the on position.

Is the A/C clutch engaged?

--

Go to Step 14

Go to Step 16

14

Disconnect the A/C clutch connector.

Is the A/C clutch engaged?

--

Go to Step 15

Go to Step 17

15

Replace the A/C clutch. Refer to Compressor Clutch Plate and Hub Assembly Removal .

Is the action complete?

--

Go to Step 18

--

16

Replace the A/C relay. Refer to Compressor Relay Replacement .

Is the action complete?

--

Go to Step 18

--

17

Locate and repair the short to voltage in the battery positive feed circuit to the A/C clutch. Refer to Repair Procedures in Wiring Repairs .

Is th action complete?

--

Go to Step 18

--

18

Important: :  The following conditions must be met before continuing with this step:

   •  Ambient air temperature must be above 5°C (41°F).
   •  A/C pressure must be above 35 psi (0.4 volts).
   •  Coolant temperature must be below 121°C (250°F).

  1. Start and operate the engine between 1000-1500 RPM.
  2. Turn the A/C selector switch to the on position.
  3. Listen for engagement of the A/C clutch.
  4. Wait 5 seconds and then turn the A/C selector switch to the off position.
  5. Listen for disengagement of the A/C clutch.

Did the A/C clutch engaged and disengage?

--

System OK

Go to Step 3