GM Service Manual Online
For 1990-2009 cars only

Object Number: 388067  Size: MF
Engine Controls Components
Park Neutral Position (PNP) Switch
OBD II Symbol Description Notice
Handling ESD Sensitive Parts Notice

Circuit Description

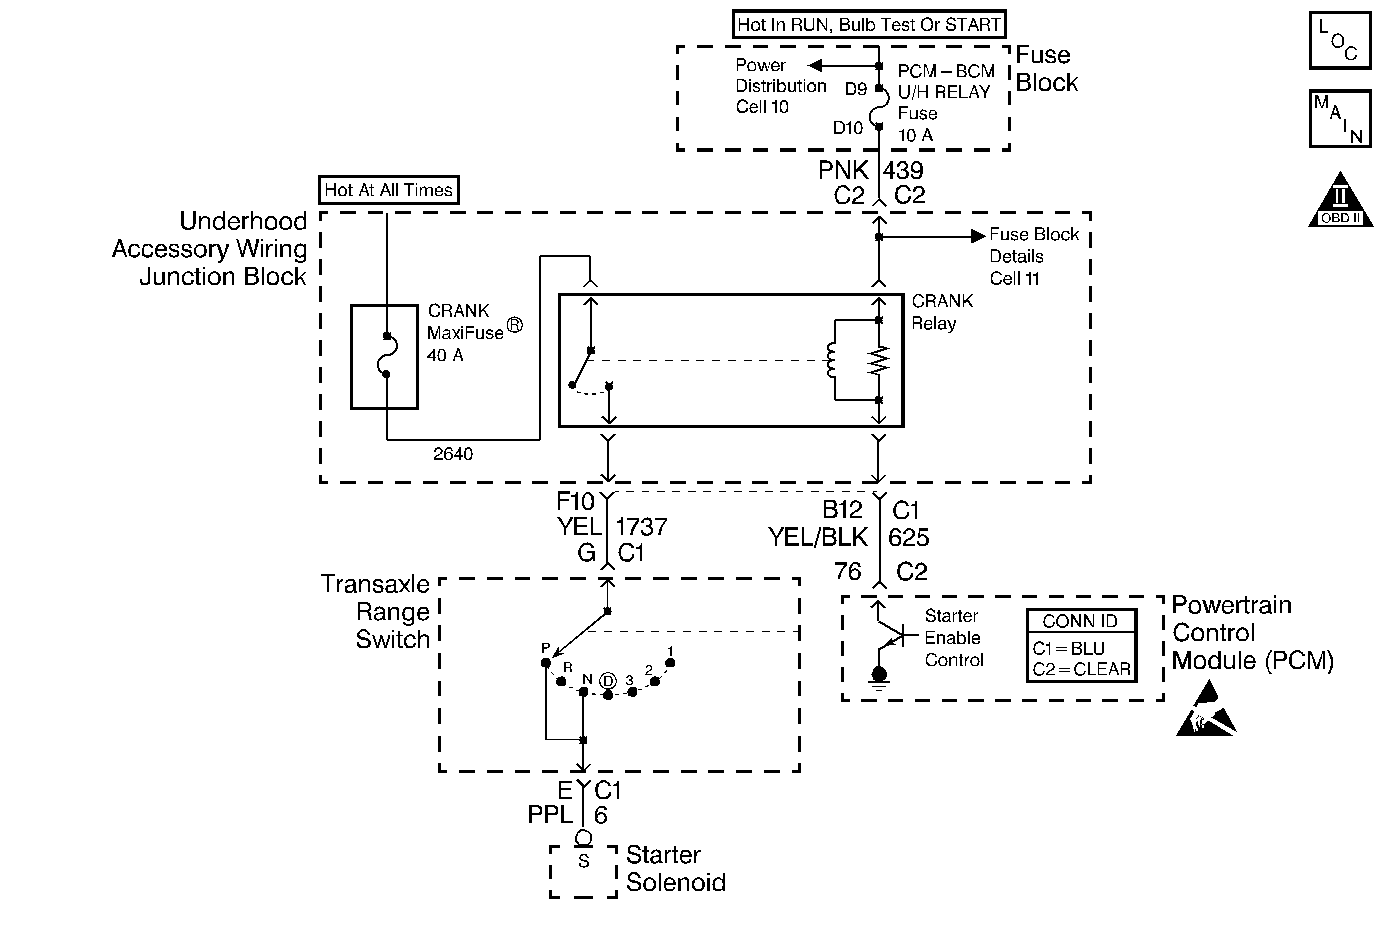
The PCM has the ability to disable starter operation if conditions inappropriate for starter operation exist. The PCM disables the starter if the engine is running, if a correct theft deterrent password is not received or if the vehicle operator attempts to engage the starter for an extended period of time.

The PCM controlled starter system consists of the following components:

    •  Crank relay.
    •  The Transaxle Range / Park Neutral Position switch.
    •  The ignition switch.
    •  The starter solenoid.
    •  The PCM.

Diagnostic Aids

The PCM Controlled Starter Diagnosis table is intended to identify electrical malfunctions that can occur with the system. For additional system diagnosis, refer to Starting System Check .

Check for the following conditions:

    •  Poor connection at the PCM , the Crank Relay, the Transaxle Range / PNP switch, the ignition switch or the starter solenoid. Refer to Intermittents and Poor Connections Diagnosis and Connector Repairs and Wiring Repairs .
         Inspect harness connectors for the following conditions:
       -  Backed out terminals.
       -  Improper mating.
       -  Broken locks.
       -  Improperly formed or damaged terminals.
       -  Poor terminal to wire connection.
    •  Damaged harness.
         Inspect the wiring harness for damage.
    •  Either of the following conditions can cause the PCM to disable starter operation:
       -  The engine has been running for longer than 10 seconds.
       -  The starter has been continuously engaged for longer than 15 seconds.
       -  A correct theft deterrent password has not been received.

Refer to Intermittents and Poor Connections Diagnosis and Connector Repairs and Wiring Repairs .

Test Description

Number(s) below refer to step number(s) in the diagnostic table:

  1. If the engine cranks with the vehicle ignition switch in the off position, there are three possible malfunction areas: malfunction Crank Relay, a short to voltage in the starter feed circuit, or a short to voltage in the starter enable circuit.

  2. Determines if the starter feed or the starter enable control circuit is shorted to voltage. If the engine does not crank with the relay removed, then the relay or the starter enable circuit is suspect.

  3. Checks for proper ignition positive voltage on the starter enable control circuit.

  4. Checks for proper current draw through the relay. Excess current will cause an inoperative PCM driver circuit.

  5. This vehicle is equipped with a PCM which utilizes an Electrically Erasable Read only Memory (EEPROM). When the PCM is being replaced, the new PCM must be programmed.

PCM Controlled Starter Diagnosis

Step

Action

Value(s)

Yes

No

1

Was the Powertrain OBD System Check performed?

--

Go to Step 2

Go to Powertrain On Board Diagnostic (OBD) System Check

2

Does the engine crank with the ignition switch in the off position?

--

Go to Step 4

Go to Step 3

3

Does the engine crank with the ignition switch in the run position?

--

Go to Step 21

Go to Step 7

4

  1. Disconnect the Negative Battery Cable. Refer to Battery Negative Cable Disconnection and Connection .
  2. Remove the Crank Relay (Relay 11).
  3. Reconnect the Negative Battery Cable. Refer to Battery Negative Cable Disconnection and Connection .

Does the engine continue to crank with the ignition switch in the off position?

--

Go to Step 5

Go to Step 6

5

  1. Locate and repair the short to voltage in the following circuit(s):
  2. • The battery feed between the Crank Relay (Relay 11) and the PNP Switch.
    • The Battery feed between the PNP Switch and the Starter Solenoid (CKT 6).
  3. If a problem is found repair as necessary. Refer to Wiring Repairs .

Is the action complete?

--

Go to Step 31

--

6

Test for a short to battery positive voltage in the Starter Enable Control circuit.

If a problem is found repair as necessary. Refer to Wiring Repairs .

Was a problem found?

--

Go to Step 31

Go to Step 26

7

Important: :  If any of the following DTCs are set, diagnose the DTCs first:

  1. DTC P1626 Theft Deterrent Fuel Enable Signal Lost
  2. DTC P1631 Theft Deterrent Start Enable Signal Not Correct

Attempt to start the engine.

Does the engine crank?

--

Go to Diagnostic Aids

Go to Step 8

8

  1. Turn the ignition switch to the off position.
  2. Remove the Crank Relay (Relay 11).
  3. Remove the fuel injector feed fuse.
  4. Turn the ignition switch to the on position.
  5. Connect a 30A fused jumper between the battery positive and starter feed in the Crank Relay (Relay 11) cavities.

Does the engine crank?

--

Go to Step 16

Go to Step 9

9

Inspect the battery positive feed 40A fuse (Fuse 2).

Is the fuse blown?

--

Go to Step 10

Go to Step 14

10

  1. Turn the ignition switch off.
  2. Leave the Crank Relay (Relay 11) disconnected.
  3. Connect a J 35616-200 test light to battery positive voltage.
  4. Probe the Crank battery positive feed cavity in the relay connector (CKT6).

Is the J 35616-200 test light on?

--

Go to Step 22

Go to Step 11

11

  1. Leave the Crank Relay disconnected.
  2. Disconnect the battery positive feed from the starter solenoid (CKT 6).
  3. Using J 35616-200 test lamp connected to battery positive voltage, probe the starter feed cavity in the Crank Relay (Relay 11) connector (CKT 1737).

Is the J 35616-200 test lamp on?

--

Go to Step 12

Go to Step 27

12

  1. Leave the Crank Relay (Relay 11) disconnected.
  2. Leave the starter solenoid feed (CKT 6) disconnected from the Starter.
  3. Leave the J 35616-200 test lamp connected to battery positive voltage and the starter feed cavity in Crank Relay (Relay 11) CKT 1737.
  4. Disconnect the PNP Switch connector C1.

Is the J 35616-200 test lamp on?

--

Go to Step 23

Go to Step 13

13

  1. Test for a short to ground in the starter solenoid feed circuit (CKT 6).
  2. If a problem is found, replace 40A fuse (Fuse 2), and repair circuit fault as necessary. Refer to Wiring Repairs .
  3. Reinstall fuel injector feed fuse.
  4. Reinstall Crank Relay (Relay 11).

Was a problem found?

--

Go to Step 31

Go to Step 28

14

  1. Leave the 30A jumper wire connected between the battery positive, and starter feed cavities in the relay connector.
  2. Leave the fuel injector feed fuse removed.
  3. Turn on the ignition switch.
  4. Disconnect the PNP Switch connector C1.
  5. Connect the appropriate jumper between terminals E and G in the PNP Switch connector.

Does the engine crank?

--

Go to Step 24

Go to Step 15

15

  1. Test for the following circuit condition(s):
  2. •  open in CKT 1737 or CKT 6
    •  poor terminal connections at the Starter
  3. If a problem is found repair as necessary. Refer to Wiring Repairs .

Was a problem found?

--

Go to Step 31

Go to Step 27

16

  1. Turn the ignition switch off.
  2. Reinstall the Crank Relay (Relay 11).
  3. Disconnect the PCM C2 connector.
  4. Turn the ignition switch on.
  5. Connect J 39200 DMM between the starter enable control circuit and ground.

Does the J 39200 DMM display a voltage near the specified value?

B+

Go to Step 17

Go to Step 18

17

  1. Leave the ignition switch in on position.
  2. Remove the 40A fuse (Fuse 2).
  3. Set J 39200 DMM to the 10A scale.
  4. Using the J 39200 DMM, measure the current between the starter enable control circuit and ground.
  5. Monitor current reading for at least 2 minutes.

Does the J 39200 DMM display a current reading within the specified value?

0.05-1.5A

Go to Step 20

Go to Step 26

18

Test for a blown ignition positive feed fuse.

Is the fuse blown?

--

Go to Step 25

Go to Step 19

19

  1. Test for the following circuit condition(s):
  2. • open ignition positive feed to the Crank Relay (Relay 11)
    • open starter enable control circuit
    • poor terminal connections at the Crank Relay (Relay 11)
  3. If a problem is found repair as necessary. Refer to Testing for Continuity , Intermittents and Poor Connections Diagnosis , Repairing Connector Terminals , Connector Repairs and Wiring Repairs .

Was a problem found?

--

Go to Step 31

Go to Step 26

20

  1. Leave the PCM disconnected.
  2. Leave the fuel injector fuse removed.
  3. Reinstall the 40A fuse (Fuse 2).
  4. Connect the starter enable control circuit to engine ground.

Does the engine crank?

--

Go to Step 29

Go to Step 26

21

Test for a short to ground in the Starter Enable Control circuit. If a problem is found repair as necessary. Refer to Wiring Repairs .

Was a problem found?

--

Go to Step 31

Go to Step 30

22

  1. Locate and repair the short to ground in the battery positive voltage feed circuit to the Crank Relay (Relay 11). Refer to Wiring Repairs .
  2. Replace the 40A fuse (Fuse 2).

Is the action complete?

--

Go to Step 31

--

23

Locate and repair the short to ground in the starter feed circuit. Refer to Wiring Repairs .

--

Go to Step 31

--

24

Test for the following circuit condition(s):

  1. Poor terminal connections at the PNP Switch. Refer to Wiring Repairs .
  2. Misadjusted PNP Switch. Refer to Park/Neutral Position Switch Adjustment .

--

Go to Step 31

Go to Step 28

25

  1. Locate and repair the short to ground or shorted component in the ignition positive feed to the Crank Relay (Relay 11). Refer to Wiring Repairs .
  2. Reconnect the PCM.
  3. If a problem is found, inspect the ignition feed fuse to the Crank Relay (Relay 11)

Is the action complete?

--

Go to Step 31

--

26

  1. Replace the Crank Relay (Relay 11).
  2. Reinstall fuel injector feed fuse.
  3. Reconnect the PCM.

Is the action complete?

--

Go to Step 31

--

27

  1. If 40A Fuse 2 is open replace fuse.
  2. Service the starter. Refer to Starter Motor Replacement .

Is the action complete?

--

Go to Step 31

--

28

  1. Replace the Transaxle Range Switch. Refer to PNP Switch Replacement .
  2. If the Crank Relay (Relay 11) is disconnected, reinstall Crank Relay (Relay 11).
  3. If 40A Fuse 2 is open, replace the fuse.

Is the action complete?

--

Go to Step 31

--

29

  1. Test the Starter Enable Control circuit for poor terminal connections at the PCM.
  2. If a problem is found repair as necessary. Refer to Testing for Continuity , Intermittents and Poor Connections Diagnosis , Repairing Connector Terminals , Connector Repairs and Wiring Repairs .
  3. Reinstall fuel injector feed fuse.

Was a problem found?

--

Go to Step 31

Go to Step 30

30

Important: :  The replacement PCM must be programmed. Refer to Powertrain Control Module Replacement/Programming .

Replace the PCM.

Is the action complete?

--

Go to Step 31

--

31

  1. If the PCM is disconnected, reconnect the PCM.
  2. Attempt to start the vehicle.

Does the engine crank?

--

System OK

Go to Step 7