CAMPAIGN: DIESEL INJ. PUMP GOVERNOR WEIGHT RETAINER ASSY.

MODELS AFFECTED:
The National Traffic and Motor Vehicle Safety Act, as amended, provides that each vehicle which is subject to a recall campaign of this type, must be adequately repaired within a reasonable time after the owner has tendered it for repair. A failure to adequately repair within sixty (60) days after tender of a vehicle is prima facie evidence of failure to repair within a reasonable time. If the condition is not adequately repaired within a reasonable time, the owner may be entitled to an identical or reasonably equivalent vehicle at no charge, or to a refund of the purchase price, less a reasonable allowance for depreciation.
In order to avoid having to provide these burdensome solutions, every effort must be made to promptly schedule an appointment with each owner and to repair his vehicle as soon as possible. As you will see in reading the attached copy of the letter which is being sent to owners, the owner is being instructed to contact the nearest Buick Zone Office if his dealer does not remedy the condition within five (5) days of the mutually agreed upon service date. If the condition is not remedied within a reasonable time, he is instructed on how to contact the National Highway Traffic Safety Administration.
DEFECT INVOLVED
General Motors has determined that a defect which relates to motor vehicle safety exists in some early production 1982 Regals, LeSabres, Electras, and Rivieras equipped with 5.7L V-8 diesel engines. Under certain vehicle operating conditions the governor weight retainer in the injection pump may fail and the throttle valve could stick, preventing return to idle and shut down of the engine by the operator of the vehicle. This could result in a loss of vehicle control and a vehicle crash could occur without prior warning.
VEHICLES INVOLVED
1982 Regals, LeSabres, Electras, and Rivieras built with a 5.7L diesel engine from the Start of Production, through and including the following serial numbers:
ASSEMBLY PLANT SERIAL NUMBER
Fairfax - CX118128 Linden - CE417785 Flint -Factory 04 - CH436377 Flint -Factory 40 - CH156905 Arlington - CR122757
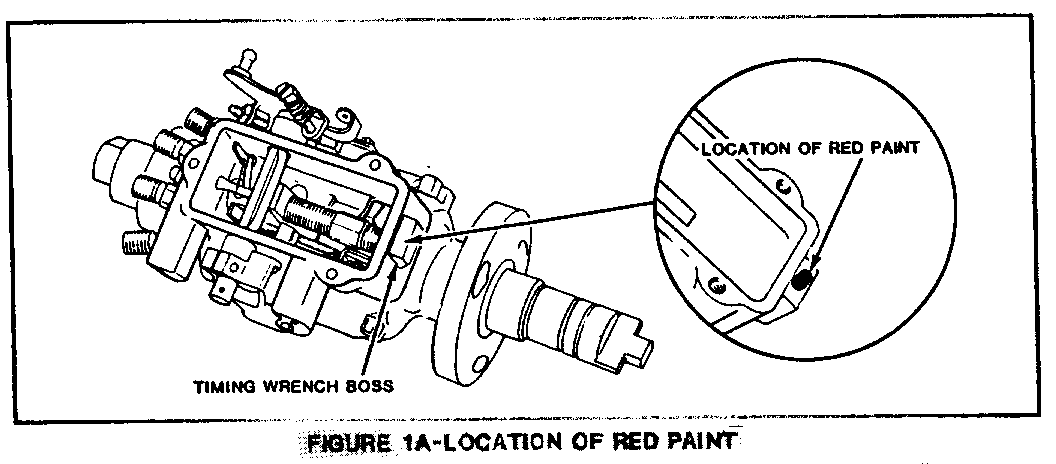
Some vehicles within the serial numbers listed may have had the campaign correction performed in the assembly plant before the vehicle was shipped. These corrected vehicles can be identified by a red "C" sticker on the front of the left valve cover, or by a daub of red paint on the pump timing boss.
DEALER ACTION
Dealers are to perform this recall campaign at no charge to the owner on affected vehicles, regardless of time, mileage, or ownership; and are to correct all affected vehicles in dealer new and used inventory prior to their sale.
Whenever a vehicle subject to this campaign is taken into your new or used car inventory in the future, you should take the steps necessary to be sure the campaign correction has been made before reselling the vehicle.
Dealers are to perform the campaign services on all affected vehicles as they are brought in for any kind of service until all affected vehicles have been corrected.
Special Instructions for Injection Pump Service
The original campaign bulletin was written with the assumption that all campaign corrections would be performed by Buick dealers. The purpose of this section is to address dealer completion or sublet of the campaign correction. Dealers should be aware that, if the injection pump is provided to Stanadyne (Roosa Master), they will perform the governor weight retainer assembly correction; however, Roosa Master will charge dealers for performing the correction. Dealer credit will be issued by Buick for servicing injection pumps as outlined below.
A. Dealers are encouraged to perform the campaign correction in their dealership according to the service procedures outlined in this bulletin. Dealers should submit a properly prepared warranty claim as detailed in the Credit section of this bulletin.
B. Some dealers may find it necessary to sublet the injection pump to Roosa Master for performance of the campaign correction. Dealers who choose this alternative should provide the pump and a Governor Weight Retainer Parts Kit (P/N 22518269) to their local roosa Master repair station for servicing. Upon completion of the campaign correction, Roosa Master should return the original pump along with the parts removed and an invoice detailing the service charge. Dealers are to be advised that they will be charged for the required labor based upon Roosa Master's current suggested labor time of .9 hr. Dealers should submit a properly prepared warranty claim as detailed in the Credit section of this bulletin.
DEALER MATERIAL
If your dealership has vehicles involved in this campaign, you will receive the following items:
List of all vehicles involved in this campaign shipped to your dealership.
One (1) campaign identification label per vehicle involved.
OWNER NOTIFICATION
Owners of vehicles involved in this campaign will be notified by Buick Motor Division (See copy of owner letter included with this bulletin).
NOTICE: Owners of vehicles recently sold from your new vehicle inventory are to be contacted by the dealer, and arrangements made to make the required modification according to instructions contained in this bulletin.
Involved vehicles have been identified by Vehicle Identification Number computer listings. Computer listings contain the complete Vehicle Identification Number, owner name and address data, and are furnished to the involved dealers with the campaign bulletin. Owner name and address data furnished will enable dealers to follow-up with owners involved in this campaign.
The computer listings may contain owner names and addresses obtained from State Motor Vehicle Registration Records. The use of such motor vehicle registration data for any other purpose is a violation of the law in several states. Accordingly, you are urged to limit the use of this listing to the follow-up necessary to complete this campaign. Any dealer not receiving a computer listing with the campaign bulletin was not shipped any involved vehicles.
TRANSFER OF VEHICLE
If a vehicle on your list is not in your area, please forward campaign identification label and vehicle information for this vehicle to your Buick Zone Office for handling with the proper dealer.
PARTS INFORMATION
Parts required to complete the modification are to be obtained from your General Motors Parts Distribution Center. One of the following kits is required per vehicle:
Part Number 22518269 Governor Weight Retainer Assembly Kit
To ensure this part will be obtained as soon as possible, it should be ordered from GM Part (G.M.W.D.D.) on a C.I.O. order with no special instruction code, but order on an advise code (2).
TECHNICAL PROCEDURE
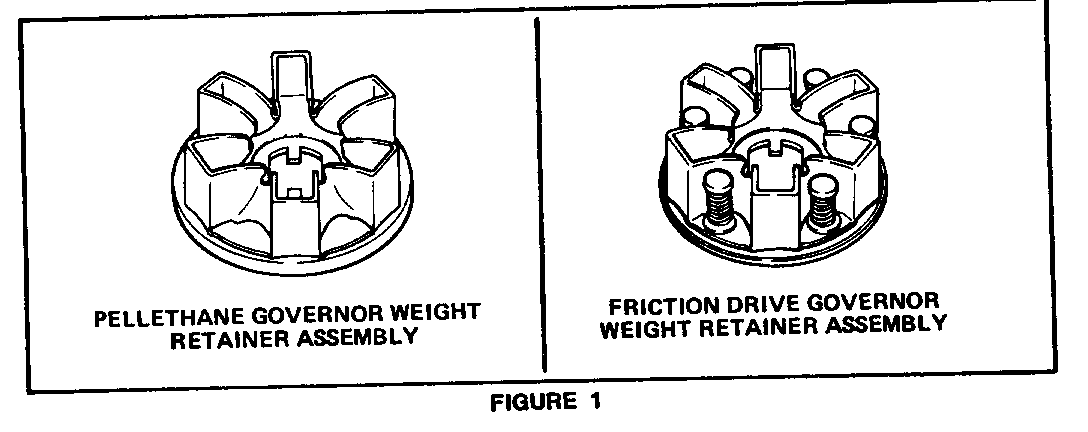
The friction drive governor weight retainer assembly is to be replaced with a pellethane governor weight retainer assembly, See Figure 1.
A. INSPECTION ONLY:
If the vehicle serial number falls within the above range, open the hood and locate a red "C" sticker on the front of the left valve cover or a daub of red paint on the pump timing boss. If either of these identifying marks are located, no further action is required.
Install campaign identification label, Part C of this procedure.
To determine the location of the daub of red paint that identifies a corrected pump, refer to Figure 1A. The paint is located on the top of the timing wrench boss which is on the front of the housing as illustrated. There may be red sealer on the cover or other parts of the housing, but this does not indicate a corrected pump and should not be mistaken for the red paint on the timing wrench boss. Should there still be doubt after inspeting for the "C" sticker and red paint, the campaign correction should be performed.
If the above described identifying marks cannot be located on the left valve cover or on the pump wrench timing boss, the following service procedure must be performed:
B. INSPECTION AND CORRECTION
Many dealers have attended the advance diesel class or have otherwise been trained to change governor weight retainer rings. These procedures are almost identical to the training you have previously received; however, there are some changes that need your attention. (See Steps 7 and 15 of the Assembly Procedure).
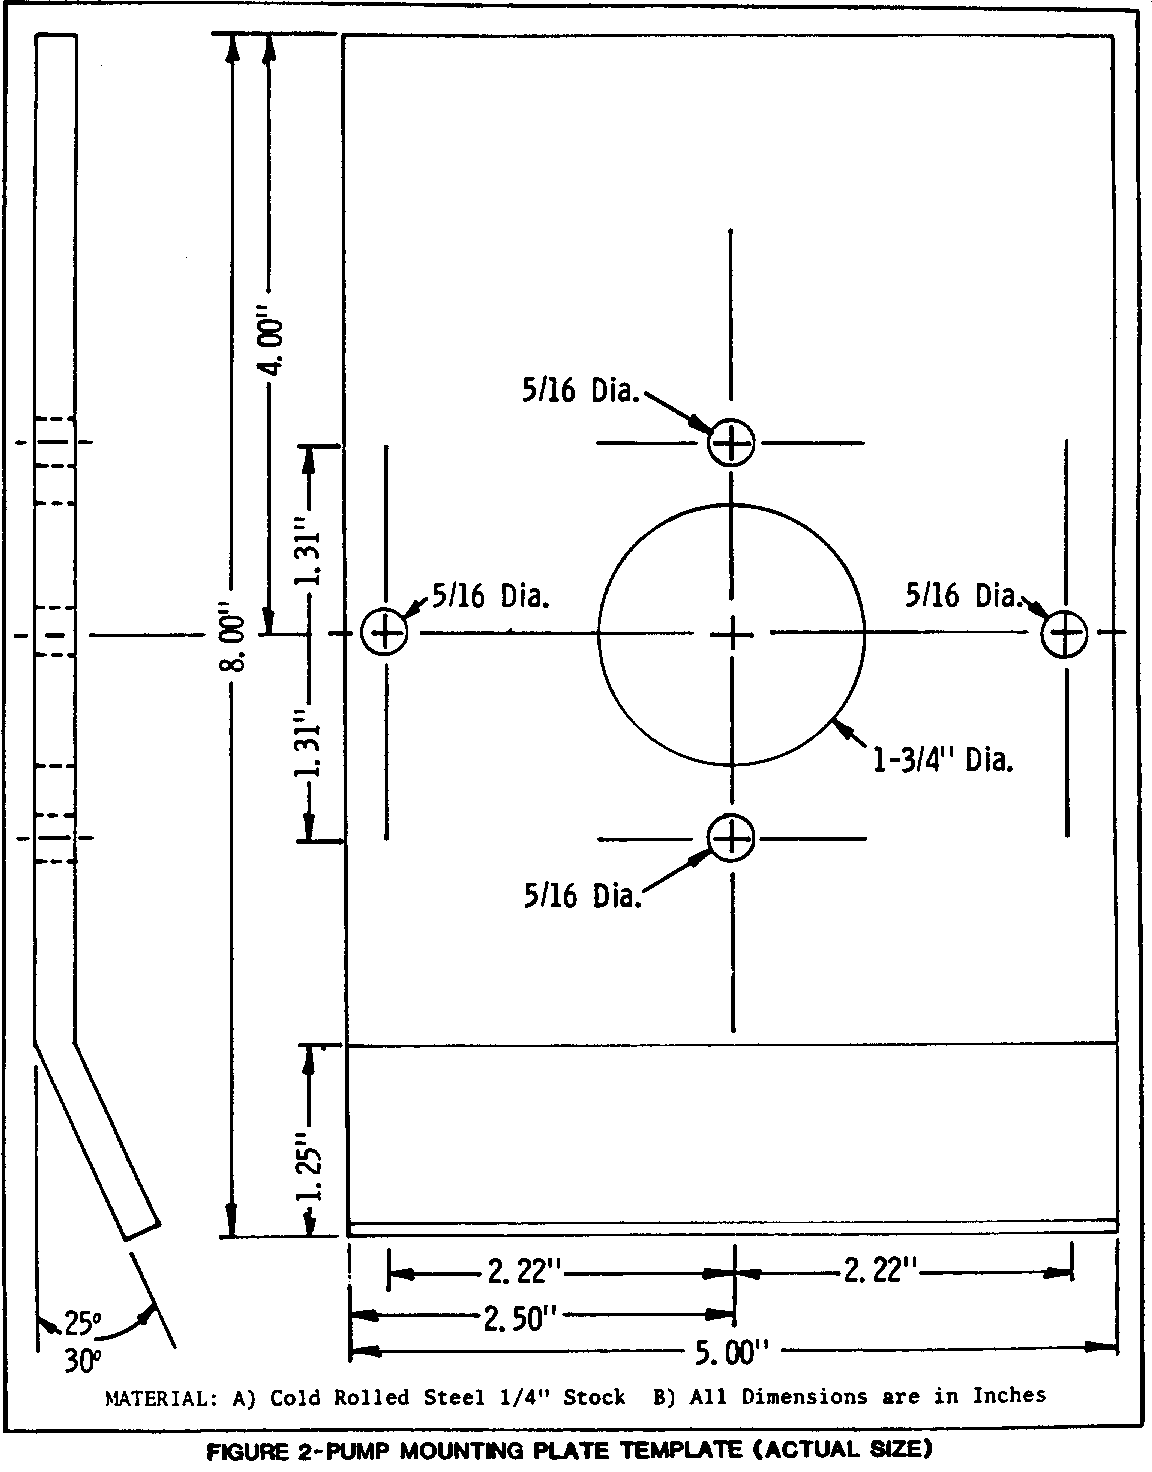
Dealers should follow the step-by-step procedures. There are no special tools required, however, a plate to mount the pump may make the job considerably easier.
NO ATTEMPT WHATSOEVER SHOULD BE MADE TO MOUNT THE PUMP IN A VISE BY CLAMPING ON THE PUMP ATTACHING FLANGE.
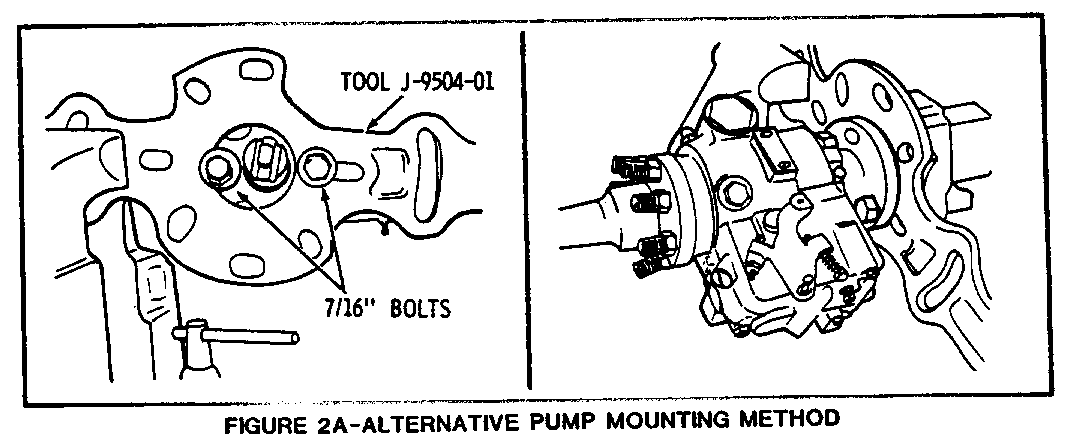
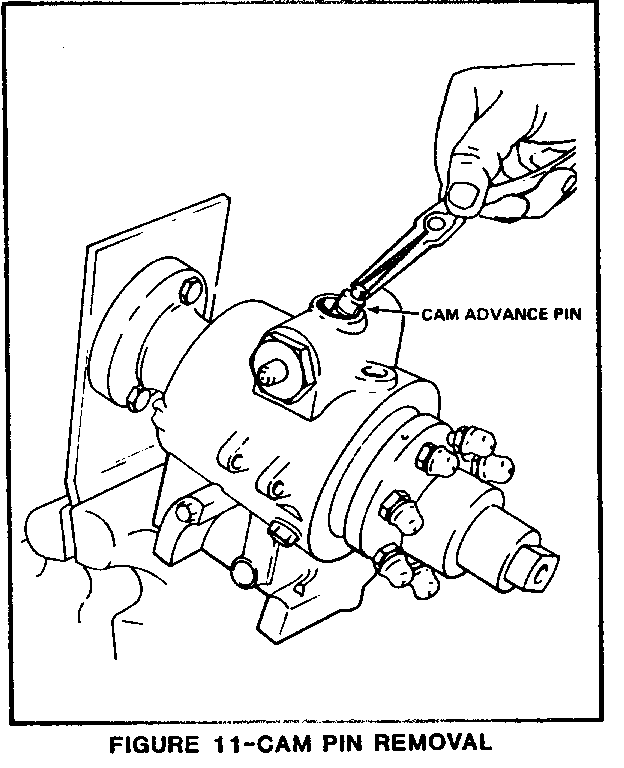
A template showing a pump mounting plate is included in the event you should wish to have one made. (See Figure 2). Mounting plates are available from Kent-Moore (Tool number J-29692-A) and Burroughs Tool and Equipment Company (Tool number BT-8046 or BT-8046-P). An alternative mounting method uses vacuum booster tool J-9504-01, (See Figure 2A), or differential tool J-8614-11. The fuel injection pump must be mounted in the vise with the fuel distribution head end lower than the attaching flange end, as shown in Figure 11. This facilitates removal of the governor assembly by preventing the weights from falling out of the retainer cage.
The diesel injection pump is a complex item, containing close tolerance pieces. Cleanliness is essential. Your tools and work area must be clean. Injection pump parts should be placed in clean metal trays only.
DISASSEMBLY
1. Observe position of timing alignment marks so pump can be reinstalled in same position.
Remove the injection pump from the vehicle, following the procedure outlined in Section 6C5 of the 1982 Regal, LeSabre, Electra and Riviera Chassis Service Manual.
2. Scribe a line on the vacuum regulator valve and pump body so the valve can be reinstalled without resetting. Remove the valve.
3. Install plugs in the discharge ports, fuel inlet port and return line port. Clean the pump thoroughly on the outside. Any cleaner that does not irritate the skin should be satisfactory. If nothing else, immerse in diesel fuel, brush clean, and blow dry.
4. Install the pump in a holding fixture so that rear of pump is tilted downward. See Figure 11.
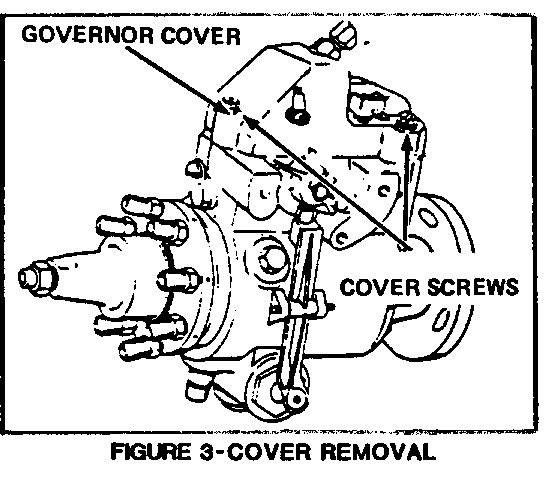
5. Remove the three governor cover screws and remove the cover. Refer to Figure 3. Catch Diesel fuel in drain pan when cover is removed.
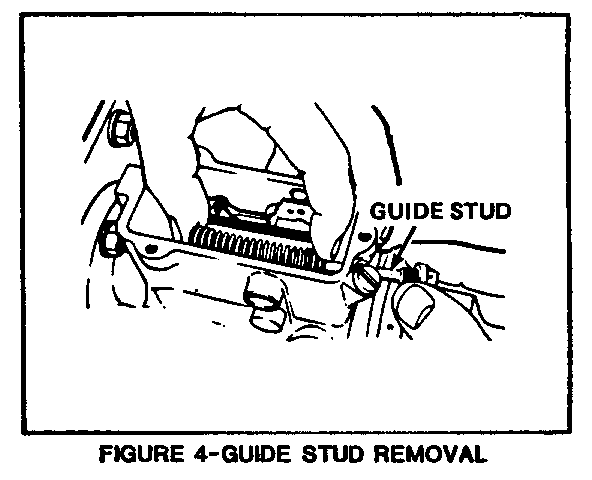
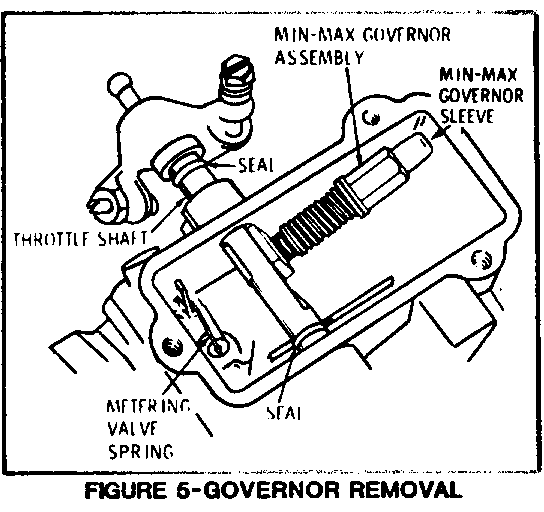
6. Remove the guide stud and guide stud washer. Remove the min./max. governor assembly. See Figures 4 and 5. If guide stud washer has a rubber insert in it, do not discard; if it is a solid aluminum type, discard.
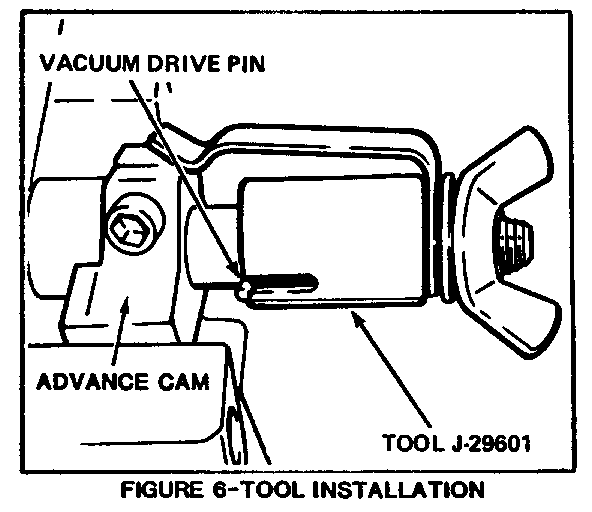
7. Install Tool J-29601 on the throttle shaft and tighten thumb screw. Remove the tool. See Figure 6.
NOTE: This setting is used to position Advance Cam during re-assembly.
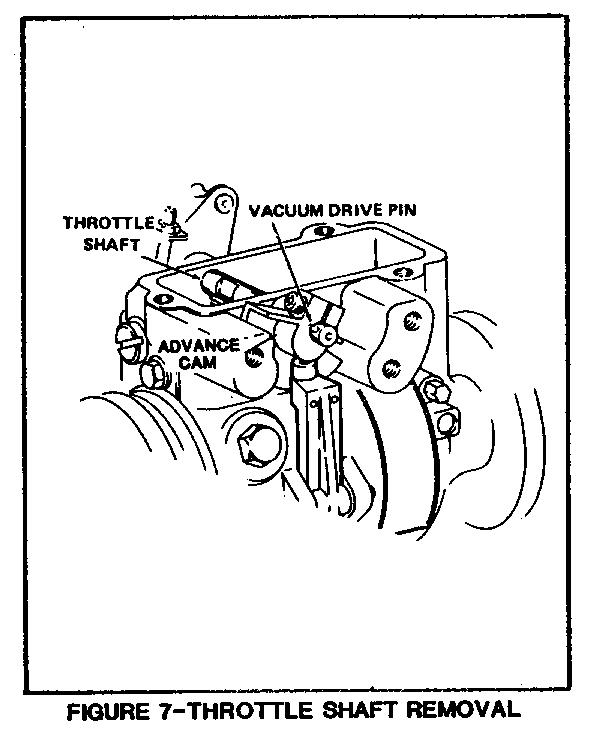
8. Remove the vacuum regulator valve drive pin and cam screw. Remove the Throttle Shaft and Advance Cam. See Figure 7.
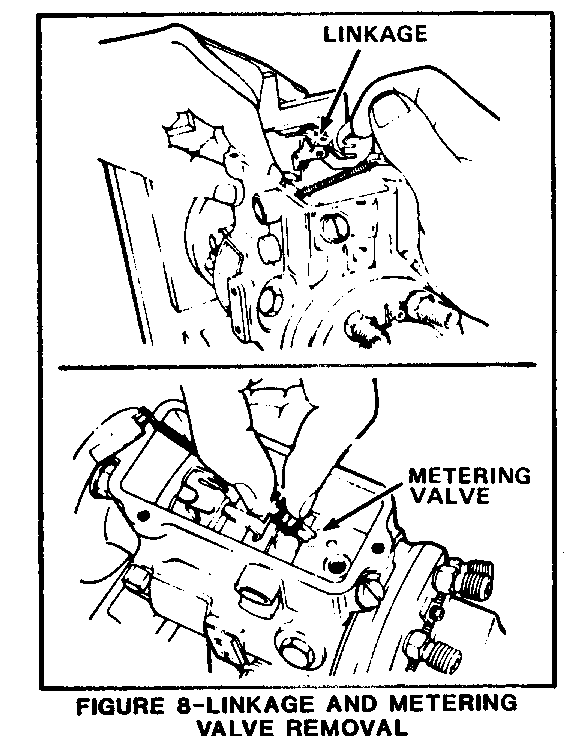
9. Remove the governor linkage assembly and the metering valve. See Figure 8.
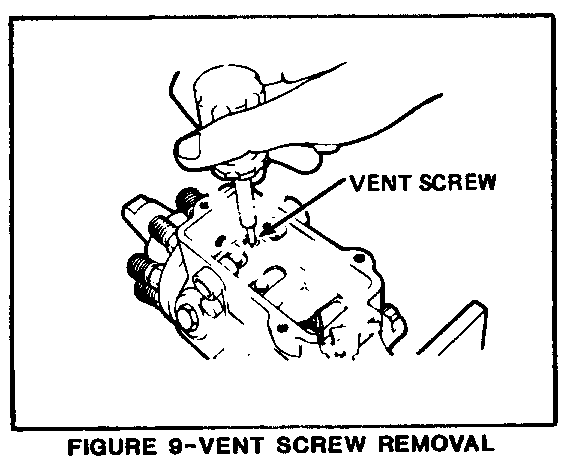
10. Using a 1/8" Allen Wrench, remove the housing vent screw. Refer to Figure 9.
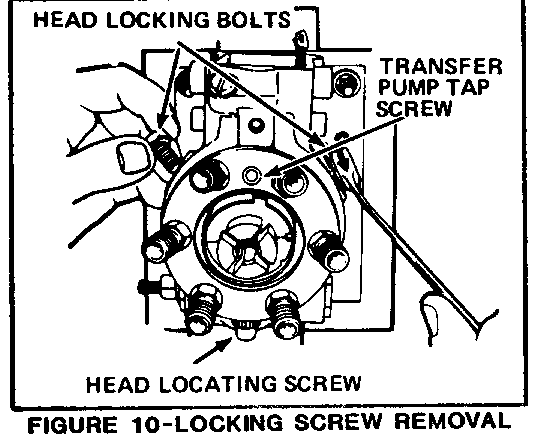
11. Remove one (1) head locking screw and loosen the other, turn pump upside down and remove the head locating screw. See Figure 10.
12. Remove the advance screw hole plug. Lift out the cam advance pin, using a pair of needle nose pliers. See Figure 11.
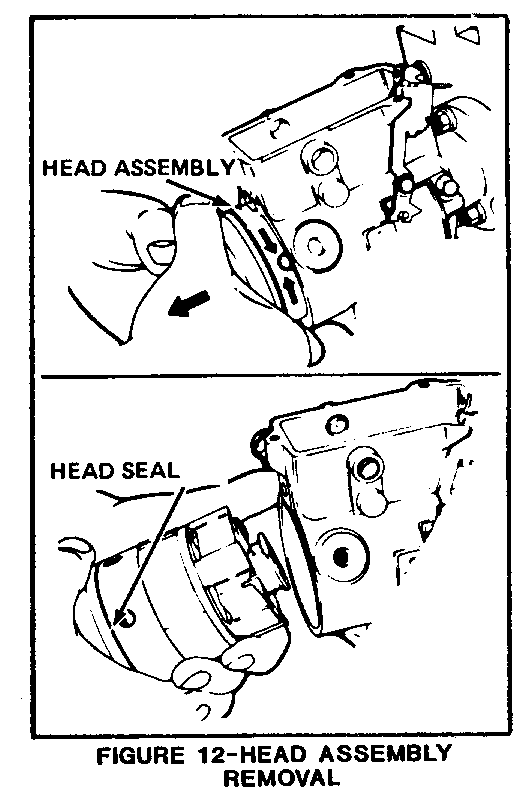
13. Rotate the pump upright and remove one (1) remaining head locking screw. Remove the head and rotor assembly from the pump housing by grasping the head with both hands, and rotating back and forth while pulling. Refer to Figure 12.
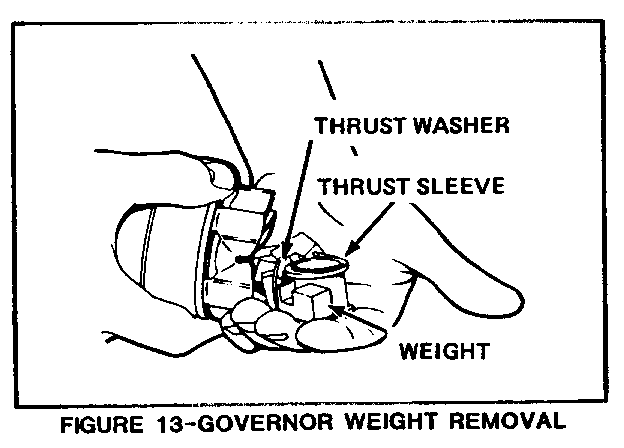
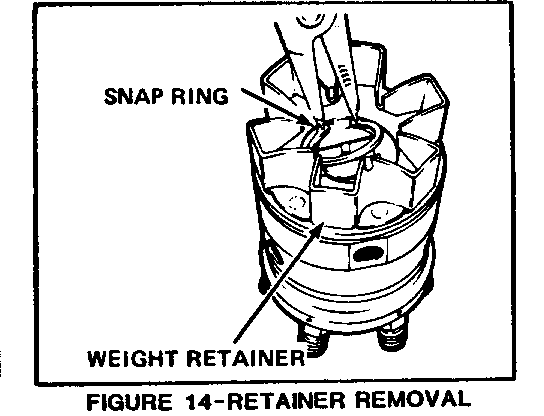
14. Remove the governor weights, thrust sleeve and thrust washer, and remove the snap ring. Remove the governor weight retainer assembly. See Figures 13 and 14.
NOTE: Do not remove any other parts from the head and rotor.
ASSEMBLY
1. Remove old hydraulic head seal and install a new hydraulic head seal provided in kit. See Figure 12 for location of head seal.
2. Install the new governor weight retainer assembly provided in the kit.
3. Install governor weight retainer snap ring.
4. With head and rotor assembly standing upright on work bench, install governor weights and thrust washer in cage. Make sure washer is positioned in slots of each governor weight. See Figure 15.
5. Position thrust sleeve on top of thrust washer.
6. Apply a coat of grease from grease pack in kit to the hydraulic head seal.
7. Locate the top of the head and rotor by finding the transfer pump tap screw. See Figure 10. Rotate the cam ring until the smallest hole is at the bottom.
Note: This is done to properly index the cam ring.
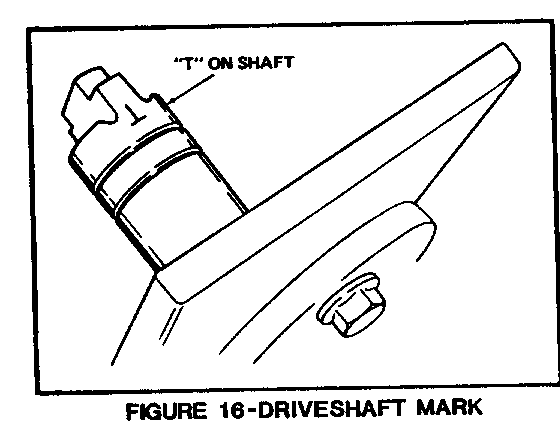
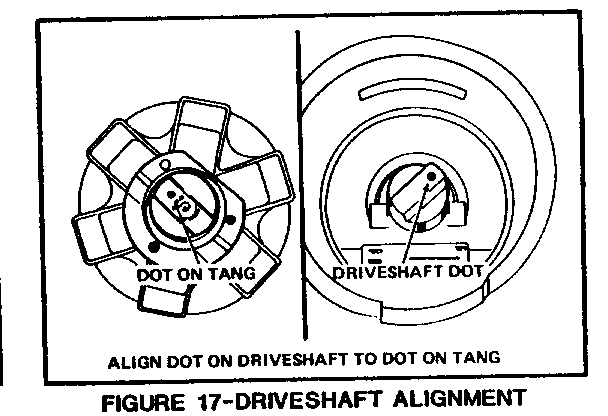
8. Rotate the drive shaft until the "T" mark is positioned upward. See Figure 16. Observe the dot on the opposite end of the drive shaft tang, and locate the dot in the drive shaft slot. Hold the cam ring and rotate the retainer to align the dots. See Figure 17.
9. Insert the head and rotor assembly into the housing. Rotate the drive shaft back and forth slightly until it is engaged. Complete the insertion of the head and rotor into the housing using a twisting motion until the head locking screw holes line up.
NOTICE: Insertion of the head too far into the pump may cut the head seal. If the head goes in further than the locating screw holes, check the housing to see if seal is exposed in the opening for the vent screw; if it is, remove and replace the seal.
10. Retain the head and rotor assembly into the housing by installing the two (2) head locking screws (hand tighten). Refer to Figure 10.
11. Turn pump upside down and install head locating screw using a new head locating screw seal. Torque locating screw to 24.4 N.m (17 ft. lbs.), then torque the two (2) head locking screws to 24.4 N.m (17 ft. lbs.).
12. Install cam pin using needle nose pliers. Refer to Figure 11.
NOTE: With a small screwdriver, line up the hole in the piston and cam ring. Move the servo piston out of the way.
13. Install advance pin hole plug. Torque to 10.8 N.m (8 ft. lbs.).
Note: Inspect for "O" ring seal damage and replace if necessary. The seal is not included in the parts kit; however, it is available through Roosa Master. Refer to Credit section for further details.
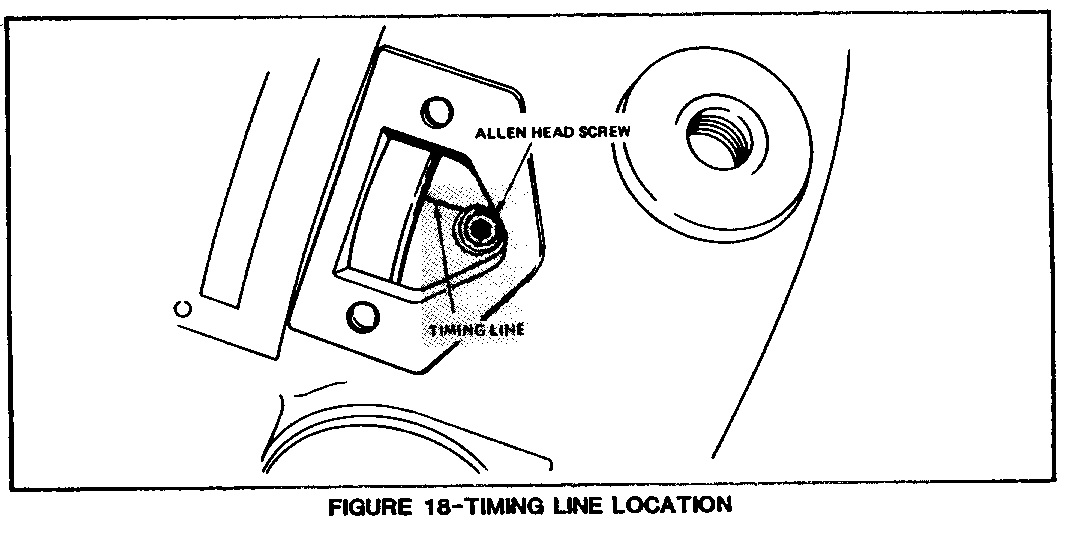
14. Turn pump right side up and remove the timing line cover and gasket. See Figure 18.
Note: A new gasket is not included in the parts kit; therefore, use care in removing the cover to avoid damaging the gasket.
15. Check internal pump timing by viewing through the timing line opening. The line of the cam ring should be visible. Using a flashlight, rotate the drive shaft until the head of the screw (Allen head) is visible the bole in the cam ring. The "T" on the drive shaft should be positioned at approximately a "5 o'clock position", viewing the drive end of the shaft, if properly timed. If both conditions are not met, the cam ring or the head could be installed improperly. Disassemble and correct. Refer to Figure 18.
16. Install timing line gasket and cover.
17. Install housing vent screw and metering valve. Refer to Figure 8.
18. Rotate thrust sleeve so that flat on sleeve is up.
19. Install governor linkage assembly, making sure the feet on the pivot are forward of the thrust sleeve.
20. Rotate the metering valve back and forth; the linkage should not restrict the movement of the valve.
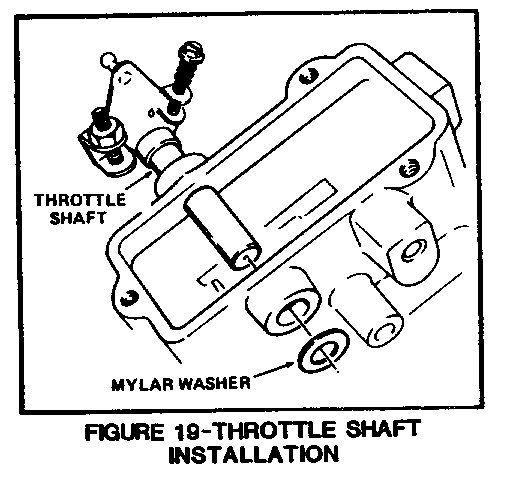
21. Position advance cam between advance lever arm and housing, making sure that mylar washer is in position on the cam. See Figure 19.
22. Using new throttle shaft seals, lubricate seals and shaft and install throttle shaft into housing and advance cam.
23. Install advance cam screw (hand tighten).
24. Install new throttle shaft drive pin provided in kit.
25. Install tool J-29601 on throttle shaft over drive pin to properly align cam. Refer to Figure 6.
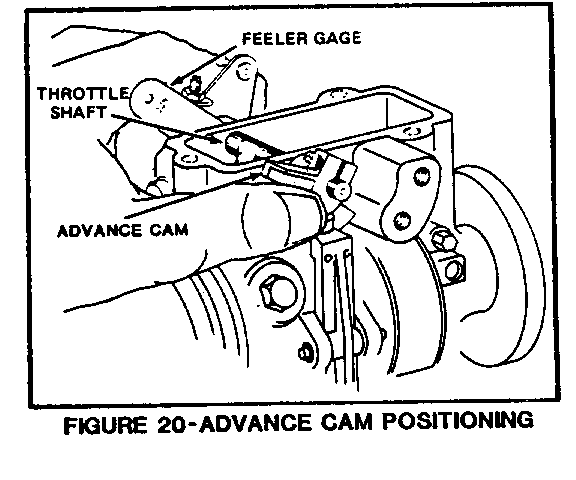
26. Insert a .005" feeler gage between the white washer on the throttle shaft and the pump housing. Squeeze the cam and throttle shaft together and tighten the cam screw. Torque to 3.4 N.m (30 in. lbs.) Secure with Loctite 290 or equivalent. Remove tool J-29601. Refer to Figure 20.
27. Pivot the min./max. governor assembly into position. Refer to Figure 5.
28. Install the guide stud and new guide stud washer, if needed; making certain that the upper extension of the metering valve spring rides on top of the guide stud. Torque the guide stud to 9.5 N.m (7 ft. lbs.). Do not over-torque guide stud.
29. Install a new pump cover gasket on the cover. Make sure the screws are not in the cover and position the cover about 1/4 inch forward (toward shaft end) and about 1/8 inch above the pump.
30. Move the cover rearward and downward into position, being careful not to cut the gasket, and reinstall the cover screws. Be careful not to drop flat washer and internal lock washer with each screw. Flat washer must be against pump cover. Torque to 3.5 N.m (33 in. lbs.). Remove pump from mounting bracket.
31. Pressure test the injection pump for leaks as follows:
a) Assure discharge ports are capped (step 3 of Disassembly).
b) Remove the fuel return elbow and install a 1/8" pipe plug in fuel return check valve connector.
c) With selected fittings, connect a length of 1/4" copper tubing (at least 12" in length) to the pump fuel inlet connection; connect the other end of the copper tubing to a regulated clean, dry air supply.
d) Completely immerse the pump in a bath of clean diesel fuel.
e) Raise air pressure to a maximum of 137.9 kPa (20 PST) and observe for leaks.
NOTE: If excessive leakage is observed at any of the discharge ports rotate the drive shaft slightly until it stops. Slight leakage at the discharge ports is normal.
f) Lower air pressure to 13.8 kPa (2 PSI) and observe for leaks. Raise air pressure again to 137.9 kPa (20 PSI) and observe for leaks. If necessary, correct leaks before installing pump on vehicle.
Refer to Credit section for further details.
32. Reinstall vacuum regulator valve on pump, lining up valve to scribe mark made in Step 4 of disassembly. Torque bolts to 5.4 N.m (4 ft. lbs.). Reinstall pump in vehicle following the procedure in Section 6C5 of the 1982 Regal, LeSabre, Electra and Riviera Chassis Service Manual. Timing alignment marks should be aligned in same position noted in Step 1 of disassembly. Do not start the engine until Steps 33 and 34 have been completed.
Note: It should not be necessary to adjust the throttle linkage, reset pump timing, or adjust vacuum regulator valve as described in the Service Manual.
33. After pump is reinstalled in the vehicle, turn the ignition switch to the run position and touch the pink fuel solenoid wire to the solenoid. A clicking noise should be heard as the wire is connected and disconnected. If this clicking is not observed, the linkage may be jammed in a wide open throttle position and the engine MUST NOT be started. If clicking is observed, connect the electrical connector(s) then proceed to Step 35.
34. If clicking is not observed, remove the cover. Ground the solenoid lead (opposite the hot lead) and connect the pink wire. With the ignition switch in the run position, the solenoid in the cover should move the linkage. If not, the solenoid must be replaced. Minimum voltage across solenoid terminals must be 12.0 volts.
35. Start the engine and check for leaks. (Using a jumper to energize the housing pressure, cold advance solenoid will reduce starting time.)
36. Idle roughness may be observed due to the air in the pump. Give it plenty of time to purge which it will do by allowing the engine to idle. It may be necessary to shut the engine down for several minutes to allow air bubbles to rise to the top of the pump where they will be purged.
37. Using Mag-Tac (J-26925), set idle speeds according to emission label.
38. After the above has been completed, install a Campaign correction label.
C. CAMPAIGN IDENTIFICATION LABEL INSTALLATION
Each label provides a space to include the campaign number, the five (5) digit Dealer Code of the dealer performing the campaign service, and the date vehicle was campaigned. This information may be inserted with a typewriter or ball point pen. When installng label, clean the surface of the fan guard and apply the campaign label where it is readily visible.
DISPOSITION OF REPLACED PARTS
Campaign parts replaced by dealer or Roosa Master must be held for disposition by Buick Contact personnel. Each replaced part must have a claim tag attached, showing the repair order and the VIN of the vehicle from which it was removed.
WARRANTY INFORMATION
Dealers are to submit each campaigned vehicle as a separate case on the one-line Warranty Document Form S-764. Dealers submitting warranty claims by teletype terminal are to transmit campaign completions as a separate case also.
LABOR AND PARTS CREDIT
Use the one applicable labor operation.
List .1 hour for administration in other labor hours.
SUBLET PART FAILED PARTS FAILURE LABOR LABOR OTHER DEALER OPERATION COUNT PART NO. ALLOW. CODE OP.NO. HOURS HOURS MTL.TWG.
Inspection Only 96 V1100 .2 hrs. .1 hr. -
Inspection, R&R Pump, Dealer Replaces Governor Weight Retainer Assembly 1 2251829 * 96 V1101 2.0 hr. .1 hr. -
Inspection, R&R Pump, Roosa Master Replaces Governor Weight Retainer Assembly 1 22518269 * 96 V1102 1.3 hr.**.3 hr. ***
* Parts credit will be allowed for current dealer price of kit number 22518269, plus 30%.
** Includes .1 hr. administrative allowance and .2 hr. sublet adminstrative allowance.
*** List the cost of the campaign sublet correction (governor weight retainer assembly replacement) labor charged by Roosa Master as indicated on their invoice as one net amount.
Additional Information Regarding Dealer Repair of Pump - Operation Number V1101:
(1) If it is determined that a new advance pin hole plug seal is required (refer to step 13 of Assembly) show a parts count of two (2) and include the net price plus 30% in the total parts allowance.
(2) If pressure testing reveals that leaks must be corrected (refer to step 31 of Assembly), up to .3 hr. additional labor can be claimed by listing as "Other Labor Hours." Include any additional parts in the parts count and total parts allowance amounts. DEALERS MUST OBTAIN A LEVEL II ZONE APPROVAL PRIOR TO SUBMITTING FOR THIS ADDITIONAL .3 HR. AND/OR PARTS COST.
NOTE: ANY CHARGES FROM ROOSA MASTER FOR REPAIRS NOT COVERED BY THIS CAMPAIGN MUST BE HANDLED ACCORDING TO THE NORMAL WARRANTY PROCEDURE.
To assure accurate records of all transactions on this campaign, it is recommended that campaign repairs for each vehicle be listed on a separate repair order. Other repairs performed to the vehicle may be listed on the same repair order, and warranty cases other than campaigns may be listed on the same warranty document.
Warranty documents on this campaign are not to be sent to the Zone Office. Send directly to Buick, Flint, as is done with normal submissions of warranty documents.
Zone authorization is not required.
Dear Buick Owner:
This notice is sent to you in accordance with the requirements of the National Traffic and Motor Vehicle Safety Act.
General Motors has determined that a defect which relates to motor vehicle safety exists in some early production 1982 Regals, LeSabres, Electras and Rivieras equipped with 5.7L V-8 diesel engines. Under certain vehicle operating conditions, if the governor weight retainer assembly in the injection pump has failed, the throttle valve could stick, preventing return to idle and shut down of the engine by the operator of the vehicle. This could result in loss of vehicle control and a vehicle crash could occur without warning.
To reduce the possibility of this occurring on your vehicle, please contact your Buick Dealer on or after the date shown below to arrange a service date. Your dealer will replace the governor weight retainer assembly in the injection pump. This service will be done at no charge to you.
In the event the throttle sticks before you have your vehicle modified, the driver should shift the transmission into neutral, apply the service brakes to bring the vehicle to a safe stop at the side of the road, and then turn off the ignition and call the nearest Buick Dealership for assistance.
Instructions for making this correction have been sent to your dealer. It is expected that parts will be available on February 15, 1982. Please contact your dealer after this date to arrange a mutually satisfactory service date to have this modification performed. The labor time to perform the correction is approximately 2 hours. Please allow additional time for the dealer to process your vehicle. If you take your vehicle to your dealer on the agreed service date, and they do not remedy the condition without charge on that date or within five (5) days, you should contact your nearest Buick Zone Office, either in person or by telephone, for assistance. The locations and phone numbers of the Zone Offices are listed in your Owner's Manual. If your dealer or General Motors fails, or is unable to remedy this condition, without charge, within a reasonable time, you may wish to notify the Administrator, National Highway Traffic Safety Administration, 400 Seventh Street, S.W., Washington, D.C. 20590.
The enclosed Owner Reply Card identifies your vehicle. Presentation of the card to your dealer will assist them in making the necessary correction to your vehicle in the shortest possible time. If you have sold or traded your vehicle, please let us know by completing the postage paid Owner Reply Card and returning it to us.
We are sorry to cause you this inconvenience; however, we have taken this action in the interest of your safety and continued satisfaction with our products.

General Motors bulletins are intended for use by professional technicians, not a "do-it-yourselfer". They are written to inform those technicians of conditions that may occur on some vehicles, or to provide information that could assist in the proper service of a vehicle. Properly trained technicians have the equipment, tools, safety instructions and know-how to do a job properly and safely. If a condition is described, do not assume that the bulletin applies to your vehicle, or that your vehicle will have that condition. See a General Motors dealer servicing your brand of General Motors vehicle for information on whether your vehicle may benefit from the information.
