FRT. DOOR GLASS PERFORMANCE REPAIRS AND DIAGNOSIS

VEHICLES AFFECTED: 1985-88 C AND 1986-88 H SERIES
CORRECTIVE ACTION FOR WINDOW SYSTEMS
1. Misadjusted glassis the number one cause of most customer comments regarding window operation. Front and rear guides not parallel to one another, can cause a bending moment force at the rear glass guide which in turn causes the PIN GUIDE TO UNLATCH AND REAR OF GLASS TO BE UNATTACHED. Indicators are a rocking motion of glass during window travel, top edge of glass not parallel with door header and/or rear pin guide becoming visible from beneath rubber run channel.
Corrective Action - Adjust as follows:
a. Remove door trim panel and water deflector, per 1988 Body Service Manual, Section 5C.
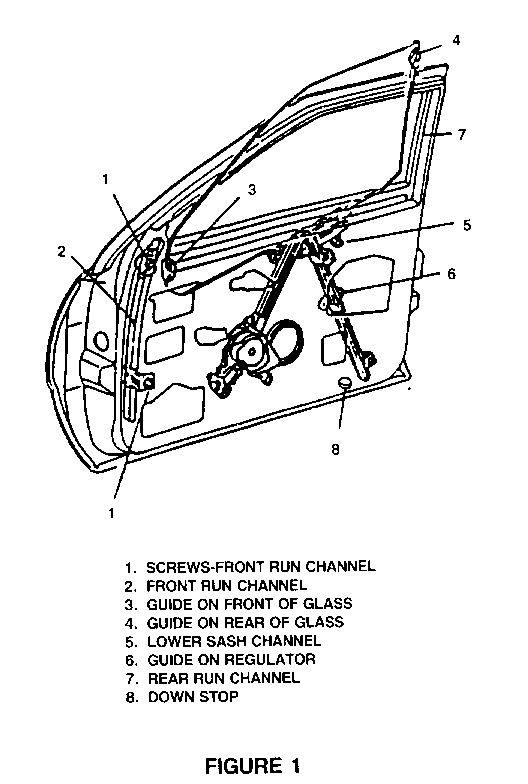
b. Loosen upper and lower glass run channel retainer screws (See Figure 1, Item 1).
c. Cycle glass to full up position into door upper frame.
d. Grasp door glass and move glass fully up and rearward.
e. Tighten previously loosely installed upper and lower glass run channel screws to specified torque of 9.0 to 12.0 N.m (80-106 in. lb.).
f. Cycle glass down and to full up position to check operation of glass.
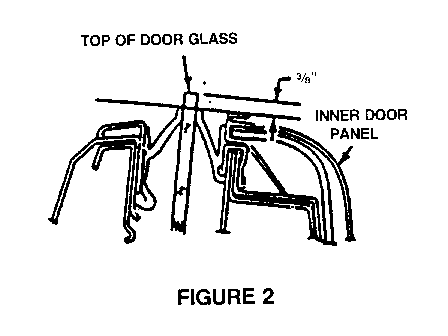
NOTICE: When glass is in full down position, the top of the door glass should be flush to no more than 7 to 10 mm (3/8") (See Figure 2) higher than beltline moulding. The position of the regulator guide to tape determines down travel position of glass in relation to door beltline moulding. DO NOT LOWER REGULATOR as this may cause the window to drop down too far, causing the front pin guide to drop below the front retainer, or cause the guide block to move forward out of the glass lower sash (if the regulator isn't equipped with an up travel stop).
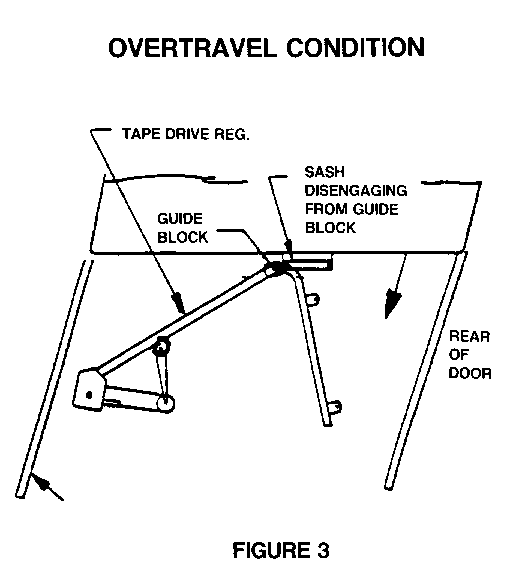
2. Regulator guide block overtravel (more prevalent on two door). A regulator guide block that does not stop at top of regulator radius, but continues on over the top and exits the sash (See Figure 3) at the front of sash, can cause the window to drop to bottom of door. Usually pin guides are intact, and the front and rear glass is in the tracks at bottom of door.
Corrective Action - 1985 C and H Coupes.
A condition may exist in which the front door windows may not raise to the full up position and/or the glass guide to regulator may break, or run out of the lower sash channel. This condition may be corrected by relocating the rear section of the window regulator guide, using the following procedure:
a. Remove door trim panel and water deflector.
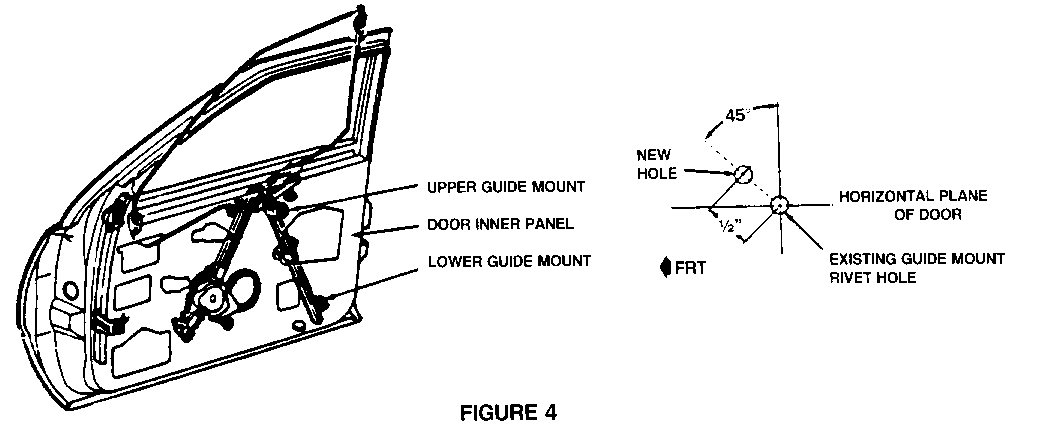
b. Using a 1/4" drill bit, drill out rivets from upper and lower guide mounts of regulator guide, See Figure 4.
c. Locate and drill new regulator guide mount holes as shown in Figure 4.
d. Reposition regulator guide over new holes and attach to inner door panel with 1/4" peel type rivets.
Corrective Action - 1986-87 C and H
If the regulator has no up stop, it should be replaced with one that has an up stop.
Late Production 1986 door glass regulator assembly on two door models with Power windows included an up stop. This expanded to all front door glass power regulators after October 1, 1986. The added up stop prevents tape drive overtravel and disengagement of the tape drive from the door glass. If a car has the above described complaint and does not have an up stop, replace it with the later design regulator.
Part Numbers and usage are indicated in the following chart:
POWER FRONT DOOR GLASS REGULATOR ASSEMBLY WITH UP STOP
PART NUMBER YEAR MODEL AND YEAR ----------- ---- -------------- 20480596 1986 LeSabre 2-Door - Right 20480597 1986 LeSabre 2-Door - Left 20733072 1986 Electra 2-Door - Right 20733073 1986 Electra 2-Door - Left 20733070 1987 LeSabre and Electra 4-Door-Right 20733071 1987 LeSabre and Electra 4-Door-Left 20738086 1987 LeSabre and Electra 2-Door-Right 20738087 1987 LeSabre and Electra 2-Door-Left
3. Mirror "Patch" Insulator Rework - 1985-86 Electra/Park Avenues and 1986 LeSabres.
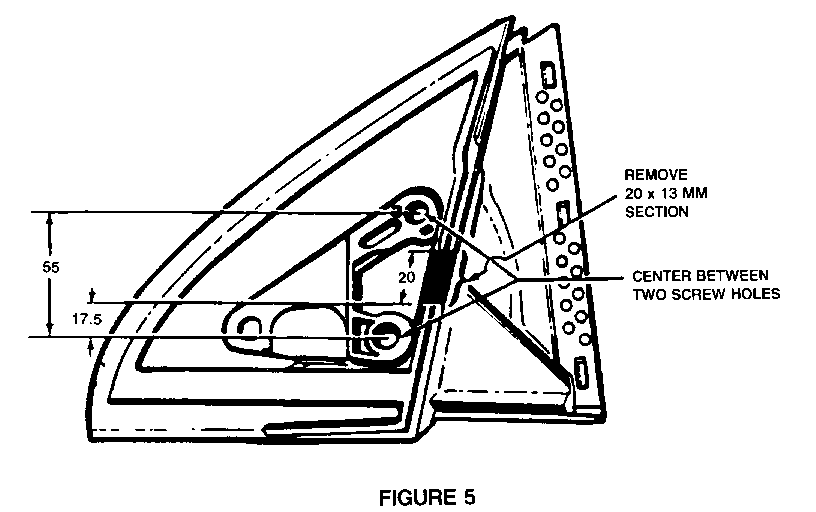
It is possible the mirror "patch" filler or insulator may cause a slight twist or bend in the front upper run channel due to the gasket interfering with the run channel upper retainer bracket. This interference causes a bind and does not allow the retainer to move freely when adjusting the glass. Correction of this condition will also reduce window operating efforts. The rework should be done before adjusting the door glass and consists of the following steps: Corr ctive Action:
a. Remove mirror cover plate.
b. Remove a 20mm (.80") wide section by 13mm (.52") deep section at the rear edge of the insulator centered between the two rear stud holes in the mirror cover plate. See Figure 5. This will allow free movement of the front run channel to upper attachment screw.
In plant breakpoints for Mirror Patch change are as follows:
Buick City GH462000 - Buick LeSabre Orion SOP 1987 - Olds 98 Wentzville G1502860 - Buick Electra G1334768 - Olds 98 G1835762 - Olds 88 Willow Run GW405640 - Olds 88
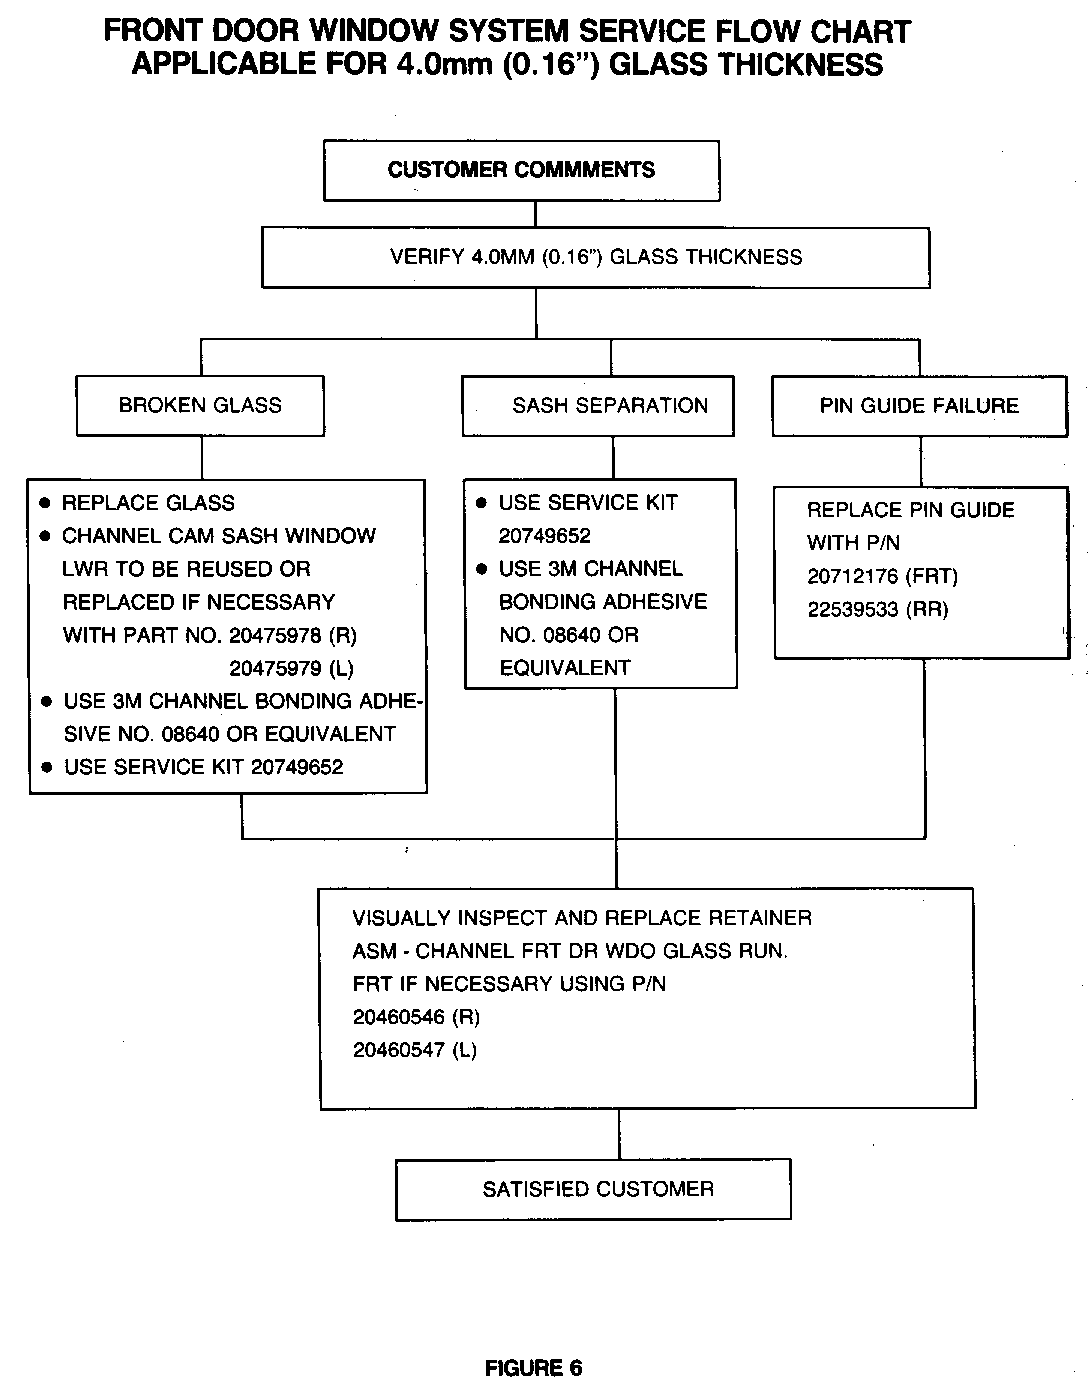
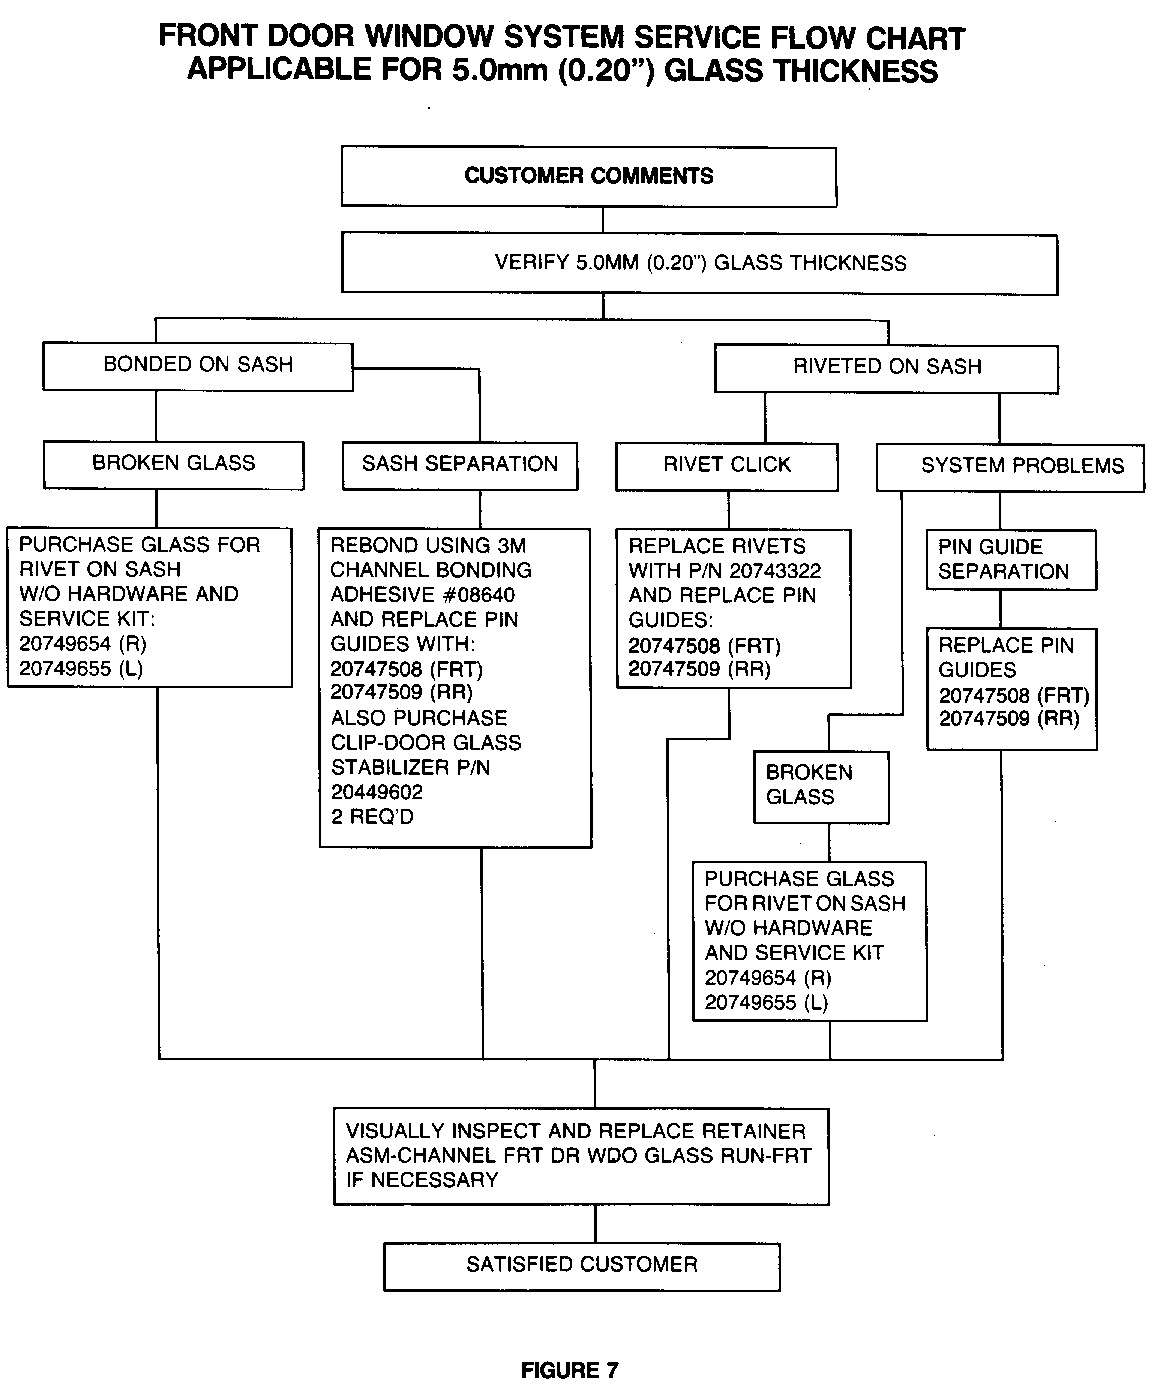
4. Hot Melt Window Sash Separation from Glass: All 1985-87 Electra/Park Avenues built before VIN 435883, and all 86-87 LeSabres built before VIN 480001 have a hot melt glue on lower sash. These glasses are either 4 or 5mm thick. If unsure of glass thickness, use a micrometer and measure.
5mm = .20" 4mm = .16"
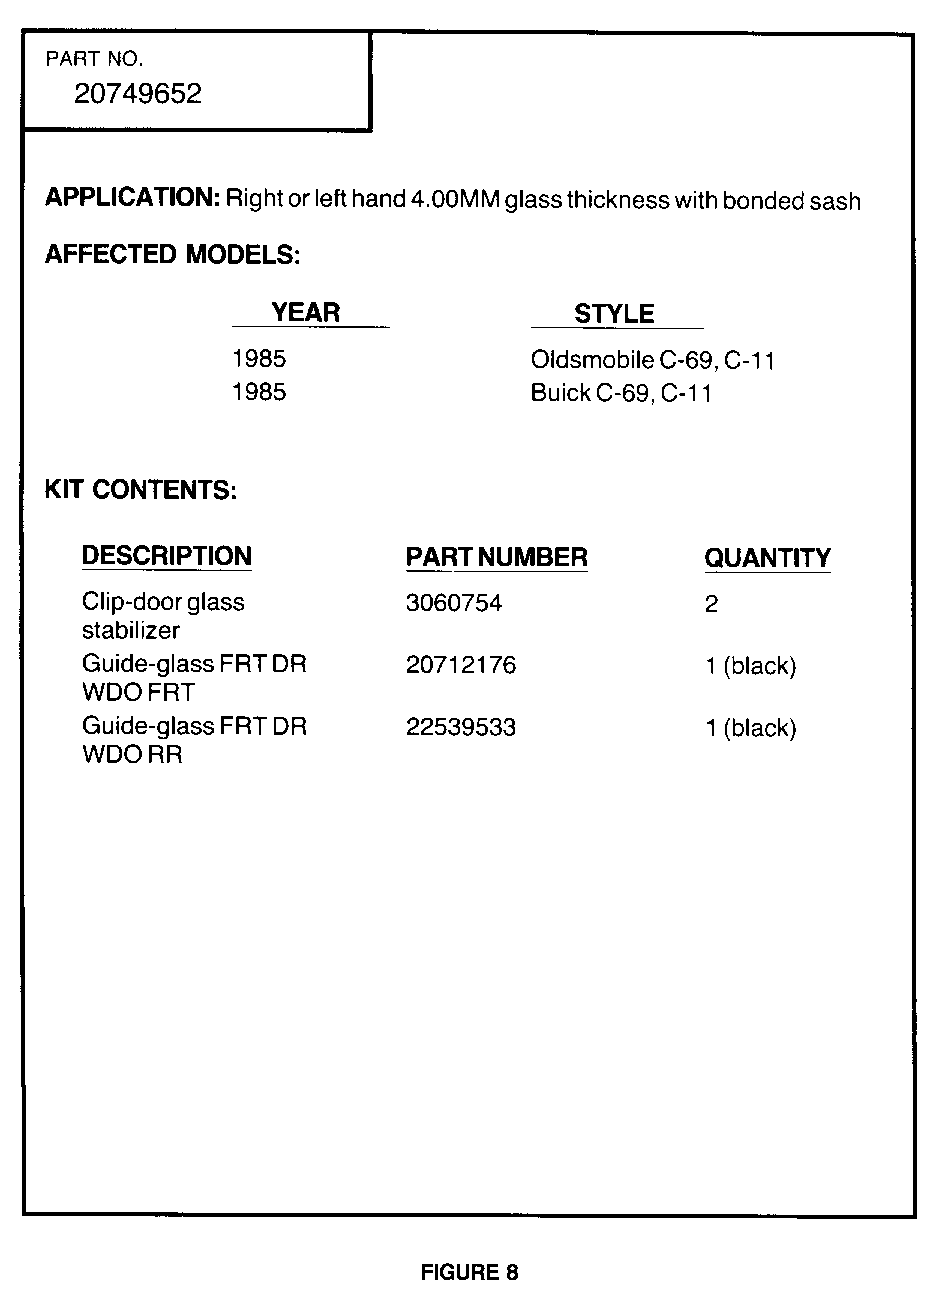
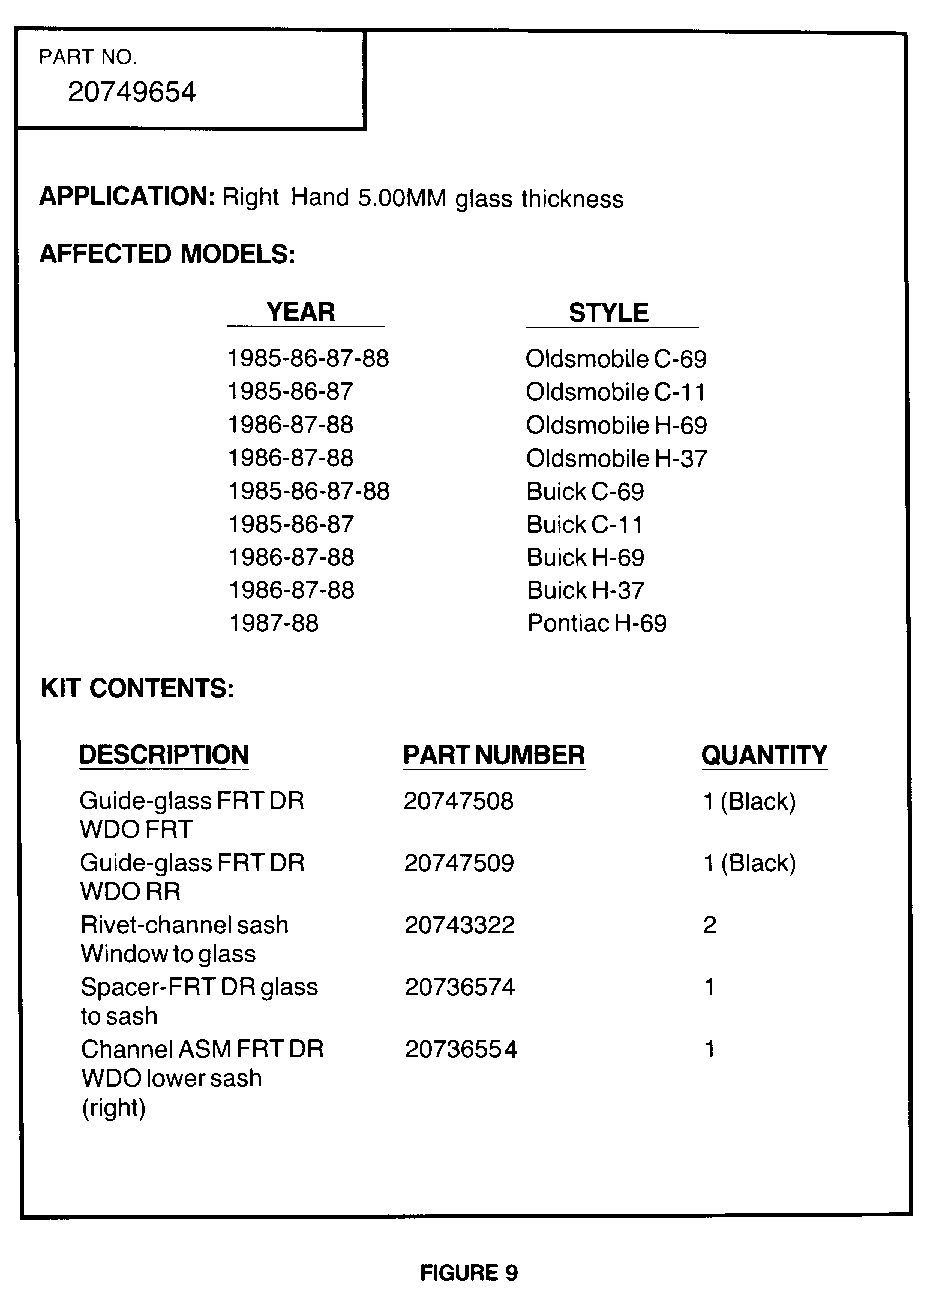
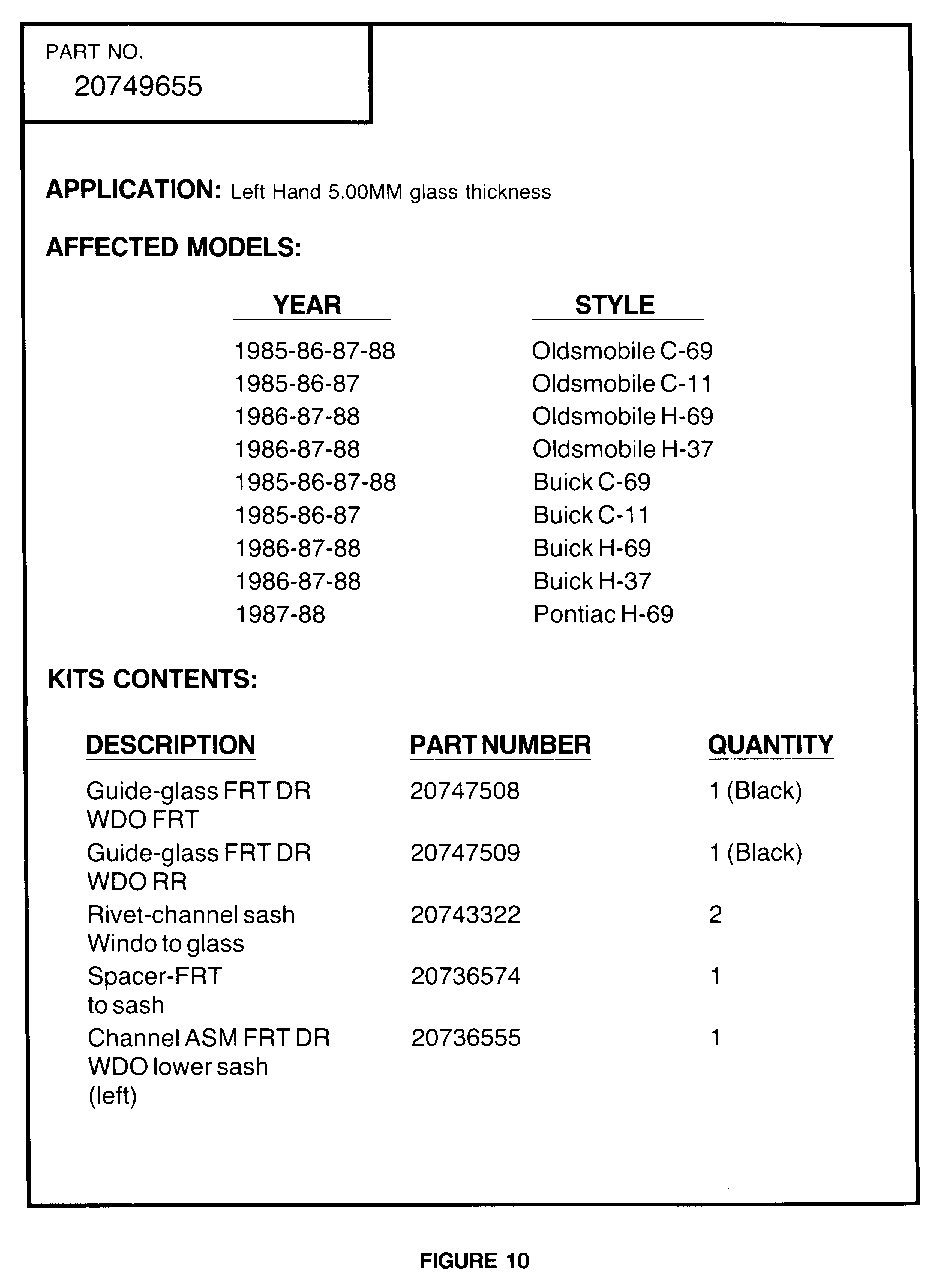
See flow chart, Figure 6 and 7 for proper repair kit. See Figures 8 thru 10 for kit part make up.
5. Clicking sound heard during window travel, approximately 2-3 inches of full up position on vehicles riveted on lower sash. All 1987 LeSabres built after VIN 480000; All 1987 Electra/Park Avenues built after VIN 435882 have a rivet retained door glass sash channel. The subject door glasses should be serviced using the factory installed method. Refer to Section 5C of the 1988 Body Service Manual (NOTICE: SINCE THE MANUAL WAS PUBLISHED, THE RIVET, PART NUMBER 9441725, LISTED ON 5C-21 IS OUTDATED. USE ONLY THE NEW EXPANDABLE RIVET, PART NUMBER 20743322, WHICH IS IN THE SERVICE KIT). See Figure 6 and 7, Flow Charts, and Figures 8 thru 10 for proper repair kit usage.
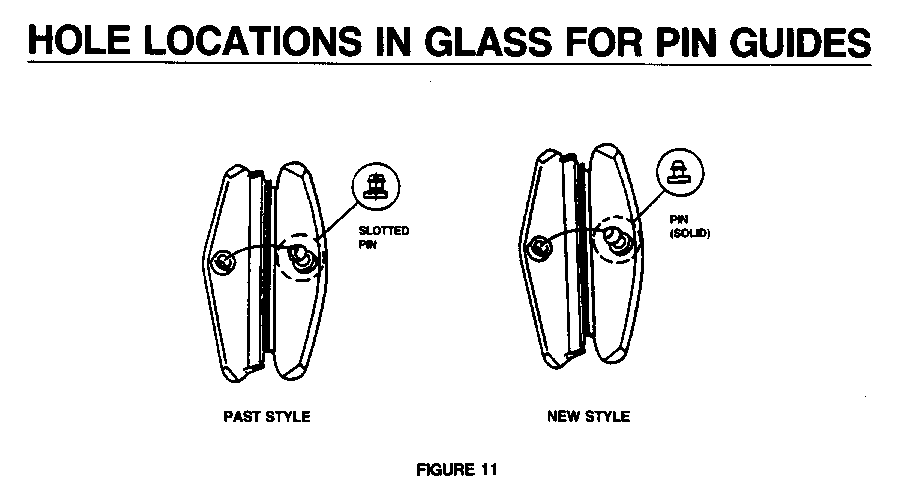
6. Glass Pin Guide Repairs - it is recommended to replace both front and rear pin guide clips if either one has disengaged from a run channel. Make sure that the new clips are properly secured thru the glass. All pin guides in repair kits are of the solid pin type (See Figure 11), black in color. Each kit will contain a front glass run channel to ensure against a distorted or damaged existing channel.
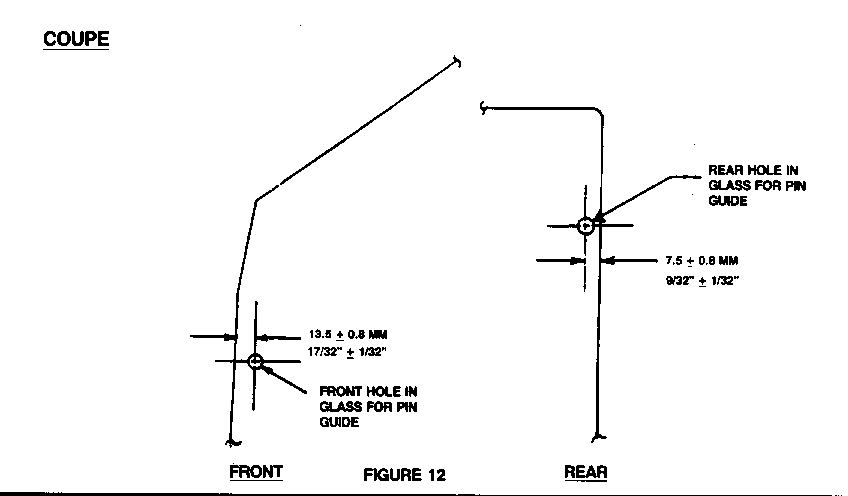
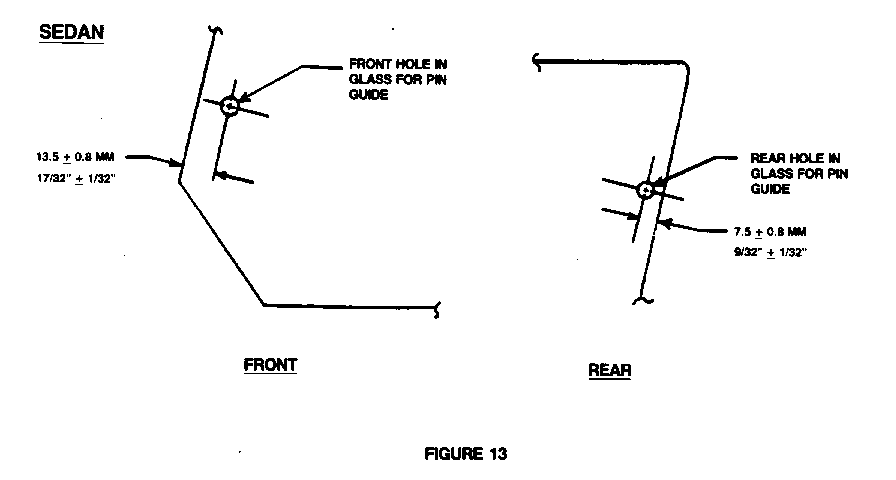
NOTICE: If any difficulty is encountered during installation of pin guides, check location of holes in glass. See Figures 12 and 13. If holes are mislocated, replace the glass.
CONTRIBUTORS TO WINDOW SYSTEM FAILURE
1. DO NOT - Elongate the door inner panel screw hole to move the lower portion of the front window guide channel rearward. If this is done, it would move the glass rearward during it's down cycle, causing the glass to pivot at the bottom of the rear run channel; resulting in the top of the glass moving forward, disengaging the rear pin guide from the glass.
2. DO - Check for correct usage.
3. DO - If the power window operates slowly and the window has had a repetitive pin guide failure.
a. Remove the window regulator, per the 1987 Body Service Manual Section 5C.
CAUTION:
Tape the edges of the door inner panel access holes with cloth back tape to prevent personal injury.
b. Reach thru the access holes with both hands and slide the glass full travel up and down to determine if the glass slides freely or binds. If a bind condition is encountered, investigate cause, run channel alignment or distortion, mirror patch insulator interference, etc.
Use the most applicable Labour Operation and time from the Canadian Labour Time Guide.
General Motors bulletins are intended for use by professional technicians, not a "do-it-yourselfer". They are written to inform those technicians of conditions that may occur on some vehicles, or to provide information that could assist in the proper service of a vehicle. Properly trained technicians have the equipment, tools, safety instructions and know-how to do a job properly and safely. If a condition is described, do not assume that the bulletin applies to your vehicle, or that your vehicle will have that condition. See a General Motors dealer servicing your brand of General Motors vehicle for information on whether your vehicle may benefit from the information.
