20 Inch Accessory Wheels Available Through GM Accessories

| Subject: | 20 Inch Accessory Wheels Available Through GM Accessories |
| Models: | 2008-2009 Buick Enclave |
| 2009 Chevrolet Traverse |
| 2007-2009 GMC Acadia |
| 2007-2009 Saturn OUTLOOK |
This bulletin is being revised to add the 2009 model year and the Chevrolet Traverse. Please discard Corporate Bulletin Number 07-03-10-005B (Section 03 -- Suspension).
The purpose of this bulletin is to provide a reference guide for the technician to upgrade a vehicle from factory wheels and tires to 20" wheels and tires, which are available through GM Accessories. This guide will cover tires, wheels, vehicle modifications, and warranty information.
Tires
GM offers one tire; the Bridgestone Dueler Alenza HL P255/55R20 107H AL3, GM P/N 19162355, to be used in conjunction with the 20" accessory wheels. The Bridgestone Dueler Alenza HL tire has a Tire Performance Criteria (TPC) spec of 1299MS (molded on the sidewall), which meets or exceeds all Federal Safety guidelines.
Tire Changers
Dealers must have the correct level of tire changing equipment to perform tire changing services. GM requirements and recommendations for servicing glamour wheels are as follows:
| • | Rim Clamp design |
| • | Runflat capable (preferred) |
| • | Side mounted bead breaking to reduce stress on the wheel and tire |
| • | No metal contact to the wheel at the clamping jaws |
| • | Protective devices to prevent damage during mounting and dismounting operations |
| • | Regulated air pressure to protect user and wheel assembly |
| • | Approved lubricant to avoid wheel slip and damage to the wheel |
For further information regarding equipment meeting the requirements for this program, call 1-800-GM-TOOLS.
Important: When mounting the tires, rubber lubricant, GM P/N 12345884 (in Canada, 5728223), must be used. Also, the vehicle should not be driven aggressively (hard acceleration or braking) for at least 6-8 hours after tire mounting to allow the lubricant to dry. Failure to do so may cause the tire to slip on the rim. This condition will affect wheel balance which could result in a vibration.
Balancing
Use only stick-on weights mounted on the outboard center of the rim (behind the spokes).
Balancing of the tire and wheel assembly must be performed on a computerized balancer, capable of static and dynamic wheel balance modes. Assemblies should be balanced to within 1/4 ounce on either rim flange. Proper cones and adapters should be used, free of nicks and burrs to ensure proper balancing.
Wheels
Wheel (Lug) Nuts
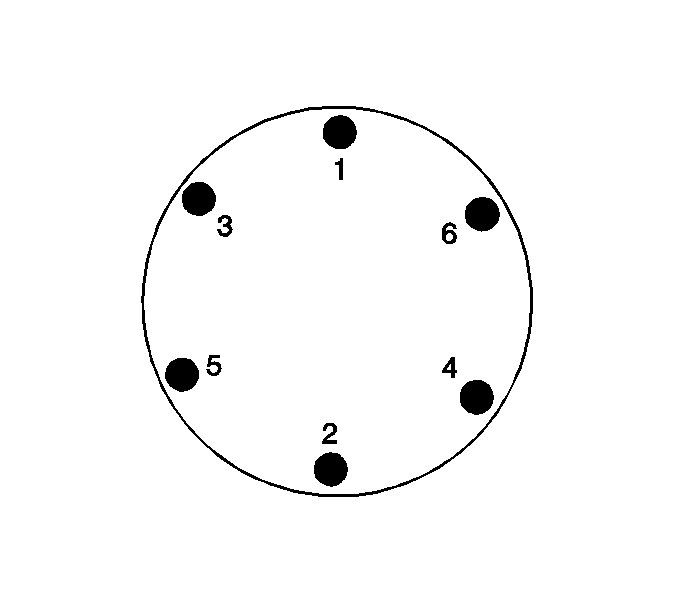
Each wheel nut should be torqued in the appropriate torque sequence (refer to graphic) and to 190 N·m (140 lb ft). The torque should be rechecked after the first 160 km (100 mi). To help protect the wheels from theft, a wheel lock kit is also available.
Caution: Incorrect wheel nuts or improperly tightened wheel nuts can cause the wheel to become loose and even come off. This could lead to an accident. Be sure to use the correct wheel nuts.
Care / Cleaning
Use soap, hot water and a 100% cotton cloth to clean and polish the new wheels. If using a wheel cleaner, be sure to select one that will not harm the wheel surface, such as GM Chrome and Wire Wheel Cleaner, P/N 1052929 (in Canada, use 10953202). Avoid car washes that use carbide tipped brushes, as these may damage the wheel's finish. Periodically clean the backside of the wheel to remove road grime, brake dust and grease.
Vehicle Modifications
Tire Label
After installing the recommended P255/55R20 tires, place the provided tire label on the vehicle. The new tire label should be located within the red box, over the top of the original tire label found on the door jamb. To locate the label within the red box use the upper left hand edge of the red line as a guide. When properly placed, the new tire label will obscure the original tire information. Be sure that the surface is clean and dry. The surface temperature should not be less than 21°C (65°F). The label is provided as a guide for tire inflation pressures and information relevant to occupant/cargo capacities.
Tire Pressure Monitor (TPM) System
To avoid system malfunctions, it is necessary to install tire pressure sensors in the accessory wheels. Replacement sensors can be obtained or sensors from the OE wheels can be transferred to the accessory wheels. After the wheels are installed on the vehicle, it is necessary to learn the new sensor identification codes/locations into the remote control door lock receiver (RCDLR).
TPM Sensor Relearn Procedure
- Turn ON the ignition, with the engine OFF.
- Initiate the TPM Learn Mode using one of the following procedures:
- Starting with the left front tire, learn the tire pressure using one of the following methods:
- After the horn chirp has sounded and the right front turn signal is illuminated, proceed as in step 3 for the next 3 sensors in the following order:
- After the LR sensor has been learned, a double horn chirp will sound indicating all sensors have been learned.
- Turn OFF the ignition to exit the learn mode.
- After the learn mode has been exited, adjust all tire pressures to the recommended PSI.
Important: Before proceeding with the steps below, ensure that no other learn procedure is being performed simultaneously, or that no tire pressures are being adjusted on another TPM equipped vehicle with close proximity.
| • | Using a scan tool (Tech 2®), initiate the TPM Learn Mode. A double horn chirp will sound indicating that the Learn Mode has been enabled. The left front turn signal will also be illuminated. |
| • | Using the key fob, simultaneously press the keyless entry transmitters lock and unlock buttons until a double horn chirp sounds, indicating that the Learn Mode has been enabled. The left front turn signal will be illuminated. |
| • | Hold the antenna of the J 46079 against the tire sidewall close to the wheel rim at the valve stem location then press and release the activate button and wait for a horn chirp. Once the horn chirp has sounded, the turn signal in the next location to be learned will be illuminated. |
| • | Increase/decrease the tire pressure for 8-10 seconds then wait for a horn chirp. The horn chirp may occur before the 8-10 second pressure increase/decrease time period has been reached, or up to 30 seconds after the 8-10 second pressure increase/decrease time period has been reached. Once the horn chirp has sounded, the turn signal in the next location to be learned will be illuminated. |
| • | Right front |
| • | Right rear |
| • | Left rear |
Electronic Brake Control Module (EBCM) Reprogramming
| • | For 2008 Buick Enclave, 2007-2008 GMC Acadia and Saturn Outlook, EBCM reprogramming is only required on vehicles when upsizing from 19" tires/wheels to 20" tires/wheels. |
| • | For 2009 vehicles, EBCM reprogramming is only required on vehicles when upsizing from factory tires/wheels. |
For proper vehicle operation and to ensure coverage under the provisions of the new vehicle warranty, the vehicle must be reprogrammed with the correct calibrations as soon as the accessory wheels are installed.
Important: Module reprogramming must be done using Pass-Thru method. There will be a specific EBCM calibration for vehicles equipped with or without Variable Effort Steering (VES) (RPO NV7), be sure to select the correct option.
- With the Tech 2® still connected, select the proper reprogramming method: "Pass-Thru" and "Reprogram ECU", then "Next.".
- Build the vehicle.
- Verify that the VIN is correct, then "Next."
- Select the proper controller to be programmed: "EBCM Electronic Brake Control Module."
- Select the proper programming mode: "Normal" , then "Next."
- On the following screen, select the proper calibration "Electronic Brake."
- From the part numbers displayed, select the one containing the correct wheel size in its description, "Next."
- On the following screen, select "Done."
Engine Control Module (ECM) Reprogramming (2009 Chevrolet Traverse Only)
Important: For proper vehicle operation and to insure coverage under the provisions of the new vehicle warranty, the vehicle must be programmed with the correct calibration as soon as the 20" wheels are installed.
When upsizing from 17" wheels only, the ECM must be reprogrammed for speedometer accuracy. Contact Techline (1-800-828-6860 English or 1-800-503-3222 French) to obtain a VCI number. Use the Service Programming System (SPS).
Body Control Module (BCM) Reprogramming (Export Mexico Only)
Important: Module programming must be done using Pass-Thru method.
For vehicles produced for sale in Mexico, it is necessary to reprogram the BCM with a new speed calibration when installing 20" accessory wheels. These calibrations are not selectable on a Tech 2® and require a VCI number from Techline® Customer Support Center (TCSC). Contact TCSC at 248-265-0840. Record this number on the form below. Use the Service Programming System (SPS).
Checking and Clearing DTCs After Reprogramming
DTCs codes may be set as a result of the programming process. In most cases the codes can be cleared using the Tech 2® and following the procedure listed below.
- Install the Tech 2® to the vehicle.
- Turn the ignition ON with engine OFF.
- Enter "Diagnostics" and build vehicle according to model year, vehicle line, etc.
- Select "Vehicle Control Systems."
- Select correct engine.
- Select "Vehicle DTC Information."
- Select "DTC Display." Scan tool will check all modules for any DTCs that are set.
- Select "View all DTCs."
- Select "Clear DTCs."
- Press the "exit" key to escape.
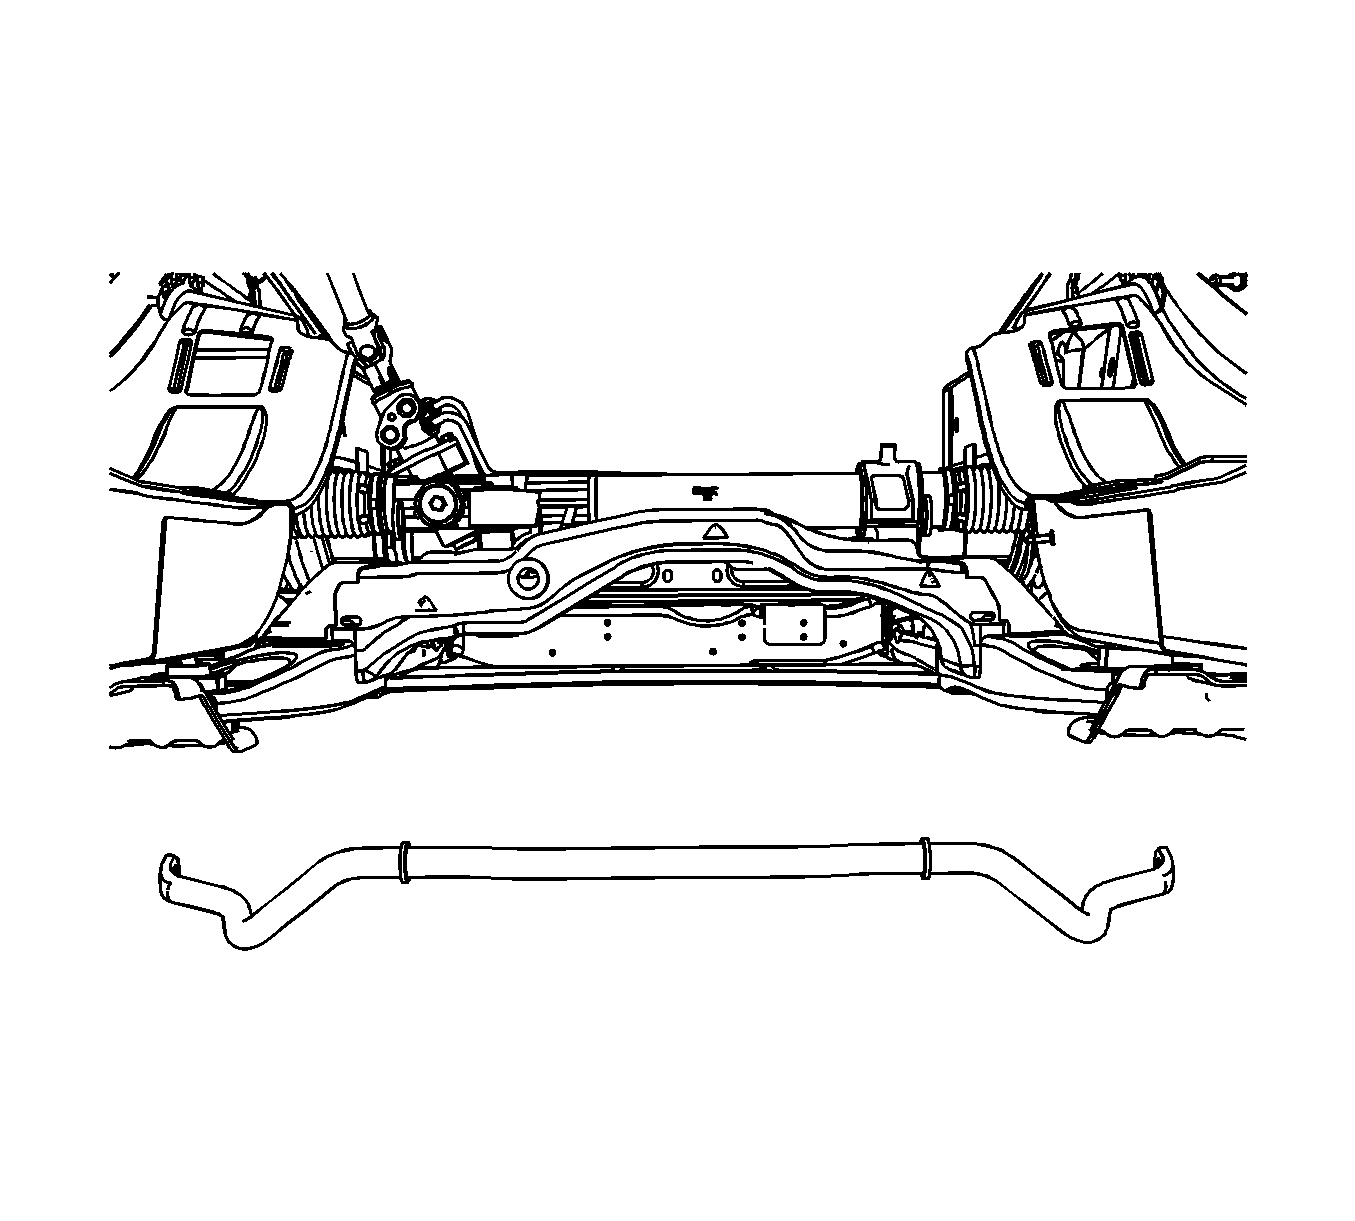
Front Stabilizer Shaft Replacement
Installing the larger (32 mm) diameter front stabilizer shaft is required only on the vehicles listed below. This will be installed for vehicle handling purposes. Replace the front stabilizer shaft with GM P/N 19166517, using the procedure listed below.
| • | Saturn OUTLOOK AWD w/18" tires |
| • | GMC Acadia AWD w/18" tires |
| • | Buick Enclave AWD w/18" tires |
| • | Buick Enclave AWD w/19" tires |
Notice: Secure the steering wheel utilizing a strap to prevent rotation. Locking of the steering column will prevent damage and a possible malfunction of the SIR system. The steering wheel must be secured in position before disconnecting
the following components:
• The steering column • The intermediate shaft • The steering gear
- Raise and support the vehicle.
- Remove the front tires and wheels.
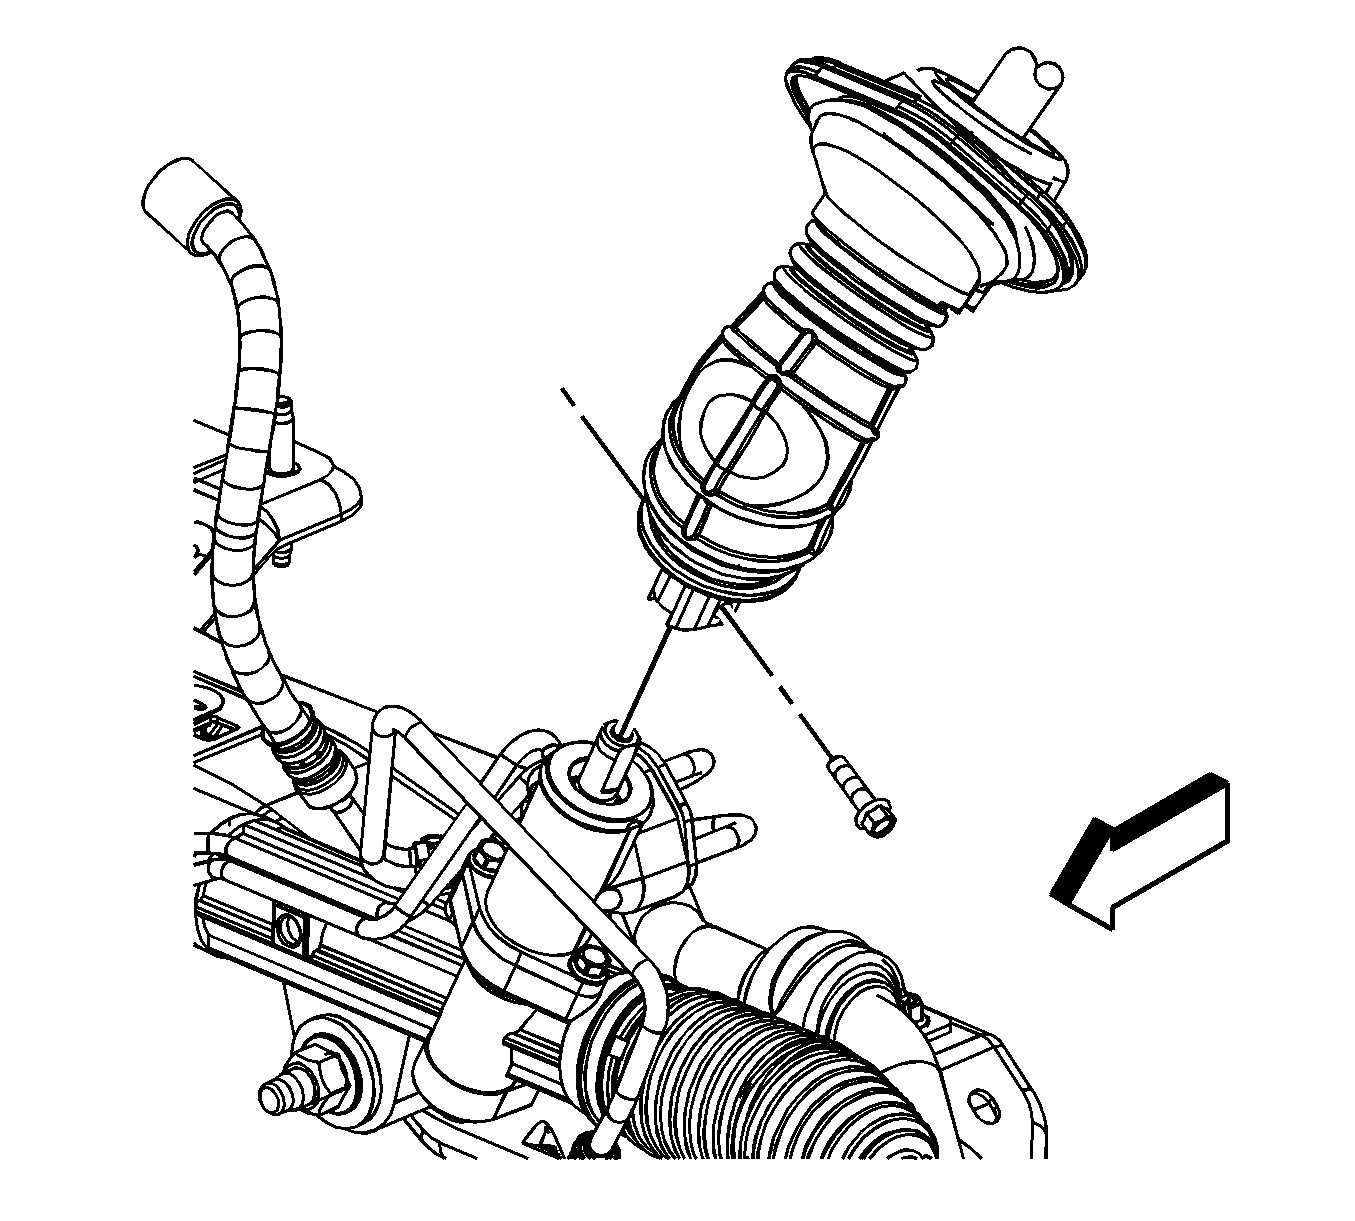
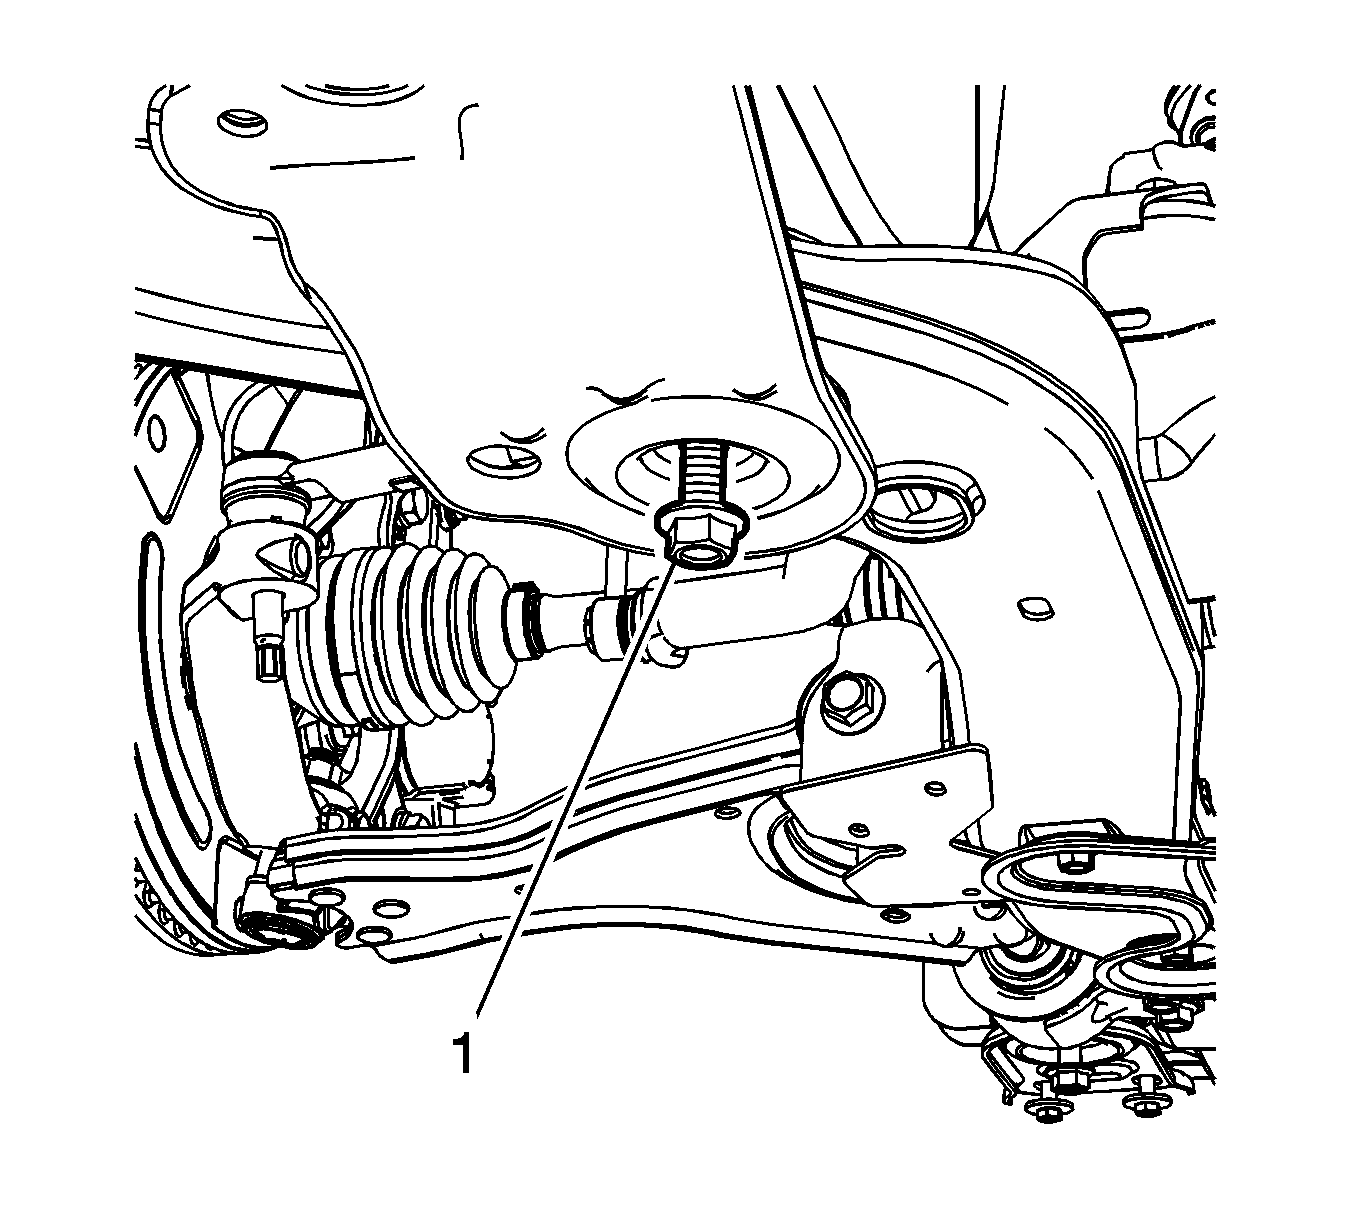
- Reposition the intermediate shaft boot and remove the bolt (1) attaching the intermediate shaft to the steering gear.
- Remove the nut (3) and disconnect the stabilizer shaft links at the stabilizer shaft.
- Position adjustable jack stands underneath the left and right side at the rear of the front cradle.
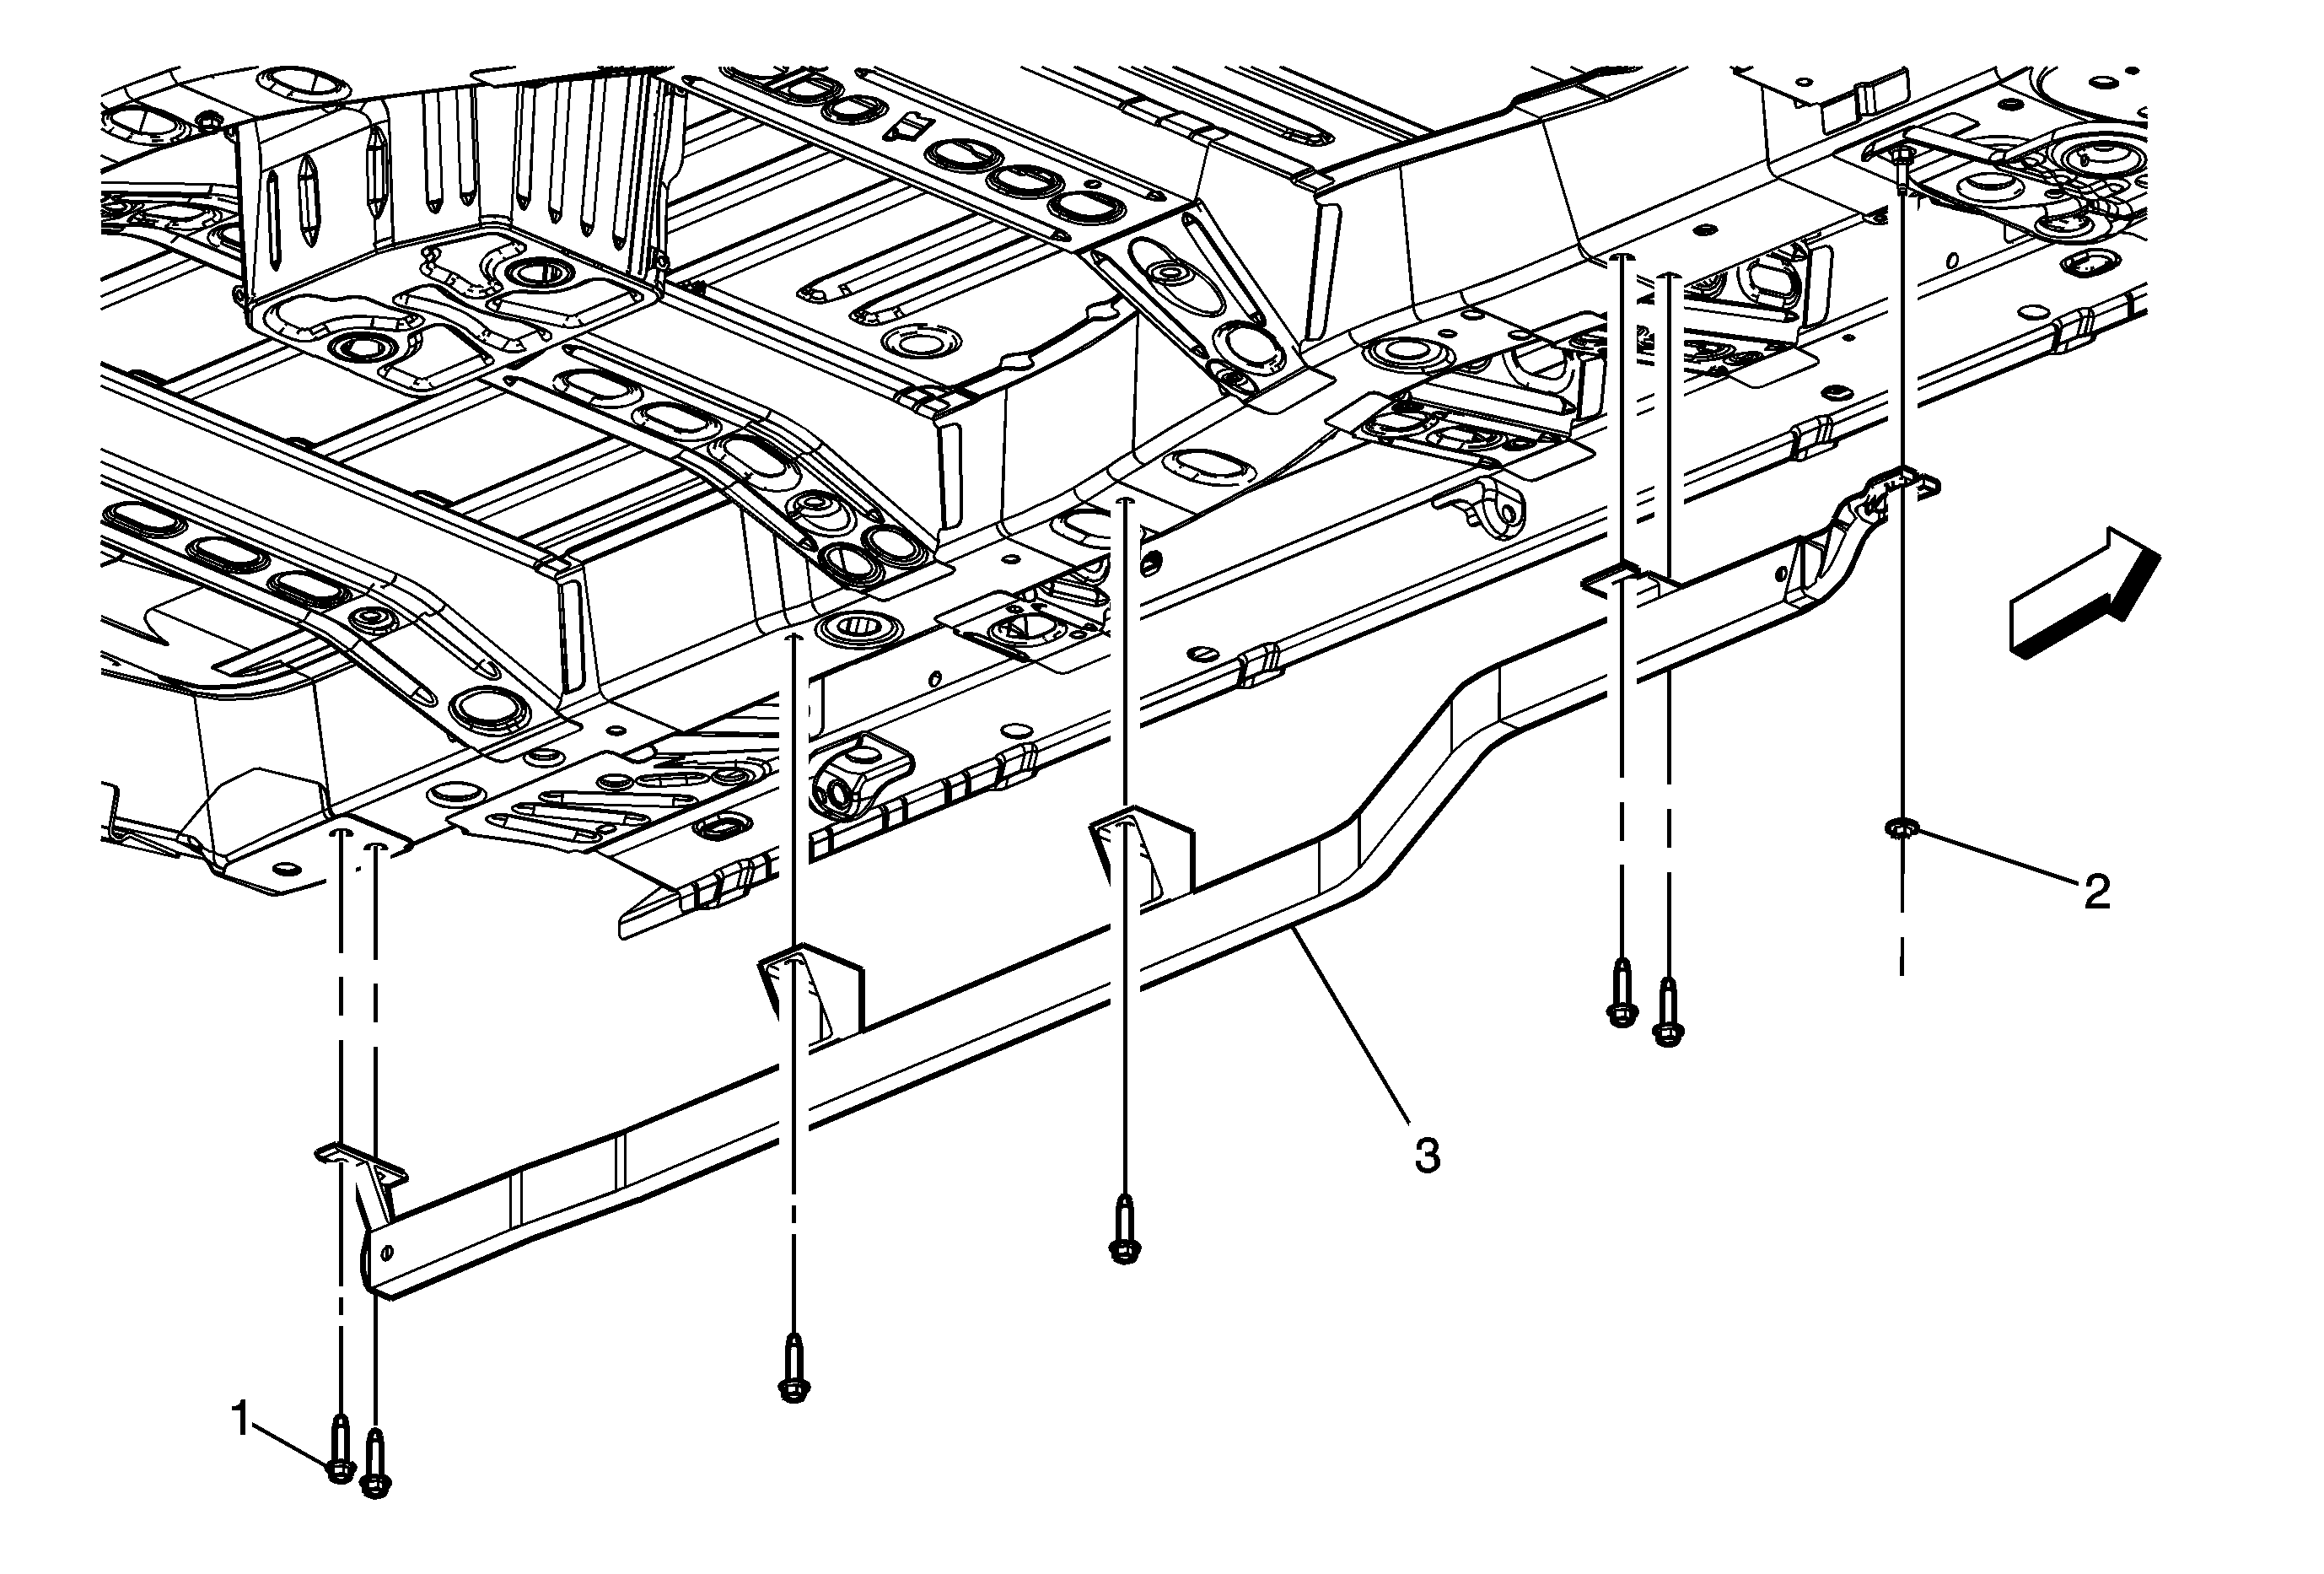
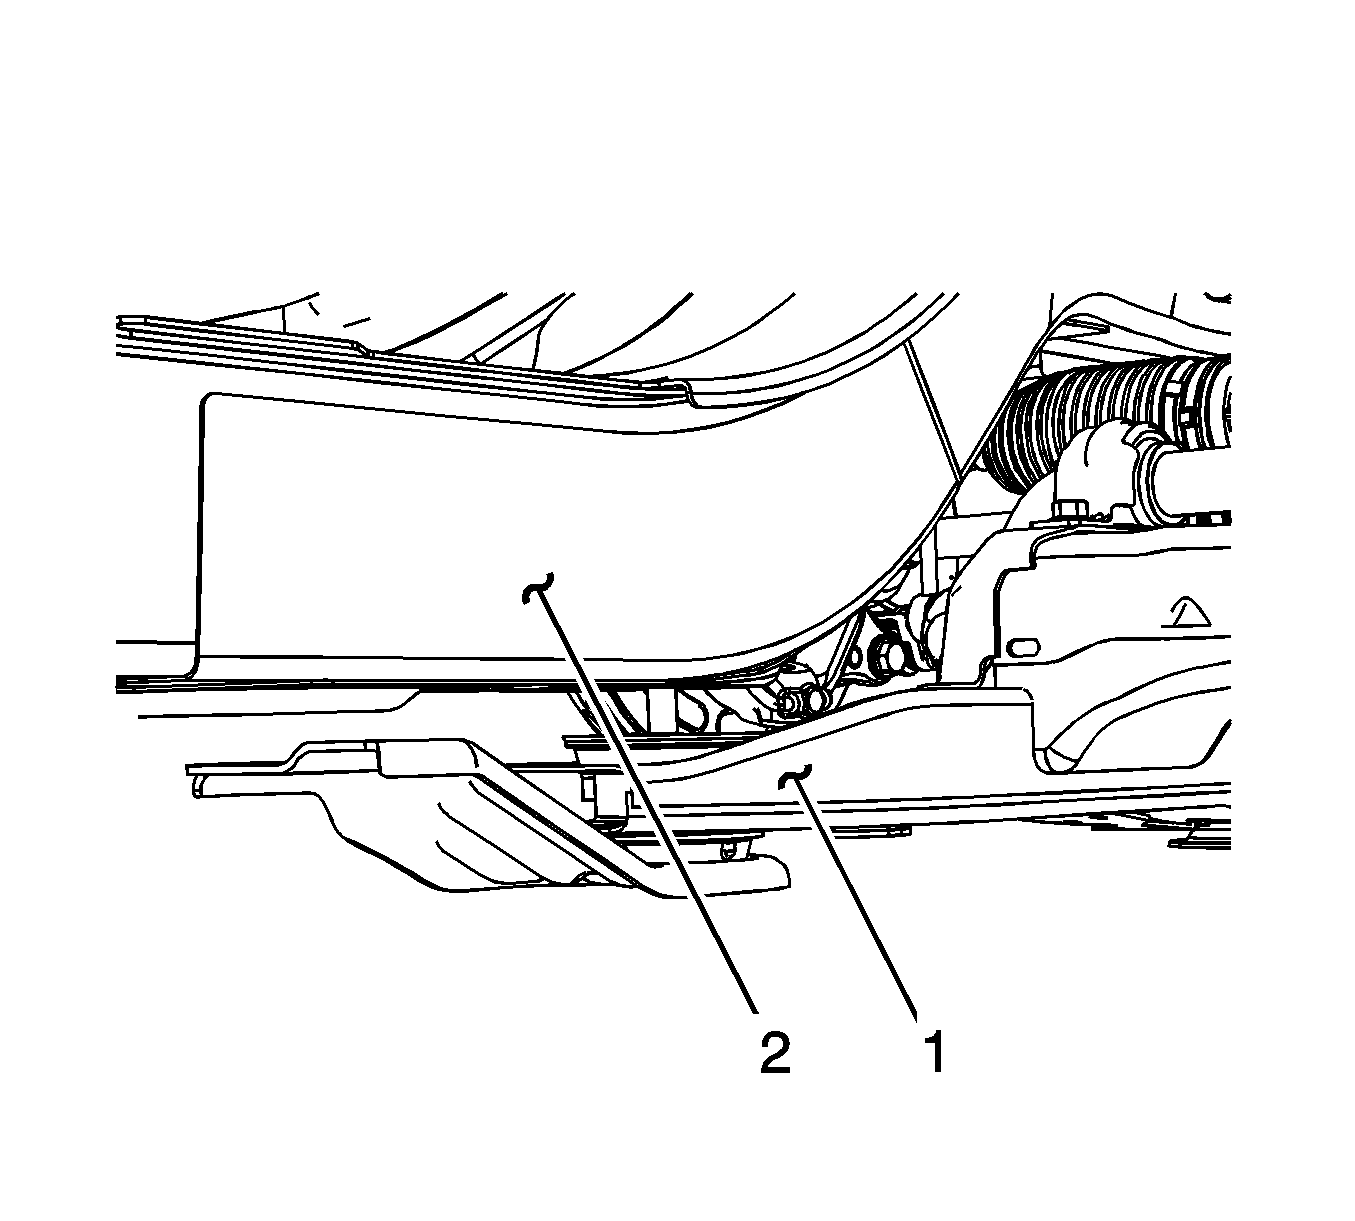
- Remove the nut (2) and the right underbody side rail front plastic extension.
- Remove the left and right frame reinforcement mounting bolts. Left side shown, right side similar.
- Loosen the rear frame mounting bolts (1).
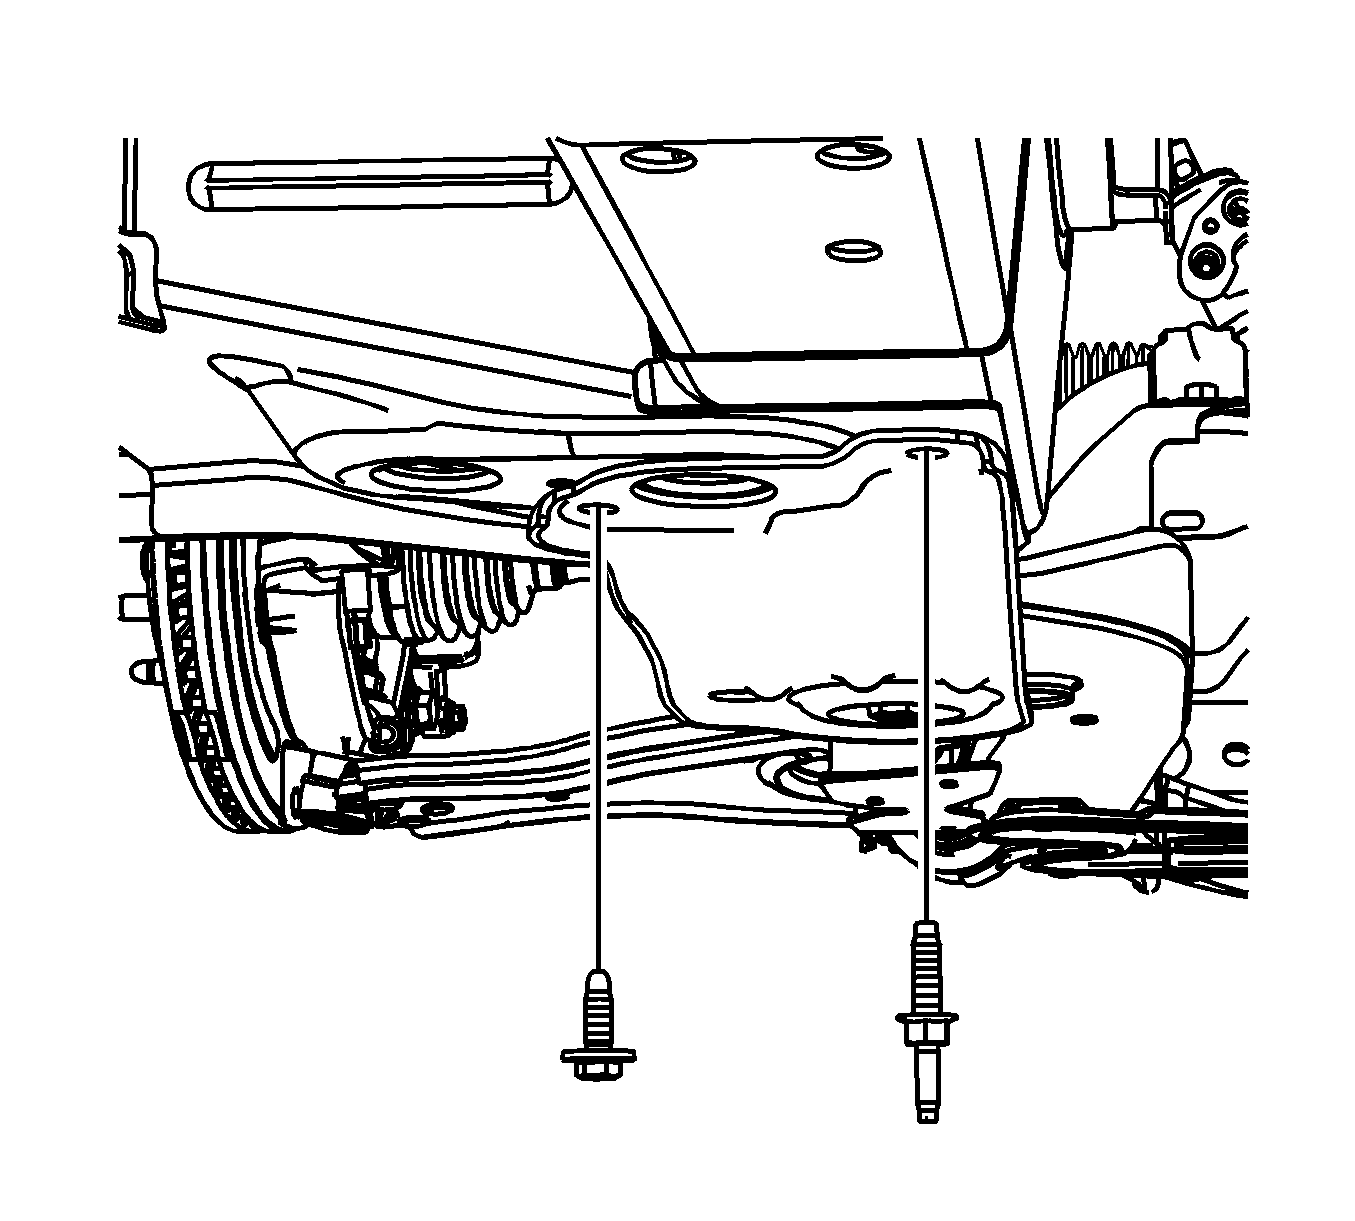
- Lower the frame (1) from the frame rail (2) until enough clearance is gained to remove the stabilizer shaft.
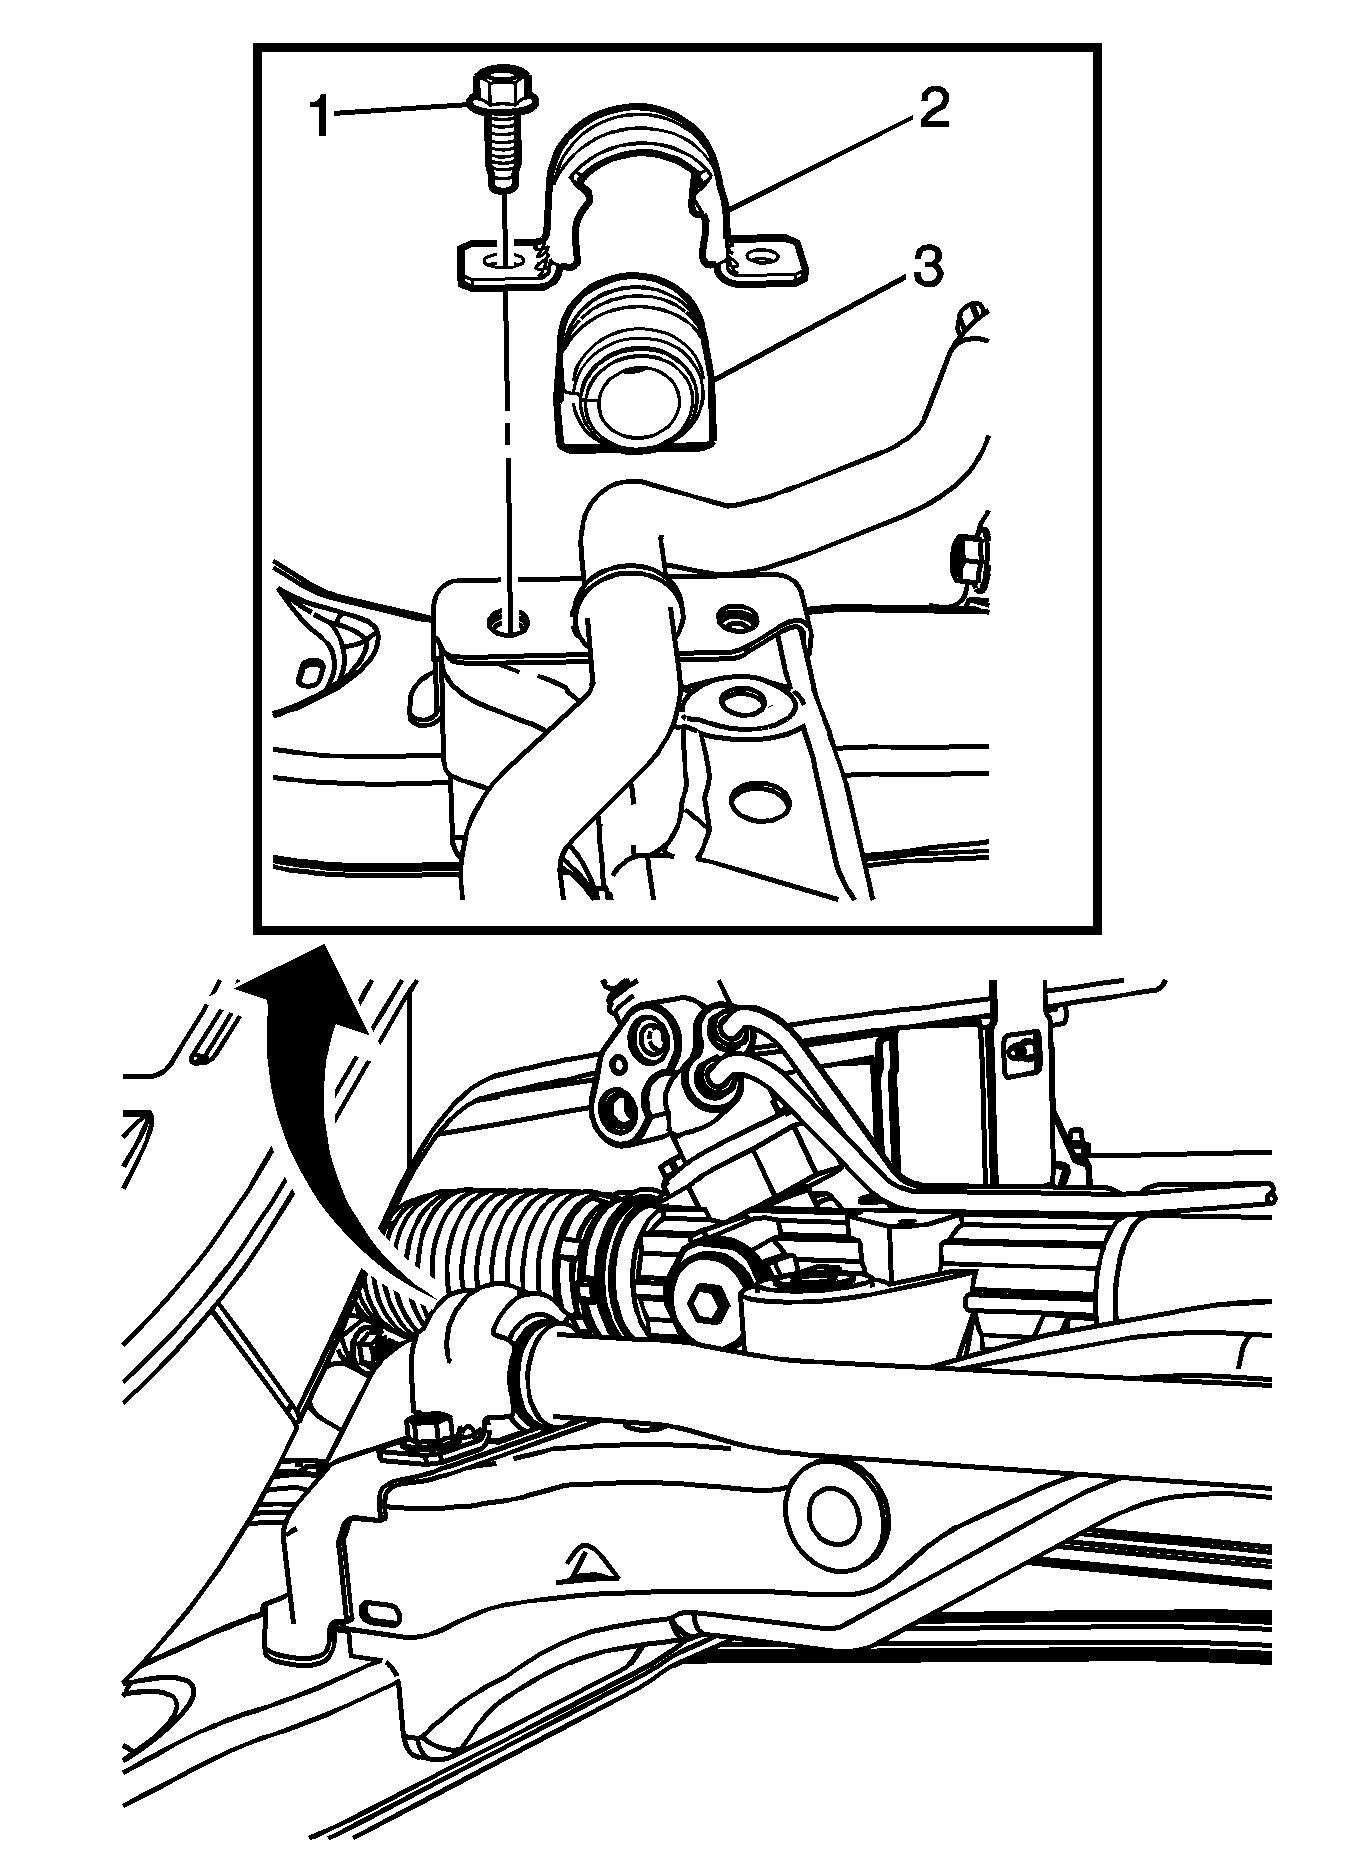
- Remove both left and right stabilizer shaft insulators bracket bolts (1).
- Remove the left and right brackets (2) and insulators (3) from the stabilizer shaft.
- Remove the stabilizer shaft from the right side (passenger side) of the vehicle. Maneuver the stabilizer shaft so it clears the underbody components.
- Position the new stabilizer shaft on the frame.
- Install the left and right stabilizer shaft insulators and brackets.
- Install both left and right stabilizer shaft insulators bracket bolts.
- Using the jack stands, raise the front cradle into position.
- Tighten the rear frame mounting bolts (1).
- Install the left and right frame reinforcement mounting bolts.
- Remove the adjustable jack stands.
- Install the right underbody side rail front plastic extension and nut.
- Install the intermediate shaft bolt.
- Install the intermediate shaft boot into position.
- Install the front tires and wheels.
- Lower the vehicle.

Tighten
Tighten the insulator bracket bolts to 50 N·m (37 lb ft).
Tighten
Tighten the frame to body bolts to 100 N·m (74 lb ft) plus 90 degrees.
Tighten
Tighten the reinforcement bolts to 50 N·m (37 lb ft).
Tighten
Tighten the nut to 11 N·m (97 lb in).
Tighten
Tighten the intermediate shaft bolt to 22 N·m (16 lb ft).
Warranty Information
Wheels
All GM Accessories sold and permanently installed on a GM vehicle PRIOR to new vehicle delivery will be covered under the provisions of the New Vehicle Limited Warranty.
For the U.S., in the event GM Accessories are installed AFTER new vehicle delivery, or are replaced under the new vehicle warranty, they will be covered (parts and labor) for the balance of the vehicle warranty, but in no event less than 12 months/12,000 miles. This coverage is only effective for GM Accessories permanently installed by a GM dealer or a GM approved ADI (Accessory Distributor / Installer).
For Canada, in the event GM Accessories are installed AFTER new vehicle delivery, they will be covered (parts and labor) for the balance of the vehicle warranty, or up to 12 months/unlimited kilometers depending on month installed. For replacement after the new vehicle warranty expires, but within the 12 months/unlimited kilometers coverage, refer to claim type "B" guidelines.
GM Accessories sold over-the-counter, or those not requiring installation, will continue to receive the standard GM Dealer Parts Warranty of 12 months from the date of purchase (parts only).
Tires
Any approved tire installed on a GM Vehicle PRIOR to delivery will be covered under the provisions of the New Vehicle Limited Warranty. Tires are covered against defects in material and workmanship. Tires are warranted for defects "without" prorated charge for tread mileage. Subsequent replacements under this warranty will continue to be covered for the remainder of the New Vehicle Limited Warranty.
Any approved tire installed on a GM Vehicle PRIOR to delivery may continue to be warranted on a prorated basis by the tire manufacturer once the New Vehicle Limited Warranty expires.
Any approved tire installed AFTER delivery will be covered under the provisions of the tire manufacturer warranty.
USA dealers should refer to GM Warranty Administration Bulletin 00-03-10-003I and GM Parts Process / Policy Bulletin IB03-001 for more information.
Canadian dealers should refer to GM Warranty Administration Bulletin 01-03-10-003C.
GM/Saturn Warranty Claims Processing
Only GM dealerships/Saturn Retailers have the ability to file warranty claims for GM Parts and Accessories. Therefore, any warranty claims filed against such parts must be handled by the servicing GM dealership/Saturn Retailer. This includes those parts purchased from a GM-approved ADI (Accessory Distributor / Installer).
ACCESSORY WHEEL AND TIRE INFORMATION FORM
You have just modified your vehicle by installing an "Accessory Package" which includes Wheels and Tires. This form contains important information about your accessory installation. In an effort to provide superior service to you, our customer, we ask that you please present this form to your Servicing Dealer when removing or installing wheels and tires on your vehicle. This form contains important information necessary to service your vehicle.
VIN: __________________________________________________________
| |
|---|---|
Original Equipment:
VCI #: ____________________________________
Tire & Wheel Size: _______________________________________________
| |
Accessory Equipment:
VCI #: _________________________________________
Tire & Wheel Size: _______________________________________________
Important: Please store this form in the vehicle with your Owner's Manual. A record of this form will also be kept on file at your Servicing Dealer. |
