For 1990-2009 cars only
Removal Procedure
- Remove the throttle body air inlet duct.
- Install the engine support fixture. Refer to Engine Support Fixture
- Remove the engine mount struts. Refer to Engine Mount Strut Replacement
- Raise and support the vehicle. Refer to Lifting and Jacking the Vehicle
- Remove the left front tire and wheel. Refer to Tire and Wheel Removal and Installation
- Remove the left engine splash shield. Refer to Engine Splash Shield Replacement
- Remove the stabilizer shaft links from the lower control arms. Refer to Stabilizer Shaft Link Replacement
- Remove the left tie rod end from the steering knuckle. Refer to Rack and Pinion Outer Tie Rod End Replacement
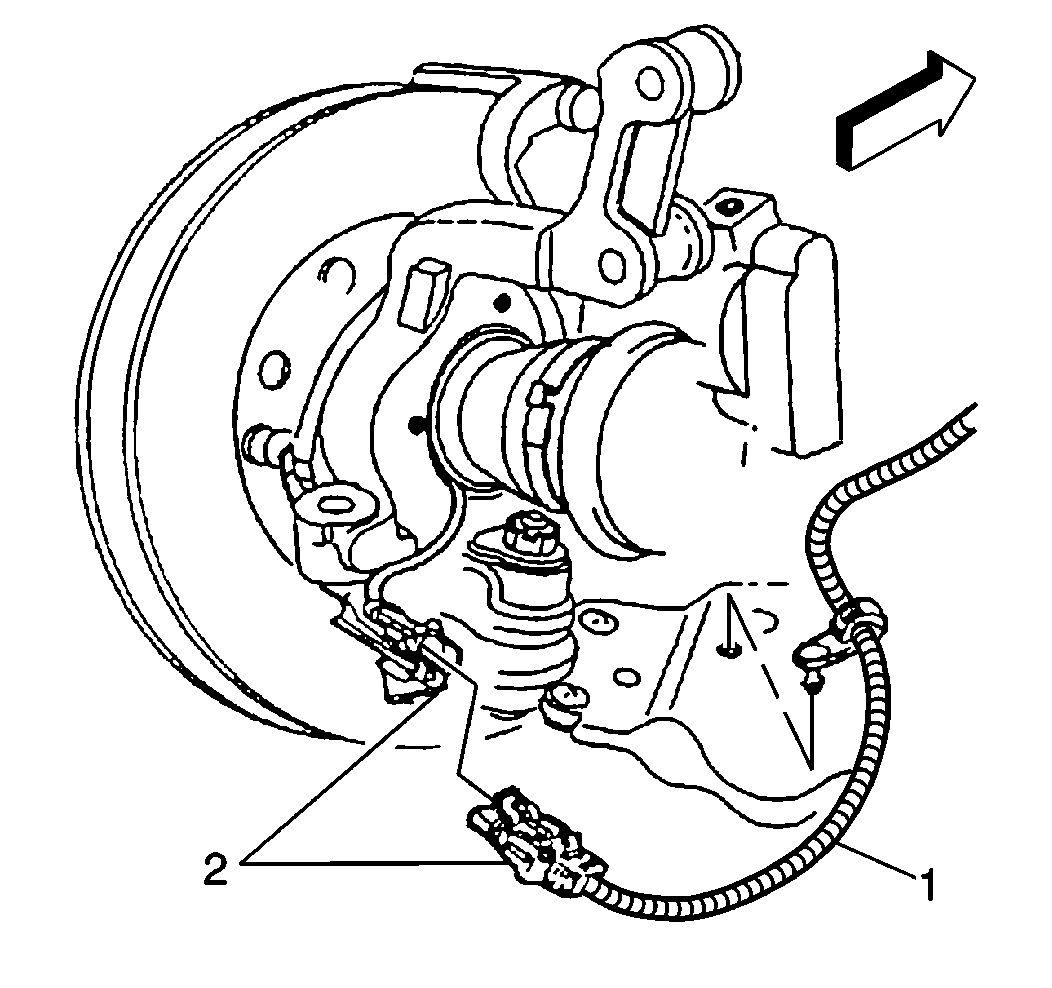
- Remove the wheel speed sensor harness connector (2).
- Remove the left lower ball joint from the left steering knuckle. Refer to Lower Control Arm Ball Joint Replacement
- Disconnect the left drive axle from the transaxle. Refer to Wheel Drive Shaft Replacement
- Reposition and secure the drive axle.
- Remove the intermediate shaft from the steering gear. Refer to Lower/Upper Intermediate Steering Shaft Replacement
- Disconnect the catalytic converter pipe from the right (rear) exhaust manifold. Refer to Catalytic Converter Replacement
- Support the right side of the frame with a utility stand.
- Support the left side of the frame with a utility stand.
- Remove the transaxle mount bracket. Refer to Transmission Mount Bracket Replacement
- Remove the transaxle mount. Refer to Transmission Mount Replacement
- Loosen the engine mount lower nuts. Refer to Engine Mount Replacement
- Loosen the right side frame bolts. Refer to Frame Replacement
- Remove the left side frame bolts. Refer to Frame Replacement
- Use the utility stand in order to lower left side of the frame.
- Position the drain pan under the transaxle.
- Disconnect the wiring harness connectors.
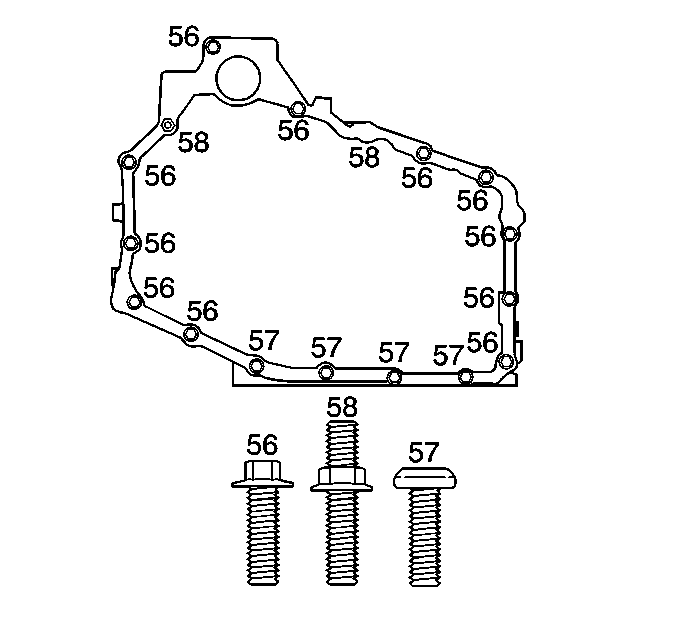
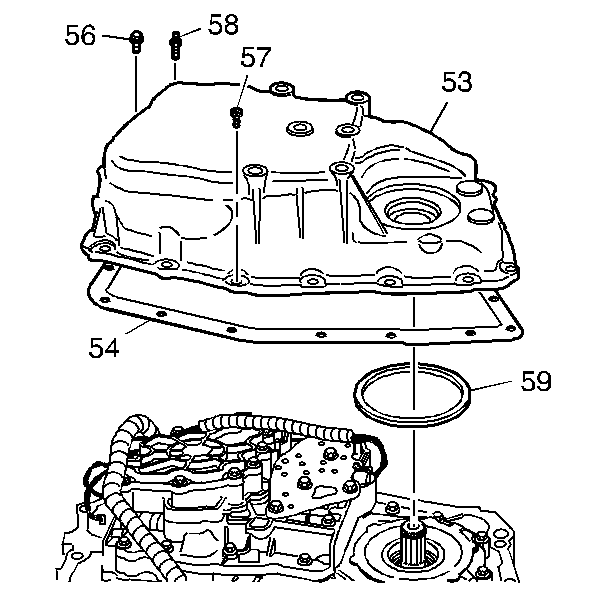
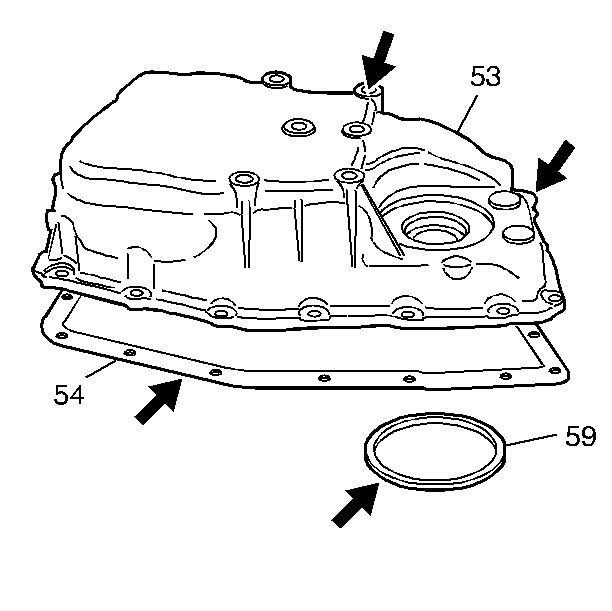
- Remove the case side cover bolts (56-58).
- Remove the case side cover pan (53).
- Remove the case side cover gasket (54).
- Remove the case side cover inner gasket (59).
- Inspect the case side cover (53) for the following conditions:
- Inspect the case side cover gasket (54) and case side cover inner gasket (59) for damage. The gaskets are reusable if they are NOT damaged.
- Clean the case side cover.
- Clean the case side cover gasket surfaces.

| • | Damaged or porous gasket sealing surfaces |
| • | Damaged or porous casting surfaces |
| • | Damaged or stripped bolt holes |
Installation Procedure
- Install the case side cover inner gasket (59).
- Install the case side cover gasket (54).
- Install the case side cover pan (53).
- Install the case side cover bolts (56-58).
- Remove the drain pan from under the transaxle.
- Connect the wiring harness connectors.
- Use the utility stand in order to raise the left side of the frame.
- Install the NEW left side frame bolts. Refer to Frame Replacement
- Install the NEW right side frame bolts. Refer to Frame Replacement
- Install the engine mount lower nuts. Refer to Engine Mount Replacement
- Install the transaxle mount. Refer to Transmission Mount Replacement
- Install the transaxle mount bracket. Refer to Transmission Mount Bracket Replacement
- Remove the utility stand support from the right side of the frame.
- Remove the utility stand support from the left side of the frame.
- Connect the catalytic converter pipe to the right (rear) exhaust manifold. Refer to Catalytic Converter Replacement
- Install the intermediate shaft to the steering gear. Refer to Lower/Upper Intermediate Steering Shaft Replacement
- Install the left drive axle to the transaxle. Refer to Wheel Drive Shaft Replacement
- Install the left lower ball joint to the left steering knuckle. Refer to Lower Control Arm Ball Joint Replacement
- Install the wheel speed sensor harness connector (2).
- Install the left tie rod end to the steering knuckle. Refer to Rack and Pinion Outer Tie Rod End Replacement
- Install the stabilizer shaft links to the lower control arms. Refer to Stabilizer Shaft Link Replacement
- Install the left engine splash shield. Refer to Engine Splash Shield Replacement
- Install the left front tire and wheel. Refer to Tire and Wheel Removal and Installation
- Lower the vehicle.
- Install the engine mount struts. Refer to Engine Mount Strut Replacement
- Remove the engine support fixture. Refer to Engine Support Fixture
- Remove the throttle body air inlet duct.
- Adjust the fluid level. Refer to the following information.
- Inspect for proper completion of the repairs.
- Inspect for fluid leaks.
Notice: Use the correct fastener in the correct location. Replacement fasteners must be the correct part number for that application. Fasteners requiring replacement or fasteners requiring the use of thread locking compound or sealant are identified in the service procedure. Do not use paints, lubricants, or corrosion inhibitors on fasteners or fastener joint surfaces unless specified. These coatings affect fastener torque and joint clamping force and may damage the fastener. Use the correct tightening sequence and specifications when installing fasteners in order to avoid damage to parts and systems.
Tighten
Tighten the case side cover bolts (56-58) to 25 N·m
(18 lb ft).
