RADIO IGNITION NOISE WITH WINDSHIELD ANTENNA

VEHICLES AFFECTED: All With Windshield Antenna
The follcwing procedure is recommended when servicing 1983-84 models equipped with a windshield antenna that may experience a ignition generated noise interference on the radio's AM dnd/or FM frequency band:
A. Perform the ignition-related radio noise diagnosis outlined in Section 9 of the Service Manual with specific attention to:
1. Inspect and replace any spark plug wire if there is evidence of wear through and/or arcing.
2. Inspect both the distributor's cap and rotor and replace either if there are cracks or evidence of carbon tracking.
3. Clean both the inside of the distributor cap and the rotor if either show signs of grease contamination.
4. Inspect both the engine compartment and instrument panel wiring for proper ground ring terminal attachments. Insure grounding screw(s) are tight and that either an integral or loose serrated washer exists between the ring terminal and grounding surface at each location.
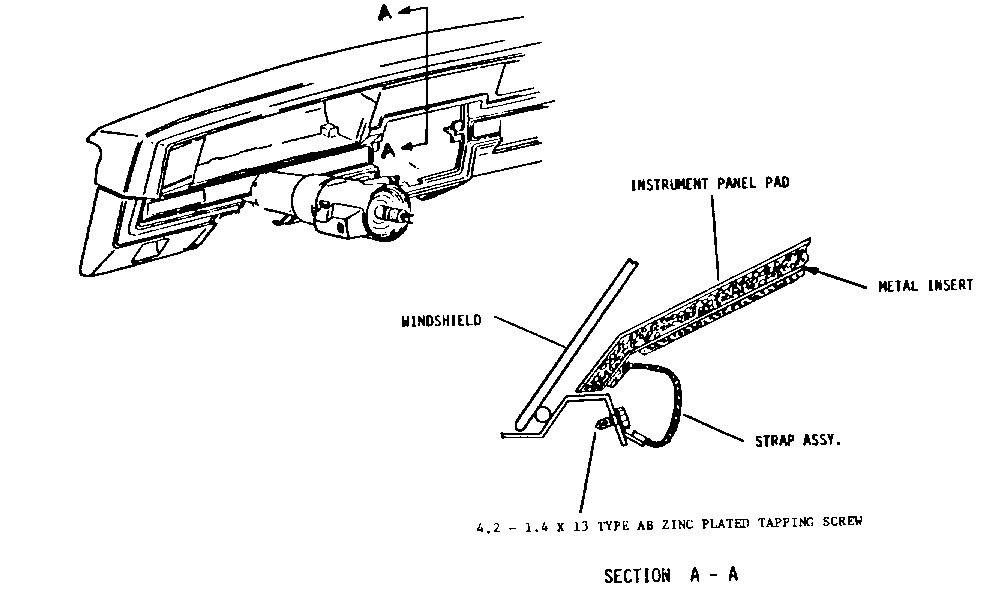
B. If the ignition noise condition persists after performing the above steps, ground the instrument panel pad's metal insert to the vehicle's body (see illustration) as follows:
1. Fabricate a ground strap assembly using P/N 2977489 or equivalent ring terminal and approximately 3 inches of No. 11 gauge copper strap.
2. Crimp the ring terminal onto one (1) strap end and tin the opposite with solder.
3. Remove the instrument panel pad as outlined in Section SC of the Service Manual.
4. Remove approximately one (1) square inch of foam flash from the under side of the pad's forward most down flange; centreline between the defroster duct openings.
5. Clean the exposed area of the pad's metal insert with '00' steel wool or crocus cloth and tin with solder.
CAUTION:
Overheating the insert could result in damage to the pad's vinyl skin.
6. Orient the ground strap as shown in the illustration and solder the strap's tinned end to the prepared surface area of the pad's metal insert. Note the caution on overheating.
7. Locate and drill a 1/8 inch diameter hole in the metal pinch weld flange below the centreline of vehicle and equidistant between the defroster ducts.
8. Clean the area around the drilled hole with crocus cloth to remove any body primer paint.
9. Partially install the instrument panel pad to allow attaching the grourd strap ring terminal and P/N 138479 or equivalent zinc plated serrated washer to the pinch weld flange with P/N 22506732 or equivalent zinc plated tapping screw.
NOTICE: Serrated washer is to be positioned between the ring terminal and grounding surface.
10. Torque the attaching screw to 1.4 +/- .2 N.m (12 +/- 2 lb.in.).
11. Complete the installation and fastening of the instrument panel pad as outlined in Section 8C of the Service Manual.
General Motors bulletins are intended for use by professional technicians, not a "do-it-yourselfer". They are written to inform those technicians of conditions that may occur on some vehicles, or to provide information that could assist in the proper service of a vehicle. Properly trained technicians have the equipment, tools, safety instructions and know-how to do a job properly and safely. If a condition is described, do not assume that the bulletin applies to your vehicle, or that your vehicle will have that condition. See a General Motors dealer servicing your brand of General Motors vehicle for information on whether your vehicle may benefit from the information.
