SCALP MOLDING W/ AUXILLARY WINDNOISE CLOSEOUT (NEW PART)

MODELS AFFECTED: 1986-1989 BUICK LESABRES (4 DOOR H-69) 1985-1989 BUICK ELECTRA/PARK AVENUES (4 DOOR C-69)
For 1990 model year, a product enhancement was made on the 4 door LeSabre and Electra Park Avenue to enhance door sealing and reduce the levels of windnoise/windrush. This bulletin provides a service procedure for replacement of these scalp moldings for the 1990 model and instructions for installation of kits on past models. In the event of a customer windnoise/windrush comment on a 1985-1989 model, Service Bulletin 88-10-41 should be followed. If sufficient reduction of windnoise/windrush is not achieved using the items covered in 88-10-41 and windnoise/windrush is from the area between the upper door frame and body opening, then the appropriate kit for the past model vehicle may be installed after obtaining Zone/Branch authorization.
FRONT DOOR SCALP MOLDING WITH AUXILIARY WINDNOISE CLOSEOUT SEAL
SERVICE INSTALLATION INSTRUCTIONS
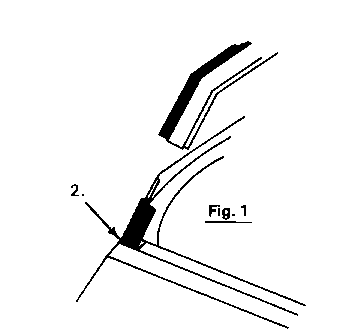
1. Apply soap solution to cover complete perimeter of outer edge of stationary door frame. Completely cover black scalp molding clip at lower front edge of door frame.
2. Insert scalp molding into beltline opening at the front of the door frame but DO NOT snap or slide onto the black scalp molding clip. (Figure 1)
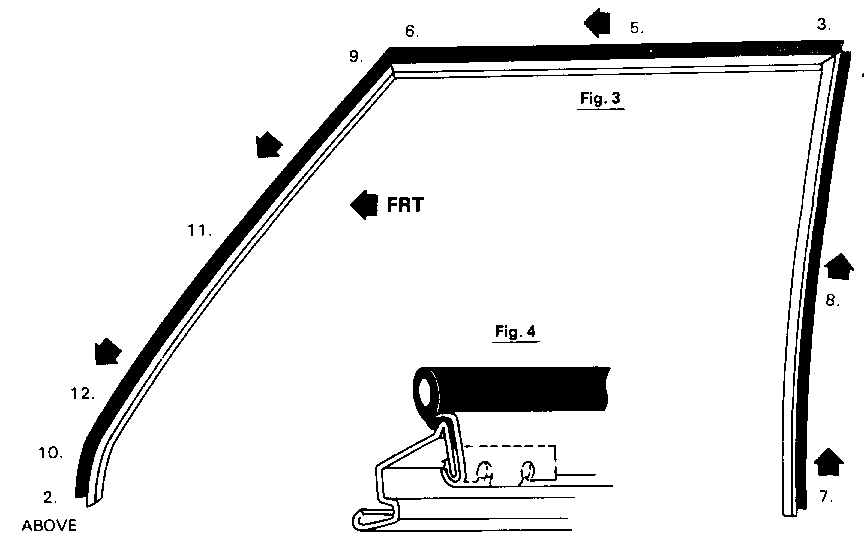
3 and 4. Position front door window frame scalp molding assembly to front door. Starting at the upper rear corner, engage over outer edges of the top leg and upper rear vertical leg of the door frame simultaneously. (Figure 3). Once corner on frame, push scalp molding as far forward as possible on horizontal leg of header.
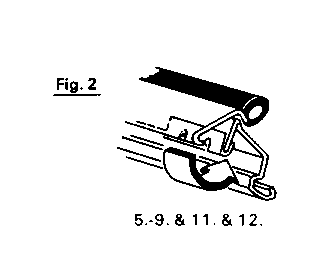
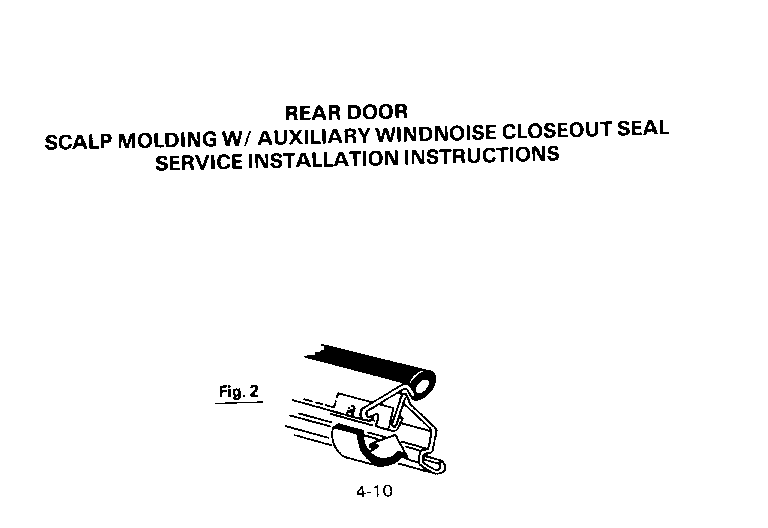
5-9. Engage molding over the outer edge of the stationary door frame and snap molding onto retainer clips on the inner edge of stationary door frame (Figure 2) working in the order depicted in Figure 3.
10. Engage molding over the INNER edge of the black clip then snap over the OUTER edge.
11 and 12. Engage molding over the outer edge of the stationary door frame and snap molding onto retainer clips on the inner edge of stationary door frame (Figure 2) working in the order depicted in Figure 3.
IMPORTANT: Cross section of correctly installed molding (Figure 4).
Kent-Moore Installation Tool No. J-38714 will be available May 1, 1990
REAR DOOR SCALP MOLDING WITH AUXILIARY WINDNOISE CLOSEOUT SEAL
SERVICE INSTALLATION INSTRUCTIONS
1. Apply soap solution to cover complete perimeter of outer edge of stationary door frame.
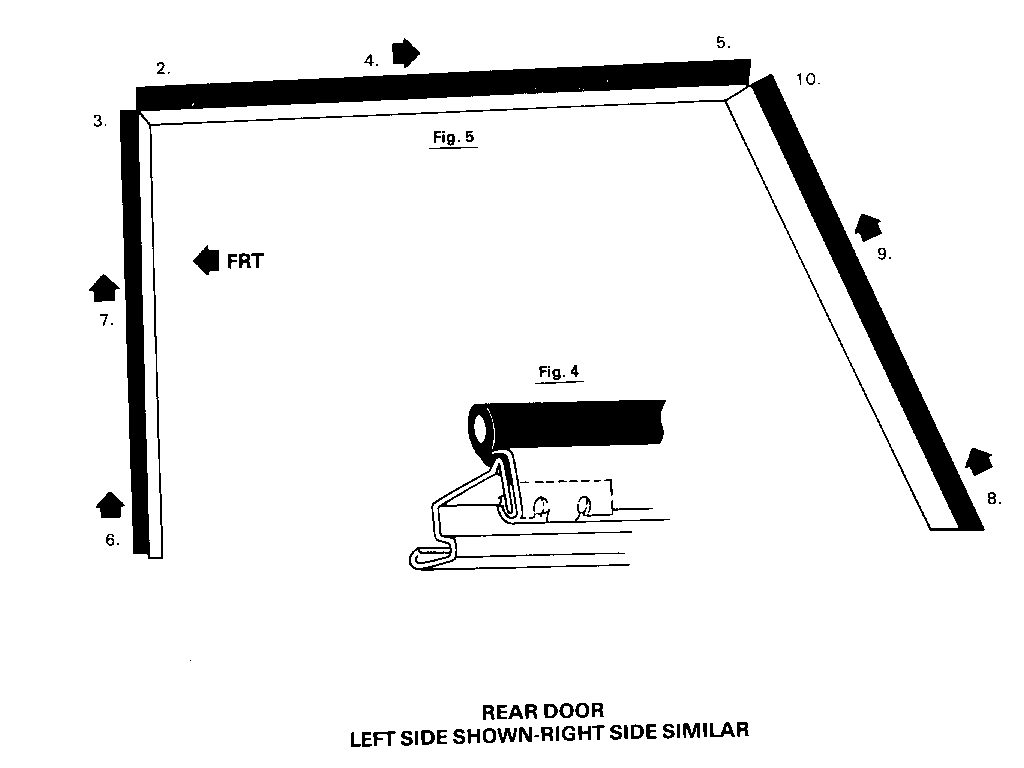
2 and 3. Position rear door window frame scalp molding assembly to rear door and starting at upper front corner, engage over outer edges of top leg and upper front vertical leg of door frame simultaneously. (Figure 4) Once corner on frame, push scalp molding as far forward as possible on horizontal leg of header.
4 - 10. Engage molding over the outer edge of the stationary door frame and snap molding onto retainer clips on the inner edge of stationary door frame (Figure 2) working in the order depicted in Figure 5.
Clean area of ALL excess soap. This would be general information for both doors.
IMPORTANT: Cross section of correctly installed molding (Figure 2).
PARTS INFORMATION:
Parts are currently available from GMSPO.
The following parts are supplied in kit form for 1985-89 model years.
Buick 25557068 - Chrome 4HA69
Buick 25557069 - Chrome 4CX69
IMPORTANT: For current model application, the individual moldings are serviced separately and are currently available.
WARRANTY INFORMATION:
For 1985-89 model year:
Operation: Installation of 1990 style scalp moldings (all 4 doors)
Operation No. T5194 (requires zone/branch authorization)
Labor Time: .9 hr.
For 1990 model year:
Use appropriate labor operation and time for scalp molding being replaced.
General Motors bulletins are intended for use by professional technicians, not a "do-it-yourselfer". They are written to inform those technicians of conditions that may occur on some vehicles, or to provide information that could assist in the proper service of a vehicle. Properly trained technicians have the equipment, tools, safety instructions and know-how to do a job properly and safely. If a condition is described, do not assume that the bulletin applies to your vehicle, or that your vehicle will have that condition. See a General Motors dealer servicing your brand of General Motors vehicle for information on whether your vehicle may benefit from the information.
