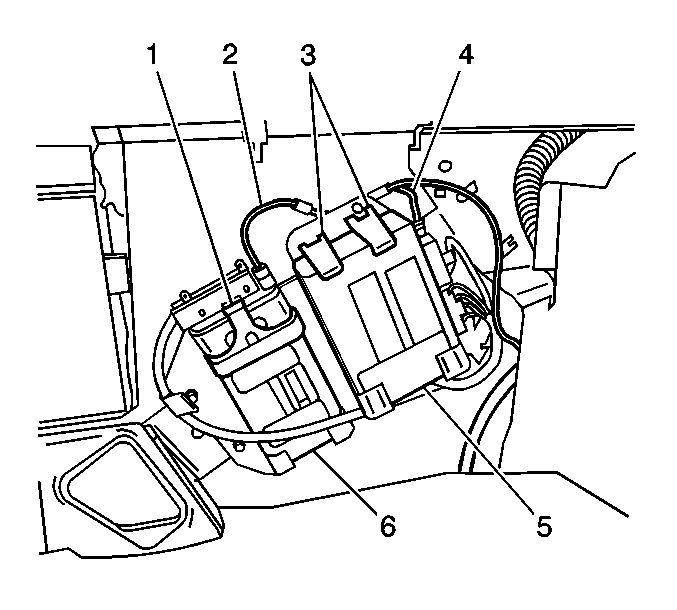
Important: Never swap OnStar® vehicle integration units (VIU), or the vehicle communication units (VCU) from other vehicles. Transfer of OnStar® components from other vehicles should NOT be done. Each OnStar® component has a unique identification number. The VIU has a 10-digit specific station identification (STID) and the VCU has a 11-digit specific electronic serial number (ESN). These identification numbers are used by the National Cellular Telephone Network and OnStar® systems, and are stored in the General Motors vehicle history files by VIN.
Removal Procedure
- Open the rear compartment lid.
- Remove the forward rear compartment trim panel. Refer to Rear Compartment Trim Panel Replacement .
- Disconnect the OnStar® global positioning satellite (GPS) antenna coaxial cable (4) from the OnStar® VIU (5).
- Disconnect the 2 electrical connectors.
- Remove the VIU (5) by lifting the retainer tabs (3) upward.
- Remove the VIU (5) from the vehicle.
- The old VIU must be returned for core credit.

Installation Procedure
- Record the 10-digit STID number from the label on the VIU module.
- Install the OnStar® vehicle interface unit (VIU) (5) into the module bracket assembly.
- Connect the 2 electrical connectors.
- Connect the OnStar® GPS antenna coaxial cable (4) to the VIU (5) until fully seated.
- Ensure the locking tabs (3) are secure to the VIU.
- Install the forward rear compartment trim panel. Refer to Rear Compartment Trim Panel Replacement .
- Reconfigure the OnStar® system. Refer to OnStar Reconfiguration .
- Close the rear compartment lid.

Notice: In order to avoid damage to the circuit board, do NOT over-tighten the thumb screws. Using your fingers, apply only a light pressure.
Tighten
Apply 0.2 N·m (2 lb in) of torque, or less, to the thumb screw electrical connectors.
The 10-digit STID number recorded will be needed by the OnStar® Dealer Support line.
