For 1990-2009 cars only
Door Glass Binds in Run Channel (Elongate Upper Regulator Attaching Slot)

| Subject: | Door Glass Binds in the Run Channel (Elongate Upper Regulator Attaching Slot) |
| Models: | 2000 Buick LeSabre |
Condition
Some customers may comment that the front door glass binds when rolling the glass up.
Cause
The regulator top attaching bolt may be too far forward.
Correction
Elongate the upper regulator attaching slot using the following procedure.
- Remove the inside door handle bezel and electrical connector.
- Remove the front side door upper trim (mirror patch), using J 38778. The bezel is attached with one retainer.
- Remove the fastener in the trim panel at the bottom rear corner of the door or behind the reflector at the rear of the door.
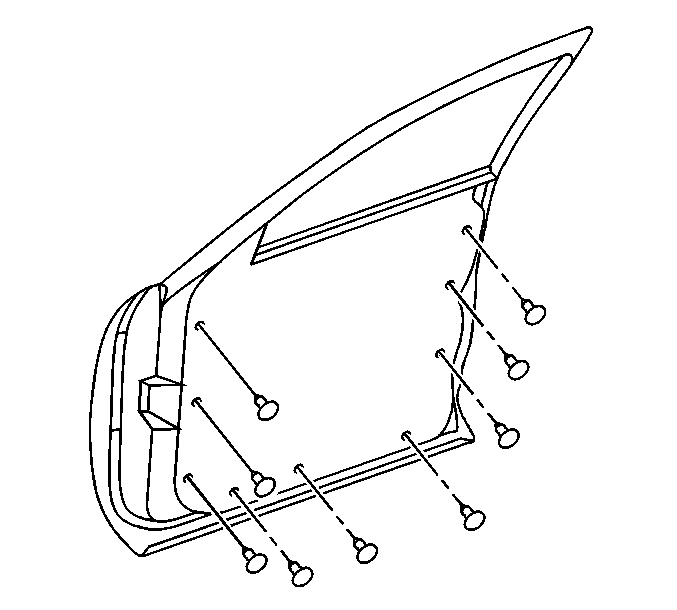
- Insert J 38778 between the door and the lower edge of the door trim panel. Center the trim panel plastic pin in the groove of the tool and pop the pin from the door. See Figure for location of the pins.
- After releasing the bottom edge, hold the panel away from the door about one inch to help disengage the front and the rear edge pins.
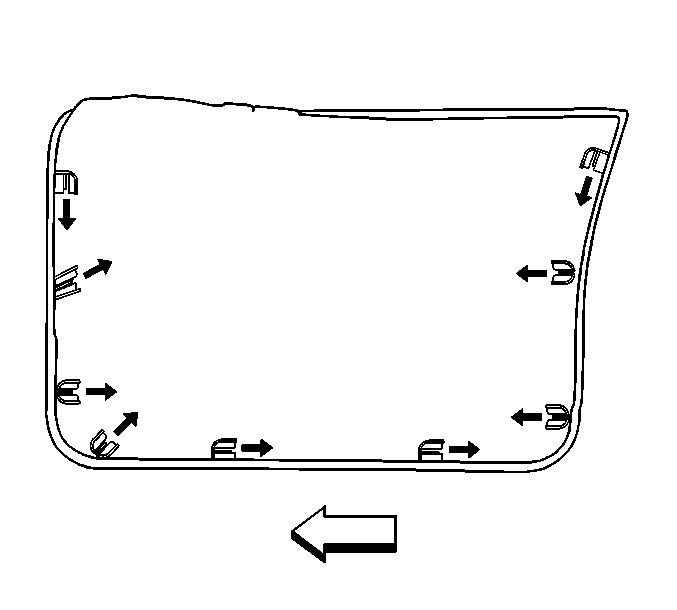
- After popping the pins, slide each from its cage and allow to fall from the door trim. See Figure 2 for the direction of the pin removal.
- To remove the trim panel pull upward. Release the electrical connector and set panel aside.
- Use needle nose pliers to depress the door mounted spring clip metal tabs. Slide the black plastic retainers from the spring clips.
- Slide the push-pins in their cages, with the three long pins at the bottom of the trim panel.
- Insert the black plastic retainers into the trim panel metal retainer.
- Run the door glass all the way up and secure to the header with tape.
- Remove the push-pin from the water deflector.
- Partially remove the water deflector.
- Remove the plastic plug at the belt line and loosen the glass attaching screws.
- Run the regulator ¾ down.
- Remove the inner belt seal and remove the glass.
- Remove the regulator top attaching nut.
- Remove the lower two regulator attaching nuts.
- Move the regulator assembly aside.
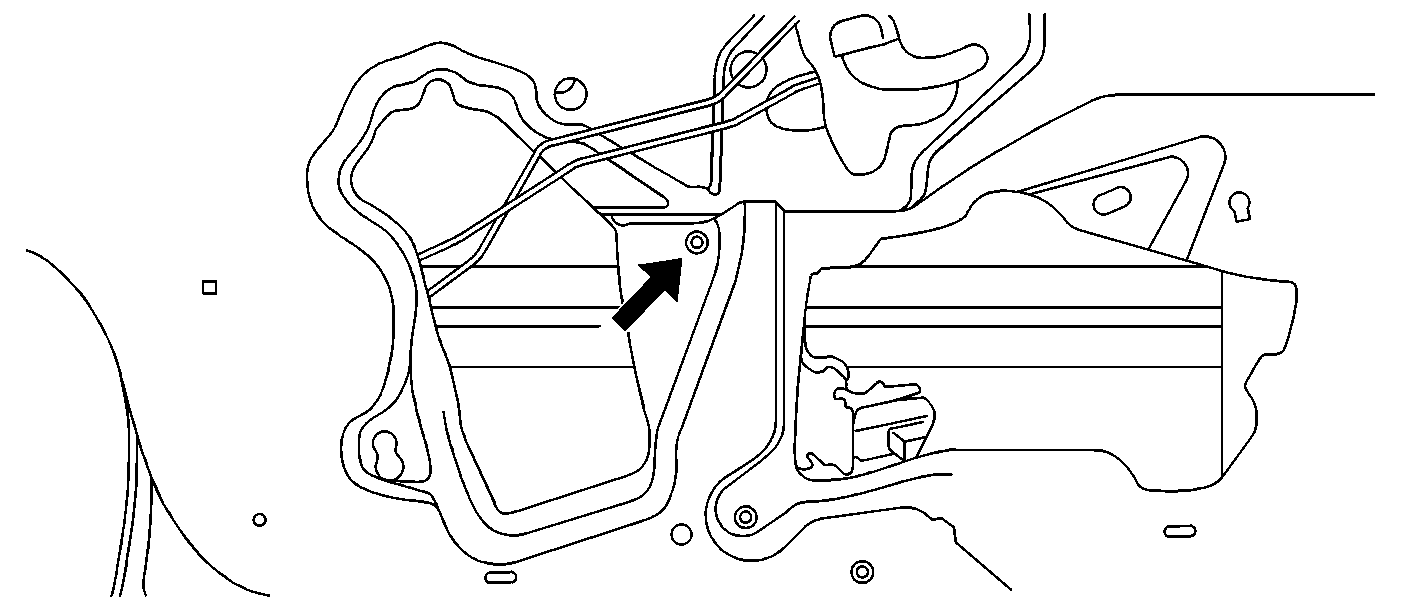
- File the door liner panel upper regulator attaching slot rearward 2.0 mm (.078 in). See Figure 3 for location.
- Reinstall the regulator assembly. Drive the upper attaching nut first by moving regulator upper attaching stud rearward and then tighten the lower two nuts.
- Verify to make sure the two rubber insulators are in the regulator where the glass attaches.
- Reinstall the front door glass, making sure the glass in fully rearward into the "B" pillar.
- While forcing the glass rearward, run the regulator up and torque the glass attaching bolts.
- Reinstall the plastic cap.
- Reinstall the inner belt strips.
- Remove the tape and cycle the glass to ensure the proper window regulator, glass and seal operation.
- Reinstall the water deflector.
- Push the pin back in. Use a two inch wallpaper roller to roll the edges of the water deflector to insure a proper seal.
- Connect the door wiring harness and the routing clip to the door module.
- Hold the top of the trim panel away from the top of the door about six inches and set the three lower push-pins in the door retainers. Push the top of the door trim panel toward the door.
- With all the pins aligned, push the three lower pins to the door. This automatically aligns the metal clips to the plastic retainers.
- Push on the upper edge to engage the top rail over the window inner belt seal strip. Tap on the door panel at the remaining retainers.
- Reinstall the speaker bezel.
- Reinstall the door handle bezel.
- Reinstall the fastener behind the door reflector or at the bottom rear corner of the door.
Notice: Do not pull the door pad outboard more than 25 mm (1 in) or breakage will occur.
Figure 1

Figure 2

Figure 3

Tighten
Tighten the regulator nuts to 11 N·m (89 lb in).
Tighten
Tighten the glass attaching bolts to 11 N·m (89 lb in).
Warranty Information
For vehicles repaired under warranty, use:
Labor Operation | Description | Labor Time |
|---|---|---|
C0110 | Glass, Front Door (RH) R&R | 0.8 hr |
C0111 | Glass, Front Door (LH) R&R | 0.7 hr |
