
| Subject: | Revised Front and Rear Door Trim Panel Replacement Procedures |
| Models: | 2000 Buick LeSabre |
This bulletin is being revised to add the front door trim
panel replacement service procedure and labor time code. Please discard Corporate
Bulletin Number 00-08-64-005 (Section 08 - Body and Accessories).
Modifications to the front and rear door trim panel assemblies
have resulted in a change to the replacement procedures for the 2000 model
year vehicles.
The front door trim panel replacement procedures are listed first followed
by the rear door trim panel replacement procedures.
Front Door Trim Panel Replacement Procedures
| • | Procedure 1 is to be followed when replacing original (1st design)
front door trim panels with the same on vehicles built PRIOR to the modifications. |
| • | Procedure 2 is to be followed when replacing modified (2nd design)
front door trim panels on vehicles built AFTER the affected VIN breakpoints. |
| • | Procedure 3 is to be followed when replacing original (1st design)
front door trim panels with modified (2nd design) front door trim panels on
vehicles built PRIOR to the modifications. |
Procedure 1: 1st Design Trim Panel Replacement -- Side Front Door
2000 Buick LeSabre (Built prior to VIN Breakpoint YU314737 -- Hamtramck
Plant)
2000 Buick LeSabre (Built prior to VIN Breakpoint Y4272437 -- Orion
Plant)
Remove and/or install the 1st design front door trim panel assembly.
Refer to Trim Panel Replacement -- Side Front Door in the Doors
sub-section of the Service Manual.
Procedure 2: 2nd Design Trim Panel Replacement -- Side Front Door
2000 Buick LeSabre (Built after VIN Breakpoint YU314736 -- Hamtramck
Plant)
2000 Buick LeSabre (Built after VIN Breakpoint Y4272436 -- Orion
Plant)
Tools Required
J 38778 Door Trim Pad and Garnish Clip Remover
Removal Procedure
- Remove the front upper trim panel (shark fin).
| 1.1. | Use the J 38778 in order to release the push-in retainer
at the top of the shark fin. |
| 1.2. | Lift the shark fin upwards in order to remove. |
| 1.3. | Disconnect the wire harness. |
- Remove the inside door handle bezel. (The front inside door handle
bezel has an electrical connector.)
| 2.1. | Insert a flat bladed tool behind the forward edge of the door
handle bezel. |
| 2.2. | Gently pry the bezel away from the door trim panel. |
| 2.3. | Pull the door handle about half way open. |
| 2.4. | Pull the bezel forward over the inside door handle. |
| 2.5. | Disconnect the electrical connector. |
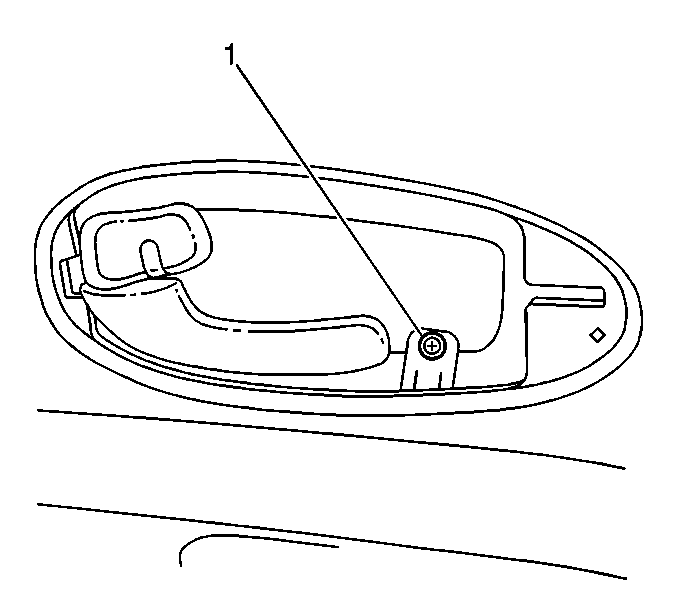
- Remove the attachment screw (1) from the door trim panel bracket
in the remote handle bezel opening.
- Remove the door lamp or reflector from the door trim panel.
| 4.1. | Insert a flat bladed tool between the front door trim panel and
the outside edge of the door lamp assembly or the reflector in order to release
it from the front door trim panel. |
| 4.2. | From the door lamp assembly, remove the bulb and socket. |
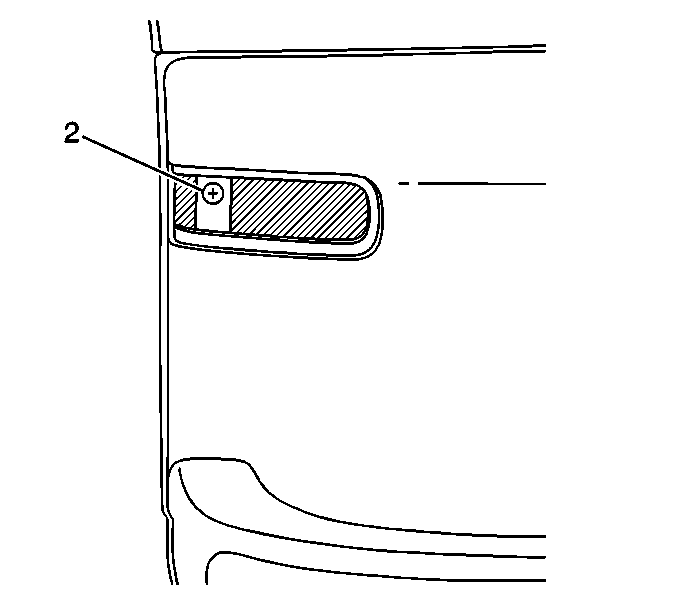
- Remove the attachment screw (2) from the door trim panel bracket
in the door lamp or reflector opening.
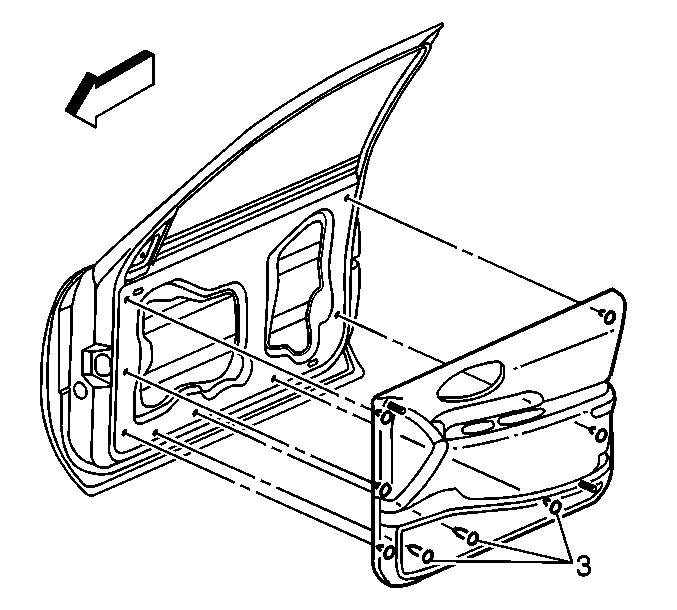
- Remove the door trim panel from the door assembly.
| 6.1. | Insert tool J 38778 between the door and the lower forward
corner of the door trim panel. |
| 6.2. | Center the door trim panel retainer (3) in the groove of the tool
and apply pressure to disengage the retainer from the door. |
| 6.3. | Repeat the procedure for the remaining eight door trim panel retainers. |
- Disconnect the door trim panel wiring harness.
Installation Procedure
- Connect the door trim panel wiring harness.
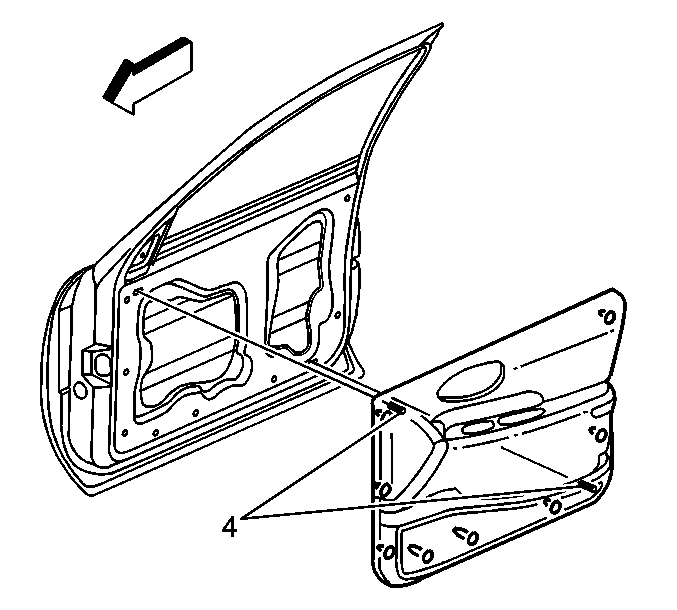
- Install the door trim panel to the door assembly.
| 2.1. | Align the two locator pins (4). |
| 2.2. | Ensure all nine door trim panel retainers are in position. |
| 2.3. | Push in both sides of the door trim panel starting at the upper
corners, down to the lower corners and then along the bottom of the panel. |
- Push outward along the upper edge of the door trim panel in order
to engage the top rail over the window inner belt seal strip.
- Install the two attachment screws to the door trim panel brackets.
Install one in the remote handle bezel opening and the other in the door lamp
or the reflector opening.
- Install the door lamp or reflector to the door trim panel.
| 5.1. | To the door lamp assembly, install the bulb and socket. |
| 5.2. | Install the door lamp assembly or the reflector into the door
panel by placing the inboard edge into the opening of the door panel. |
| 5.3. | Apply pressure to the outboard side of the door lamp assembly
or the reflector until it is secured into the door trim panel. |
- Install the inside door handle bezel.
| 6.1. | Connect the electrical connector. |
| 6.2. | Pull the door handle about half way open. |
| 6.3. | Insert the inside door handle through the opening in the door
handle bezel. |
| 6.4. | Insert the tabs at the rear of the bezel behind the door trim
panel. |
| 6.5. | Snap the front of the door handle bezel into place. |
| | Important: Use a new push-in fastener when reinstalling the shark fin. This will
prevent the shark fin from rattling against the door frame.
|
- Install the front upper trim panel (shark fin).
| 7.1. | Connect the wire harness. |
| 7.2. | Insert the tabs into the slots on the door trim panel. |
| 7.3. | Insert the push-in retainer into the hole in the door frame. |
Procedure 3: 2nd Design Trim Panel Replacement -- Side Front Door
2000 Buick LeSabre (Built prior to VIN Breakpoint YU314737 -- Hamtramck
Plant)
2000 Buick LeSabre (Built prior to VIN Breakpoint Y4272437 -- Orion
Plant)
Removal Procedure
- Remove the old 1st design trim panel assembly.
Refer to Trim Panel Replacement -- Side Front Door in the Doors
sub-section of the Service Manual.
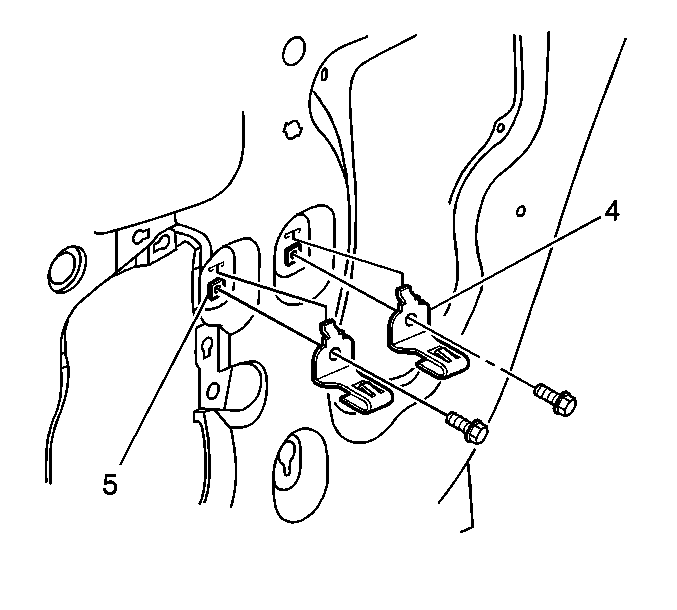
- Remove both armrest retaining spring clips (4) from the inner
door panel assembly.
- Install a small section of sound deadening material such as 3M®
Silencer Strips, P/N 08585, or equivalent over each of the two armrest
push-in nuts (5).
Installation Procedure
- Remove the two locator pins from the new 2nd design trim panel
assembly.
Use a pair of diagonal side cutters to cut off the two locator pins
as close to the panel assembly as possible.
- Connect the door trim panel wiring harness.

- Install the door trim panel to the door assembly.
| 3.1. | Ensure all nine door trim panel retainers (3) are in position. |
| 3.2. | Push in both sides of the door trim panel starting at the upper
corners, down to the lower corners and then along the bottom of the panel. |
- Install a self piercing sheet metal screw, M4.2 x 19 mm
(#8 x ¾ in), through the trim panel bracket in the remote handle
bezel opening to the inner door panel assembly.
- Install the attachment screw to the door trim panel bracket in
the door lamp or the reflector opening.
- Install the door lamp or reflector to the door trim panel.
| 6.1. | To the door lamp assembly, install the bulb and socket. |
| 6.2. | Install the door lamp assembly or the reflector into the door
panel by placing the inboard edge into the opening of the door panel. |
| 6.3. | Apply pressure to the outboard side of the door lamp assembly
or the reflector until it is secured into the door trim panel. |
- Install the inside door handle bezel.
| 7.1. | Connect the electrical connector. |
| 7.2. | Pull the door handle about half way open. |
| 7.3. | Insert the inside door handle through the opening in the door
handle bezel. |
| 7.4. | Insert the tabs at the rear of the bezel behind the door trim
panel. |
| 7.5. | Snap the front of the door handle bezel into place. |
| | Important: Use a new push-in fastener when reinstalling the shark fin. This will
prevent the shark fin from rattling against the door frame.
|
- Install the front upper trim panel (shark fin).
| 8.1. | Connect the wire harness. |
| 8.2. | Insert the tabs into the slots on the door trim panel. |
| 8.3. | Insert the push-in retainer into the hole in the door frame. |
Rear Door Trim Panel Replacement Procedures
| • | Procedure 1 is to be followed when replacing original (1st design)
rear door trim panels with the same on vehicles built PRIOR to the modifications. |
| • | Procedure 2 is to be followed when replacing modified (2nd design)
rear door trim panels on vehicles built AFTER the affected VIN breakpoints. |
| • | Procedure 3 is to be followed when replacing original (1st design)
rear door trim panels with modified (2nd design) rear door trim panels on
vehicles built PRIOR to the modifications. |
Procedure 1: 1st Design Trim Panel Replacement -- Side Rear Door
2000 Buick LeSabre (Built prior to VIN Breakpoint YU261467 -- Hamtramck
Plant)
2000 Buick LeSabre (Built prior to VIN Breakpoint Y4222260 -- Orion
Plant)
Remove and/or install the 1st design rear door trim panel assembly.
Refer to Trim Panel Replacement -- Side Rear Door in the Doors
sub-section of the Service Manual.
Procedure 2: 2nd Design Trim Panel Replacement -- Side Rear Door
2000 Buick LeSabre (Built after VIN Breakpoint YU261466 -- Hamtramck
Plant)
2000 Buick LeSabre (Built after VIN Breakpoint Y4222259 -- Orion
Plant)
Tools Required
J 38778 Door Trim Pad and Garnish Clip Remover
Removal Procedure
- Remove the inside door handle bezel. (The rear inside door handle
bezel does not have an electrical connector.)
| 1.1. | Insert a flat bladed tool behind the forward edge of the door
handle bezel. |
| 1.2. | Gently pry the bezel away from the door trim panel. |
| 1.3. | Pull the door handle about half way open. |
| 1.4. | Pull the bezel forward over the inside door handle. |

- Remove the attachment screw (1) from the door trim panel bracket
in the remote handle bezel opening.
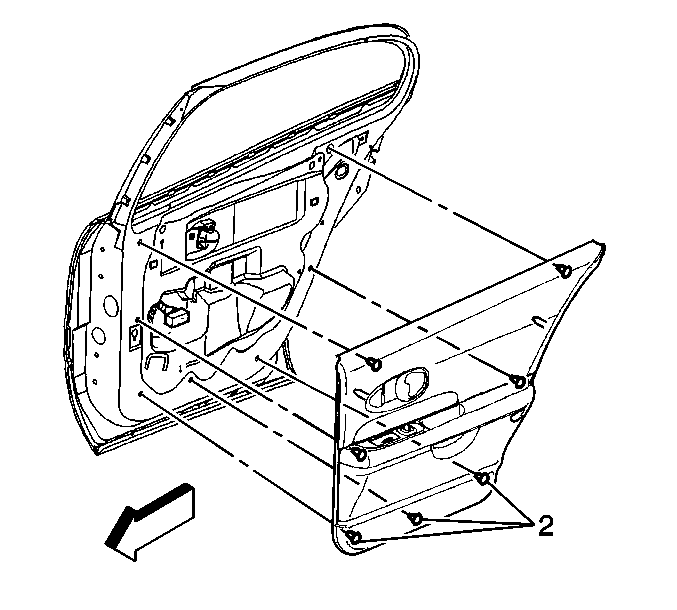
- Remove the door trim panel from the door assembly.
| 3.1. | Insert tool J 38778 between the door and the lower forward
corner of the door trim panel. |
| 3.2. | Center the door trim panel retainer (2) in the groove of the tool
and apply pressure to disengage the retainer from the door. |
| 3.3. | Repeat the procedure for the remaining six door trim panel retainers. |
- Disconnect the door trim panel wiring harness.
Installation Procedure
- Connect the door trim panel wiring harness.
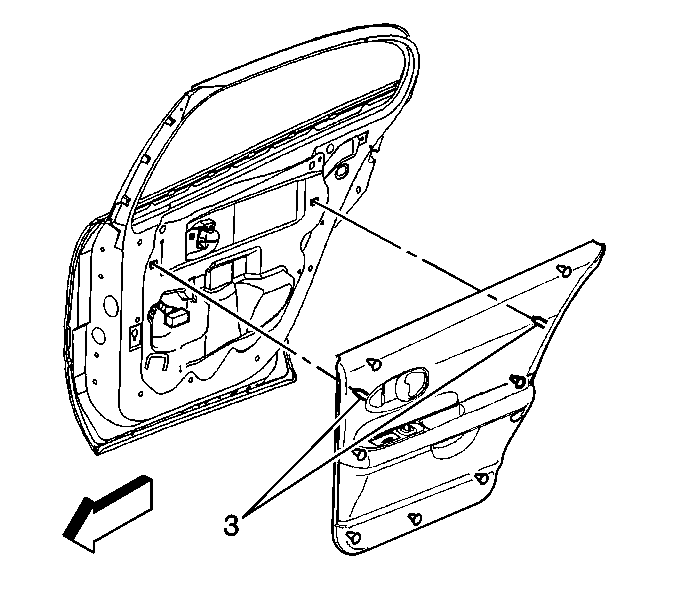
- Install the door trim panel to the door assembly.
| 2.1. | Align the two locator pins (3). |
| 2.2. | Ensure all seven door trim panel retainers are in position. |
| 2.3. | Push in both sides of the door trim panel starting at the upper
corners, down to the lower corners and then along the bottom of the panel. |
- Push outward along the upper edge of the door trim panel in order
to engage the top rail over the window inner belt seal strip.
- Install the attachment screw to the door trim panel bracket in
the remote handle bezel opening.
- Install the inside door handle bezel.
| 5.1. | Pull the door handle about half way open. |
| 5.2. | Insert the inside door handle through the opening in the door
handle bezel. |
| 5.3. | Insert the tabs at the rear of the bezel behind the door trim
panel. |
| 5.4. | Snap the front of the door handle bezel into place. |
Procedure 3: 2nd Design Trim Panel Replacement -- Side Rear Door
2000 Buick LeSabre (Built prior to VIN Breakpoint YU261467 -- Hamtramck
Plant)
2000 Buick LeSabre (Built prior to VIN Breakpoint Y4222260 -- Orion
Plant)
Removal Procedure
- Remove the old 1st design trim panel assembly.
Refer to Trim Panel Replacement -- Side Rear Door in the Doors
sub-section of the Service Manual.

- Remove both armrest retaining spring clips (4) from the inner
door panel assembly.
- Install a small section of sound deadening material such as 3M®
Silencer Strips, P/N 08585, or equivalent over each of the two armrest
push-in nuts (5).
Installation Procedure
- Remove the two locator pins from the new 2nd design trim panel
assembly.
Use a pair of diagonal side cutters to cut off the two locator pins
as close to the panel assembly as possible.
- Connect the door trim panel wiring harness.

- Install the door trim panel to the door assembly.
| 3.1. | Ensure all seven door trim panel retainers (2) are in position. |
| 3.2. | Push in both sides of the door trim panel starting at the upper
corners, down to the lower corners and then along the bottom of the panel. |
- Install a self piercing sheet metal screw, M4.2 x 19 mm
(#8 x ¾ in), through the trim panel bracket in the remote handle
bezel opening to the inner door panel assembly.
- Install the inside door handle bezel.
| 5.1. | Pull the door handle about half way open. |
| 5.2. | Insert the inside door handle through the opening in the door
handle bezel. |
| 5.3. | Insert the tabs at the rear of the bezel behind the door trim
panel. |
| 5.4. | Snap the front of the door handle bezel into place. |
Warranty Information
For vehicles repaired under warranty, use:
Labor Operation
| Description
| Labor Time
|
C3348/58
| RH/LH Trim Asm, Front Door - R&R or Replace
| Use published labor operation
time
|
C3540/41
| RH/LH Trim
Asm, Rear Door - R&R or Replace
| Use published labor operation time
|


