GM Accessories Lucerne Decklid Spoilers (Revised Install) - keywords accessory deck decklid install instructions kit lid spoiler trunk

| Subject: | GM Accessories Lucerne Decklid Spoilers (Revised Install) |
| Models: | 2007 Buick Lucerne |
The following diagnosis might be helpful if the vehicle exhibits the symptom(s) described in this PI.
Condition/Concern:
The attached installation instruction sheets for the Lucerne Accessories Decklid Spoilers have been revised with a request to use only the two outboard brackets (vs. all four brackets) to install this product. This will eliminate the potential for dimpling in various bracket locations once the product is installed.
Following are the decklid spoilers associated with this request:
Part Numbe | Part Name |
|---|---|
17800446 | Spoiler - Flushmount, Prime |
17800447 | Spoiler - Flushmount, Bronze |
17800448 | Spoiler - Flushmount, Silver |
17800449 | Spoiler - Flushmount, White |
17800450 | Spoiler - Flushmount, Red |
Finally, two bracket-design spoilers will soon begin shipping from source under the following P/Ns:
Part Number | Part Name |
|---|---|
19166534 | Spoiler Kit - Flushmount, Prime |
19166435 | Spoiler Kit - Flushmount, Bronze (53U) |
19166436 | Spoiler Kit - Flushmount, Silver (67U) |
19166437 | Spoiler Kit - Flushmount, White (40U) |
19166438 | Spoiler Kit - Flushmount, Red (86U) |
Note: The Lucerne Accessories Decklid Spoiler - Black (P/N 19159593) has always had a two bracket design. Therefore, no revision was necessary relative to installation of this product.
Recommendation/Instructions:
STEP 1: Vehicle Preparation
- Temperature must be between 61°F-86°F (16°C-31°C)
- Wash and thoroughly dry vehicle
- For best results, vehicle should be free of damage (dents, scuffs, creases, fractures, etc)
- Do not use petroleum based cleaning products. If a strong cleaner is required, we recommend using 3M general purpose Adhesive Cleaner (P/N 08984) with a clean cloth to remove all visible contaminates (road tar, etc). It may take the use of several cloths to obtain a clean surface. It is important to replace the cloth when soiled or you will be smearing or wiping contaminates back on the vehicle. After using the solvent for cleaning, use the alcohol wipes supplied with the kit.
STEP 2: Spoiler Installation
- Paint Spoiler as required.
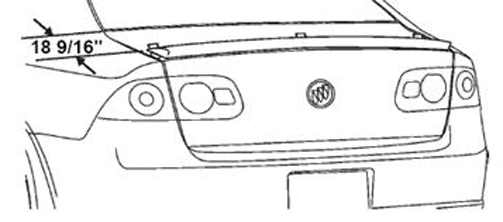
- Measure from upper corner edge of deck lid 18 9/16" rearward and mark with masking tape. Position spoiler on vehicle and center it on the deck lid. Mark the spoiler's position with masking tape. See Figure 1A.
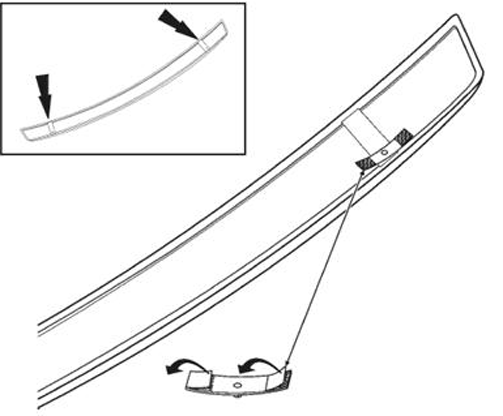
- Place drill guide into threaded mounting holes on the spoilers and peel off the liner. See Figure 1B.
- Place Spoiler into position on the vehicle ensuring the spoiler is centered on the vehicle
- Firmly press down on the drill guides onto the vehicle.
- Remove spoiler carefully ensuring the drill guides stay on the deck lid.
- Center punch the holes and discard the drill guides.
- Protect painted surfaces from metal debris before drilling.
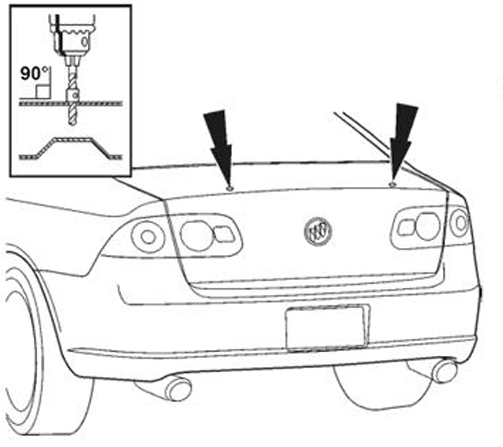
- Drill punched location from 1/8" to 3/8". Use a drill stop set at 10mm. See Figure 1C.
- De-burr and apply corrosion protection on all drilled holes. See Figure 1C.
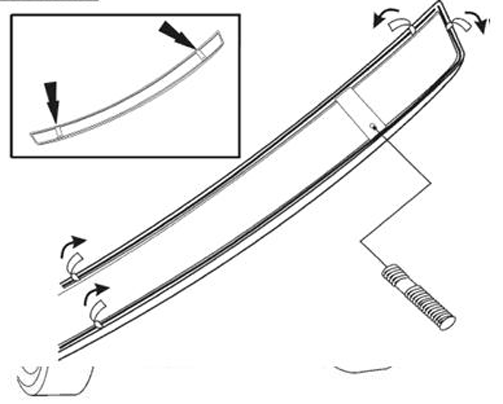
- Thread Double Ended Studs into spoiler. See Figure 1D. Note: The short thread section should thread into spoiler.
- Wipe vehicle with alcohol wipes where spoiler will be attached.
- Peel back 2" of liner from both ends. Locate spoiler on deck lid and open. See Figure 1D.
- Carefully remove tape liner from spoiler starting from the center of the vehicle and press down working out from the center to get good adhesion. Keep a distance of 6" between pressing down on tape area onto vehicle and peeling of tape liner to avoid stretching liner resulting in the liner breaking.
- Using a roller, apply pressure to the part to press the tape onto the decklid. Note: Care needs to be taken not to damage paint finish.
- Fasten 4 Nuts (M6) onto spoiler and tighten to 5Nm (44 in. lbs). See Figure 1E.


Please follow this diagnostic or repair process thoroughly and complete each step. If the condition exhibited is resolved without completing every step, the remaining steps do not need to be performed.
