SERVICE MANUAL UPDATE-SEC 10-9 TORQUE ROD/HINGE SPRING PROCS.

SUBJECT: SERVICE MANUAL UPDATE - TORQUE ROD REMOVAL INSTALLATION AND HINGE SPRING ADJUSTMENTS (NEW SERVICE PROCEDURE SECTION 10-9)
MODELS AFFECTED: 1992 LESABRE 1992 PARK AVENUE/ULTRA
This bulletin adds the procedure to remove, install and adjust torque rods on the LeSabre and also updates the hinge spring adjustment on the Park Avenue/Ultra.
TORQUE RODS (LeSabre)
This procedure should be inserted at pages 9-4-2.
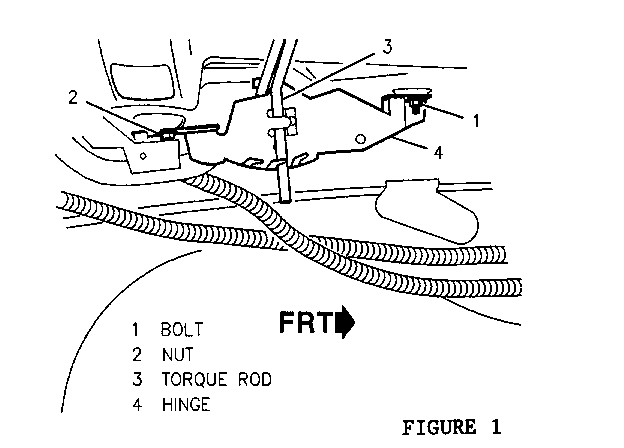
Figure 1
Removal (LeSabre)
1. Remove rear window trim panel. Refer to "Rear Window Trim Panel" in this section.
2. Remove retainer (clip) from torque rod at hinge.
3. Loosen, but do not remove, two hinge retaining bolts from inside of vehicle (through rear window shelf). (Two per side)
4. Remove hinge nut on fastener in rear compartment. (One per side).
5. Support rear compartment lid.
6. Relieve tension on torque rod to be removed by:
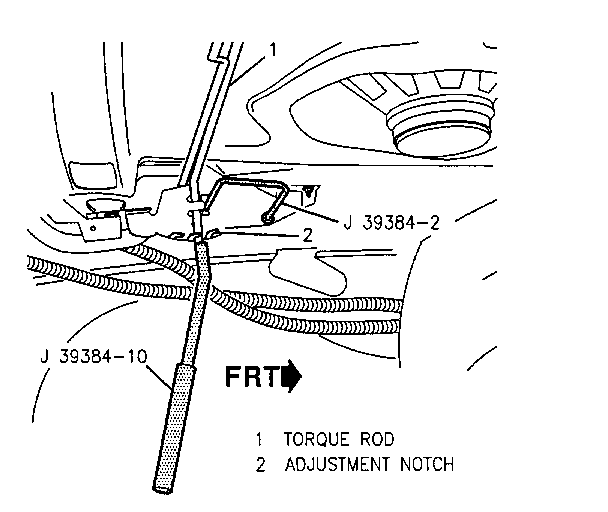
A. Inserting torque rod retaining pin J 39384-2.
B. Inserting torque rod adjustment bar J 39384-1 over end of torque rod.
C. Removing torque rod from adjusting notches.
7. Remove torque rod.
Installation (LeSabre)
1. Place torque rod between hinge and shelf.
2. Slide torque rod into hinge and secure with retainer.
IMPORTANT: MAKE SURE THAT TORQUE ROD IS PROPERLY SEATED BETWEEN HINGE AND SHELF.
3. Replace two hinge retaining bolts from inside of vehicle and hinge nut in rear compartment, but do not fully tighten.
4. Open and close rear compartment lid to make sure torque rod is properly seated.
5. Tighten two retaining bolts in rear window panel. Torque to 30 N.m (22 lb. ft.).
6. Tighten hinge nut. Torque to 30 N.m (22 lb.ft.).
7. Open and close rear compartment lid to make sure torque rod is properly seated.
8. Insert torque rod into adjustment notch by:
A. Inserting torque rod retaining pin J 39384-2.
B. Inserting torque rod adjusting bar J 39384-1 over end of torque rod.
C. Drawing back on tool and inserting torque rod into appropriate notch.
9. Adjust to desired tension. Refer to "Hinge Adjustment" in this section.
Adjustment (LeSabre)
Figure 3
1. Support rear compartment lid.
2. Insert torque rod retaining pin J 39384-2 into hinge.
3. Insert torque rod adjustment bar J 39384-1 over end of torque rod.
4. Adjust to one of three positions for desired tension. To decrease the amount of effort needed to raise the lid, reposition end of torque rod in a notch closer to the rear of the car.
HINGE SPRING ADJUSTMENT (Park Avenue)
Procedure to adjust the hinge tension of the rear compartment lid. This procedure should be inserted at pages:
10-9-4-2 for 1992 Park Avenue and Park Avenue Ultra
Adjustment (Park Avenue and Ultra)
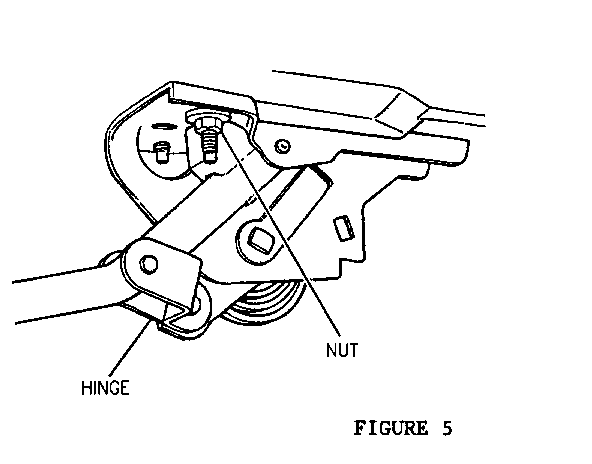
Figure 5
1. To adjust rear compartment lid so that less effort is required to open:
A. Insert rear deck lid torsion bar adjuster J 39347 onto hinge spring.
B. Rotate spring counterclockwise on the right and clockwise on the left until tab clicks into one of three positions.
NOTICE: DO NOT TRY TO FORCE TAB. TAB SHOULD MOVE INTO NEXT HIGHER POSITION WITH MINIMAL FORCE. USING EXCESSIVE FORCE MAY CAUSE SPRING DAMAGE.
2. To adjust rear compartment lid so that more effort is required to open:
A. Remove hinge from vehicle. Refer to "Hinge Removal" in this section.
B. Secure hinge to bench with C-clamp, vise or equivalent.
C. Insert rear deck lid torsion bar adjuster J 39347 onto hinge spring.
IMPORTANT: THE HINGE SPRING IS UNDER CONSTANT TENSION. IF TOOLS ARE NOT INSTALLED PROPERLY, THE SPRING COULD UNWIND AND CAUSE UNNECESSARY ADDED REPAIRS.
D. While holding breaker bar, insert a flat blade screwdriver under adjustment tab and carefully pry tab out from adjustment notch.
E. Using breaker bar, rotate tab into next notch. If more adjustment is necessary, repeat steps C through E.
F. Reinstall hinge. Refer to "Hinge Replacement" in this section.


General Motors bulletins are intended for use by professional technicians, not a "do-it-yourselfer". They are written to inform those technicians of conditions that may occur on some vehicles, or to provide information that could assist in the proper service of a vehicle. Properly trained technicians have the equipment, tools, safety instructions and know-how to do a job properly and safely. If a condition is described, do not assume that the bulletin applies to your vehicle, or that your vehicle will have that condition. See a General Motors dealer servicing your brand of General Motors vehicle for information on whether your vehicle may benefit from the information.
