Drive Belt Replacement VIN 1
Removal Procedure
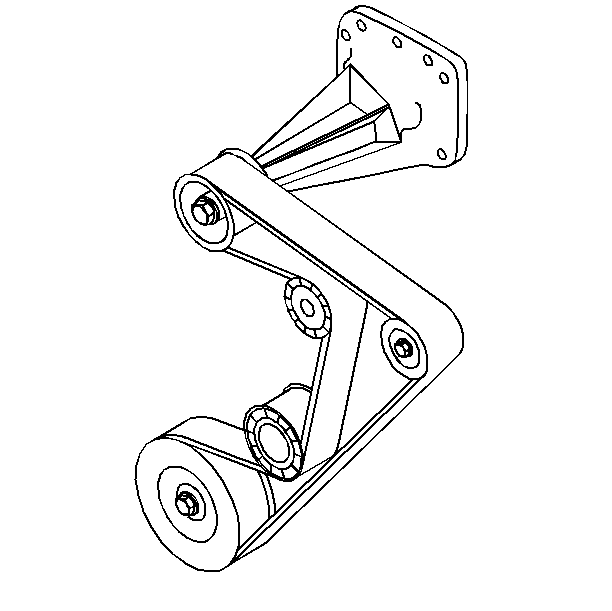
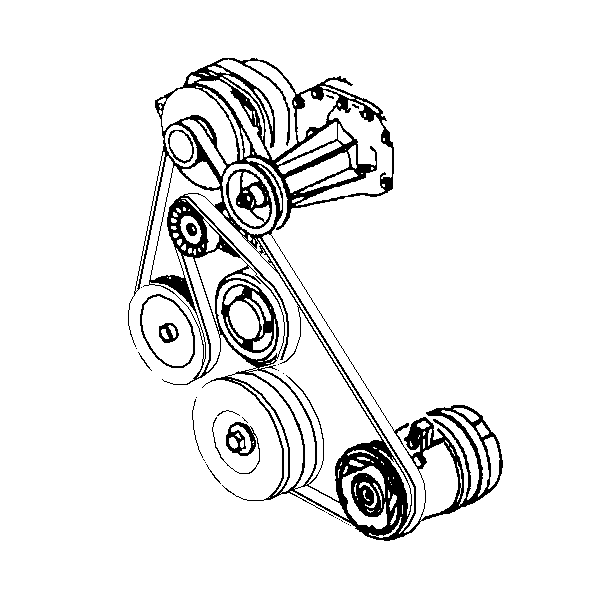
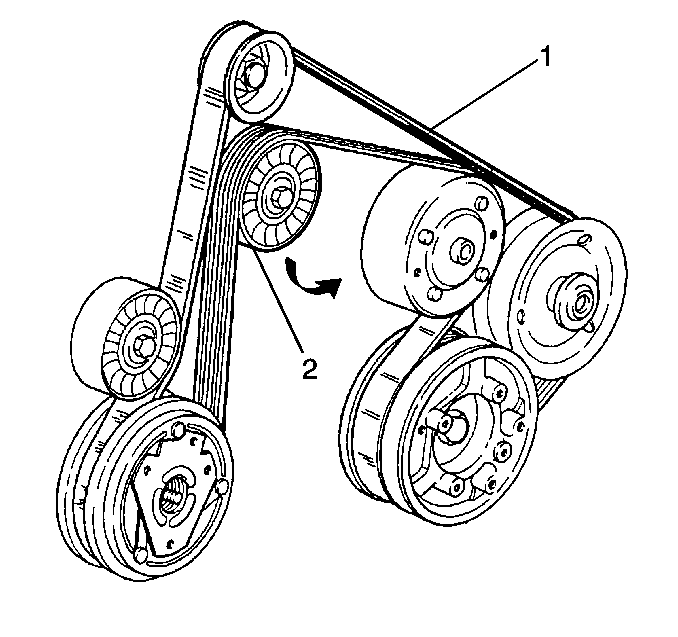
The supercharged 3800 engine uses two drive belts. The outer belt drives the supercharger. The inner belt drives the generator, power steering pump, coolant pump and air conditioning compressor. All driven accessories are rigidly mounted to the engine. Drive belt tension is maintained by the spring loaded belt tensioners. Each belt has its own tensioner.
A belt squeak when the engine is started or stopped is normal and has no effect on belt durability. The drive belt tensioner can control belt tension over a broad range of belt lengths due to stretching; however, there are limits to the tensioners ability to compensate. Using the tensioner outside of its operating range can result in poor tension control and/or damage to the tensioner. The belt should be replaced when this condition occurs.
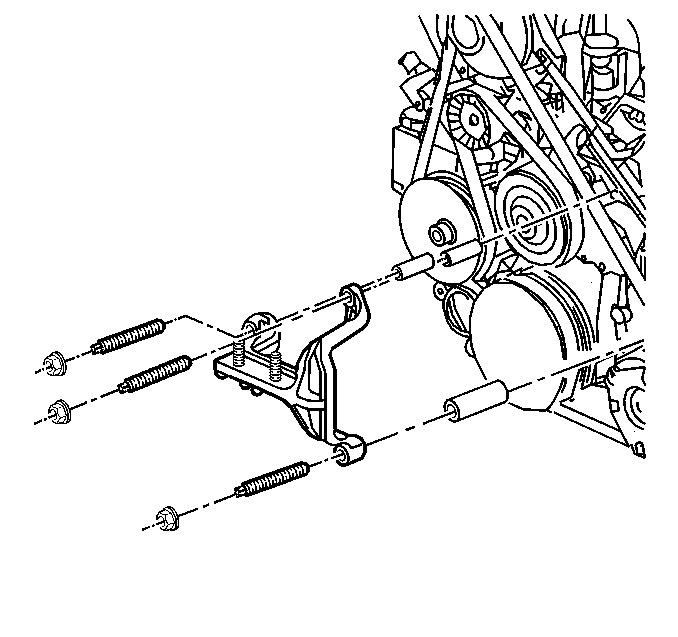
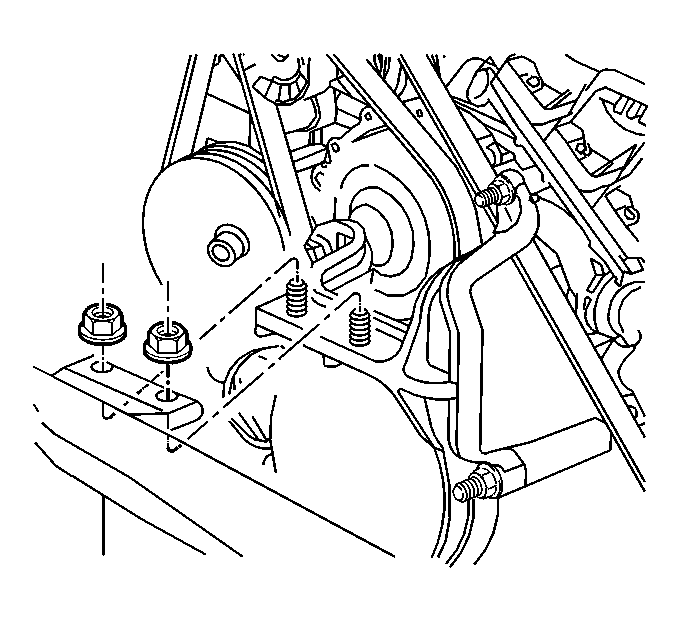
- Remove the engine mount to engine mount bracket nuts.
- Use a jack with a block of wood on the jack under the oil pan in order to support the engine.
- Remove the engine mount bracket front upper and lower nuts.
Important: Ensure that the wood block extends past the width of the oil pan in order to avoid damage.
- Remove the engine mount bracket front upper and lower studs and spacer.
- Lower the engine as necessary and rotate the tensioner to remove the drive belt.
- Remove the supercharger belt.
- Remove the drive belt.
Installation Procedure
- Install the drive belt.
- Install the supercharger belt.
- Install the engine mount bracket front upper and lower studs and spacers.
- Install the engine mount bracket front upper and lower nuts.
- Install the engine mount bracket nuts.
- Remove the floor jack.
Notice: Use the correct fastener in the correct location. Replacement fasteners must be the correct part number for that application. Fasteners requiring replacement or fasteners requiring the use of thread locking compound or sealant are identified in the service procedure. Do not use paints, lubricants, or corrosion inhibitors on fasteners or fastener joint surfaces unless specified. These coatings affect fastener torque and joint clamping force and may damage the fastener. Use the correct tightening sequence and specifications when installing fasteners in order to avoid damage to parts and systems.
Tighten
Tighten the nuts to 78 N·m (58 lb ft).
Tighten
Tighten the nuts to 87 N·m (64 lb ft).
Drive Belt Replacement VIN K
Removal Procedure
The drive belt drives all engine mounted accessories. All driven accessories are rigidly mounted to the engine. Drive belt tension is maintained by a spring loaded belt tensioner. A belt squeak when the engine is started or stopped is normal and has no effect on belt durability. The drive belt tensioner can control belt tension over a broad range of belt lengths; however, there are limits to the tensioner's ability to compensate. Using the tensioner outside of its operating range can result in poor tension control and/or damage to the tensioner.
- Remove the engine mount bracket front upper and lower nuts.
- Use a jack with a block of wood on the jack under the oil pan in order to support the engine.
- Remove the engine mount to engine mount bracket nuts.
- Remove the engine mount bracket front upper and lower nuts.
Important: Ensure that the wood block extends past the width of the oil pan in order to avoid damage.
- Remove the engine mount bracket front upper and lower studs and spacer.
- Lower the engine as necessary and rotate the tensioner to remove the drive belt.
- Remove the drive belt.
Installation Procedure
- Install the drive belt.
- Install the engine mount bracket front upper and lower studs and spacers.
- Install the engine mount bracket front upper and lower nuts.
- Install the engine mount to engine mount bracket nuts.
- Remove the floor jack.
Notice: Use the correct fastener in the correct location. Replacement fasteners must be the correct part number for that application. Fasteners requiring replacement or fasteners requiring the use of thread locking compound or sealant are identified in the service procedure. Do not use paints, lubricants, or corrosion inhibitors on fasteners or fastener joint surfaces unless specified. These coatings affect fastener torque and joint clamping force and may damage the fastener. Use the correct tightening sequence and specifications when installing fasteners in order to avoid damage to parts and systems.
Tighten
Tighten the nuts to 78 N·m (58 lb ft).
Tighten
Tighten the nuts to 87 N·m (64 lb ft).
