Step
| Action
| Value(s)
| Yes
| No
|
1
| Inspect for any stored DTCs.
Are any DTCs stored?
| --
| Go to
Step 3
| Go to
Step 2
|
2
| Connect the J 39500-B
.
Are the pressures above 350 kPa (50 psi)?
| --
| Go to
Step 4
| Go to
Step 8
|
3
| Correct any stored
DTCs. Refer to
DTC Table
.
Does the complaint persist?
| --
| Go to
Step 1
| System
OK
|
4
| Inspect and correct for a blown
Air Conditioner (A/C) fuse. Refer to
Circuit Protection - Fuses
in Body and Accessories.
Does the complaint persist?
| --
| Go to
Step 5
| System
OK
|
5
| Inspect and correct for the following
conditions:
| • | Disconnected A/C clutch wire |
| • | Proper A/C clutch rotation |
Refer to
HVAC Compressor Clutch Does Not Engage
. Does the complaint persist?
| --
| Go to
Step 6
| System OK
|
6
| Inspect
and correct for the following conditions:
Refer to
Flushing
or
Radiator Replacement
in Engine
Cooling.
Does the complaint persist?
| --
| Go to
Step 7
| System
OK
|
7
| Read the DCS for Bulletins and
Hints.
Follow the procedures indicated.
Does the complaint persist?
| --
| Go to
Step 10
| System
OK
|
8
|
- Add 0.453 kg (1 lb) of refrigerant. Refer to
Refrigerant Recovery and Recharging
and Handling Refrigerant R-134a
.
- Perform a leak check. Refer to
Leak Testing
.
Did you find a leak?
| --
| Go to
Step 9
| Go to
Step 1
|
9
|
- Repair the leak.
- Inspect the system performance. Refer to
System Performance Test
.
Does the complaint persist?
| --
| Go to
Step 2
| System
OK
|
10
| Perform an A/C Performance Check
using the following steps:
- Ensure that the ambient temperature is at least 5°C (41°F).
- Ensure that the engine is idling at normal operating temperature.
- Turn the A/C to the ON position.
- Select the coldest setting.
- Select the MAX blower speed.
- Record the A/C pressures.
- Record the A/C temperatures.
- Refer to
System Performance Test
.
Does the A/C performance meet the requirement on the Performance Chart?
| --
| Go to
Step 11
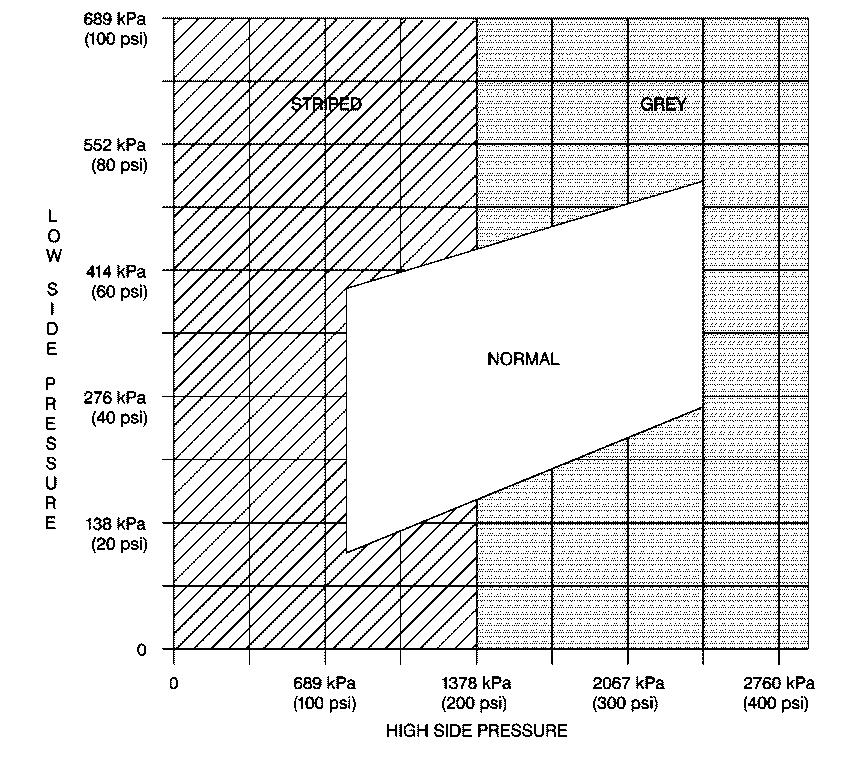
| Go to High Side vs. Low Side Pressure Chart
|
11
| Was the customer complaint made due to high temperature
and/or high humidity?
| --
| Go to
Step 12
| System OK
|
12
| Perform a leak test. Refer to
Leak Testing
.
Did you find a leak?
| --
| Go to
Step 13
| System OK
|
13
| Recharge the A/C system. Refer to
Refrigerant Recovery and Recharging
.
Does the complaint persist?
| --
| Go to
Step 10
| System
OK
|
Gray Area Diagnosis and Service
Problem
| Action
|
|
Important: The V5 clutch may cycle if the discharge pressure exceeds 2758 kPa
(400 psi).
|
Improper condenser operation
| Improper
condenser operation may result from one of the following causes:
| • | Extremely high ambient humidity |
| • | Insufficient air flow across condenser |
| • | Damaged or dirty condenser fins |
|
High side refrigerant restriction
|
- Feel liquid line before expansion tube (orifice). A cold line
indicates restriction in the high side.
- Inspect for a frost spot in order to locate the restriction.
- Repair the line as necessary.
|
Refrigerant system overcharged (high discharge and high suction pressures)
| The clutch may cycle ON/OFF and cause compressor noise.
|
Expansion
tube (orifice) blocked
| Low suction pressures.
|
Air in system (High
discharge and high suction pressures).
|
- Recover the refrigerant. Refer to
Refrigerant Recovery and Recharging
.
- Inspect the expansion (orifice) tube for blockage. Refer to
Expansion (Orifice) Tube Replacement
.
- Clean or replace the tube as required.
- Recharge the A/C system. Refer to
Refrigerant Recovery and Recharging
.
- Leak test the system. Refer to
Leak Testing
.
|
Problem
| Action
|
The compressor is damaged internally.
|
| • | If suction and discharge pressure are equal and do not change
when the A/C mode is turned ON and OFF, the compressor may be internally damaged. |
| • | Excess heat at the clutch surfaces or a free wheeling clutch driver
are signs of internal compressor damage. |
| • | When replacing the compressor, follow the component replacement
procedures in order to maintain correct oil charge in the system. |
|
The expansion tube (orifice) is missing.
|
- Feel the liquid line after the expansion tube.
- If the line is warm, recover the refrigerant. Refer to
Refrigerant Recovery and Recharging
.
- Inspect for proper installation of the expansion tube. Refer
to
Expansion (Orifice) Tube Replacement
.
- Clean or replace as necessary.
- Recharge the A/C system. Refer to
Refrigerant Recovery and Recharging
.
|
The Compressor runs at minimum stroke.
|
| • | If the compressor discharge pressures remain only 10-30 psi
above the suction pressure, the compressor may be at minimum stroke. |
| • | Run the engine at approximately 3000 RPM for 3 minutes
until pressures become normal. During this period, cycle the mode lever from
vent to A/C every 20 seconds. If there is no change, then perform
the control valve low load test below. |
|
The compressor control valve is set improperly.
| The low load test
creates a low cooling load that causes the V5 compressor to go toward minimum
stroke. Minimum stroke is necessary in order to evaluate the control
valve set point. Perform the low load test using the following procedure:
- Start the engine
- Run the engine at a fast idle.
- Open the hood.
- Close the windows and the doors.
- Set the A/C controls to LOW blower and MAX cooling.
- Record the test results.
- Evaluate the test results as follows:
| • | If suction pressure is 25-35 psi, then the control
valve is functioning properly. |
| • | If the suction pressure is outside the limits of 25-35 psi,
then replace the control valve. |
|
The refrigerant system is undercharged.
|
- The refrigerant may be undercharged when the suction pressure
is below 35 psi during the high load test.
- The suction line before the accumulator will be warm if the charge
is low.
- Add 1 lb of refrigerant.
- Recheck the pressure. Verify that the pressure is in the white
area on the chart. Then find and correct the leak.
- Evacuate the system.
- Charge the system with the correct amount of refrigerant.
|
The expansion tube (orifice) is blocked.
|
- Feel the liquid line after the expansion tube.
- If the line is warm, recover the refrigerant. Refer to
Refrigerant Recovery and Recharging
.
- Inspect for proper installation of the expansion tube. Refer
to
Expansion (Orifice) Tube Replacement
.
- Clean or replace as necessary.
- Recharge the A/C system. Refer to
Refrigerant Recovery and Recharging
.
|