Heated Air Inoperative Driver
Step | Action | Value(s) | Yes | No |
|---|---|---|---|---|
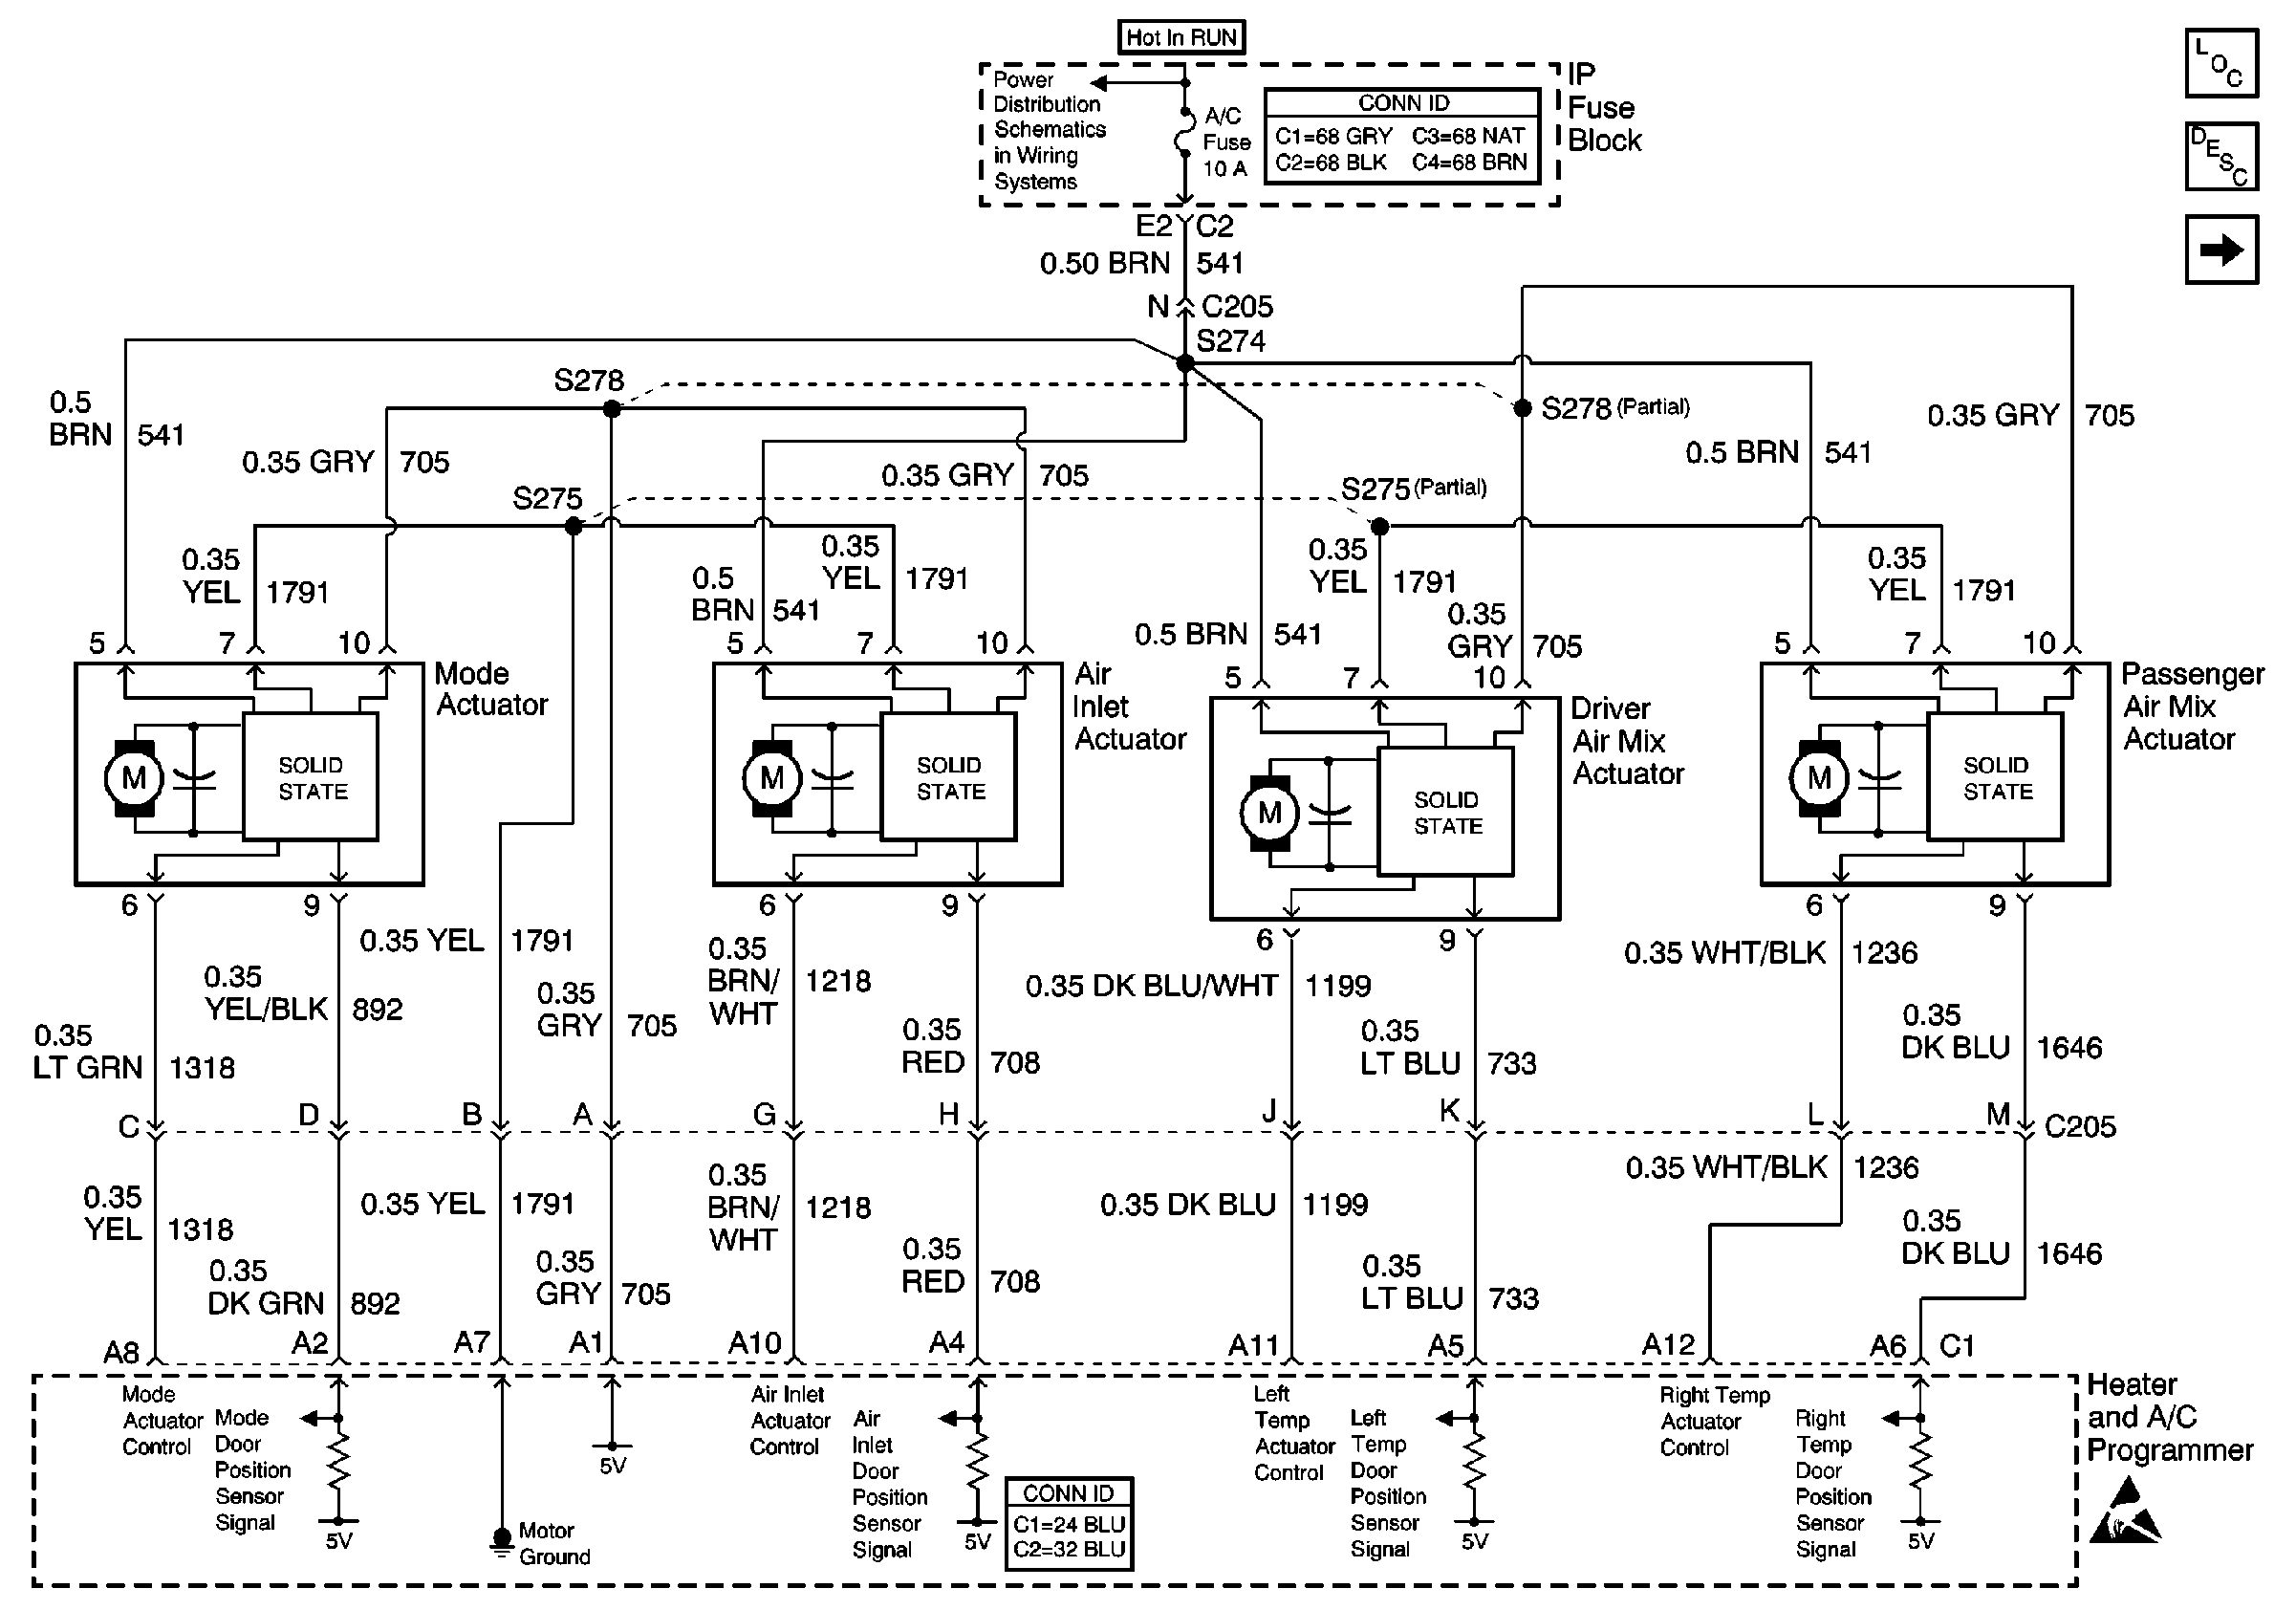
SCHEMATIC REFERENCE:
| ||||
1 | Did you perform the Air Delivery and Temperature Control Check? | -- | Go to Step 2 | |
2 |
Does the voltage measure near the specified value? | B+ | Go to Step 3 | Go to Step 4 |
3 |
Did you find and correct the condition? | -- | Go to Step 13 | Go to Step 5 |
4 | Test the ignition positive voltage circuit of the left temp door motor for an open or a short to ground. Refer to Circuit Testing and Wiring Repairs in Wiring Systems. Did you find and correct the condition? | -- | Go to Step 13 | Go to Step 7 |
5 |
Does the drive shaft of the left temp door motor rotate and do the counts change? | -- | Go to Step 6 | Go to Step 10 |
6 |
Does the voltage measure near the specified value when increasing temperature, near the specified value when decreasing temperature, and near the specified value when stationary? |
0 V increasing 5 V decreasing 2.5 V stationary | Go to Step 7 | Go to Step 9 |
7 |
Did you find and correct the condition? | -- | Go to Step 13 | Go to Step 8 |
8 | Replace the HVAC module. Refer to HVAC Module Assembly Replacement in Heating and Ventilation. Did you complete the replacement? | -- | Go to Step 13 | -- |
9 | Inspect for poor connections at the harness connector of the heater and A/C programmer. Refer to Testing for Intermittent Conditions and Poor Connections and Connector Repairs in Wiring Systems. Did you find and correct the condition? | -- | Go to Step 13 | Go to Step 11 |
10 | Inspect for poor connections at the harness connector of the left temp door motor. Refer to Testing for Intermittent Conditions and Poor Connections and Connector Repairs in Wiring Systems. Did you find and correct the condition? | -- | Go to Step 13 | Go to Step 12 |
11 | Replace the heater and A/C programmer. Refer to Programmer Replacement . Did you complete the replacement? | -- | Go to Step 13 | -- |
12 | Replace the left temp door motor. Refer to Air Mix Actuator Replacement - Driver . Did you complete the replacement? | -- | Go to Step 13 | -- |
13 | Operate the system in order to verify the repair. Did you correct the condition? | -- | System OK | Go to Step 2 |
Heated Air Inoperative Passenger
Step | Action | Value(s) | Yes | No |
|---|---|---|---|---|
SCHEMATIC REFERENCE;
| ||||
1 | Did you perform the Air Delivery and Temperature Control Check? | -- | Go to Step 2 | |
2 |
Does the voltage measure near the specified value? | B+ | Go to Step 3 | Go to Step 4 |
3 |
Did you find and correct the condition? | -- | Go to Step 13 | Go to Step 5 |
4 | Test the ignition positive voltage circuit of the right temp door motor for an open or a short to ground. Refer to Circuit Testing and Wiring Repairs in Wiring Systems. Did you find and correct the condition? | -- | Go to Step 13 | Go to Step 7 |
5 |
Does the drive shaft of the right temp door motor rotate and do the counts change? | -- | Go to Step 6 | Go to Step 10 |
6 |
Does the voltage measure near the specified value when increasing temperature, near the specified value when decreasing temperature, and near the specified value when stationary? | 0 V increasing 5 V decreasing 2.5 V stationary | Go to Step 7 | Go to Step 9 |
7 |
Did you find and correct the condition? | -- | Go to Step 13 | Go to Step 8 |
8 | Replace the HVAC module. Refer to HVAC Module Assembly Replacement in Heating and Ventilation. Did you complete the replacement? | -- | Go to Step 13 | -- |
9 | Inspect for poor connections at the harness connector of the heater and A/C programmer. Refer to Testing for Intermittent Conditions and Poor Connections and Connector Repairs in Wiring Systems. Did you find and correct the condition? | -- | Go to Step 13 | Go to Step 11 |
10 | Inspect for poor connections at the harness connector of the right temp door motor. Refer to Testing for Intermittent Conditions and Poor Connections and Connector Repairs in Wiring Systems. Did you find and correct the condition? | -- | Go to Step 13 | Go to Step 12 |
11 | Replace the heater and A/C programmer. Refer to Programmer Replacement . Did you complete the replacement? | -- | Go to Step 13 | -- |
12 | Replace the right temp door motor. Refer to Air Mix Actuator Replacement - Passenger . Did you complete the replacement? | -- | Go to Step 13 | -- |
13 | Operate the system in order to verify the repair. Did you correct the condition? | -- | System OK | Go to Step 2 |
