Horizontal Adjustment
Ensure that the window panel weatherstrip seal has contact with the metal roof panel around the entire periphery of the seal when the sliding window panel is in the closed position. Ensure that the weatherstrip is not crushed at either of the following locations:
| • | The front of the window panel |
| • | The rear of the window panel |
Inspect for contact of the weatherstrip with the metal roof panel around the periphery of the weatherstrip. Insert one of the following components between the weatherstrip and the metal roof panel:
| • | A business card |
| • | A 0.381 mm (0.015 in) feeler gage |
Drag the card or gage around the entire weatherstrip contact area.
Ensure that the business card or the feeler gage is making continuous contact between the weatherstrip and the metal roof panel around the entire sealing contact area. If the gap is excessive at the front or rear of the panel, adjust the sliding window panel in the fore/aft position.
- Fully open the sliding window panel.
- Working from the top of the vehicle, note the position of the track assembly on the fore/aft adjustment scale.
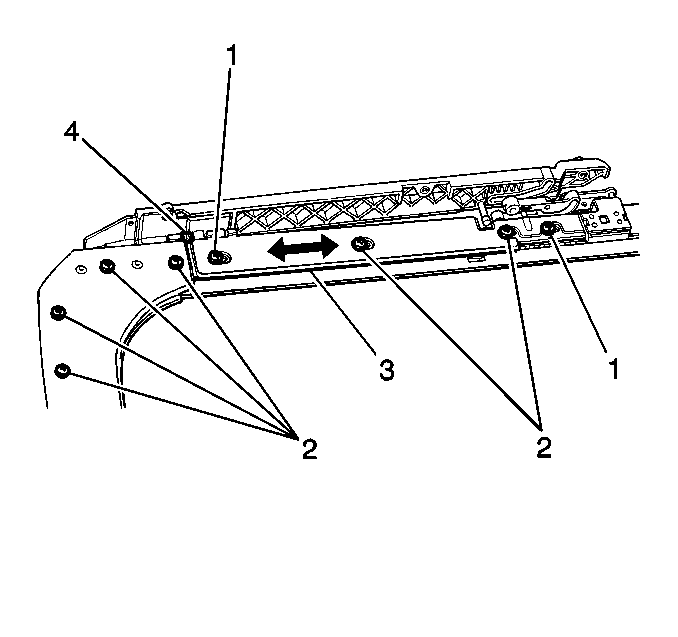
- Loosen the track cover rail fasteners (2) on both sides of the sunroof module assembly.
- For fore/aft adjustment, loosen only those fasteners called out in the graphic.
- Slide the track cover rail on both sides forward or rearward as needed 1 or 2 notches on the adjustment scale (4).
- Close the sliding window panel.
- Inspect the weatherstrip position again using a business card or feeler gage.
- Repeat the adjustment procedure as needed in order to achieve the correct weatherstrip contact.

Tighten the fasteners.
Ensure that the following items are positioned evenly fore/aft:
| • | The left track |
| • | The right track |
Ensure that all of the fasteners are tight after the adjustment procedure.
Vertical Adjustment
In order to provide proper sealing and minimize the any windnoise, adjust the height of the sliding window panel in the following manner:

| • | Equal in height from side-to-side |
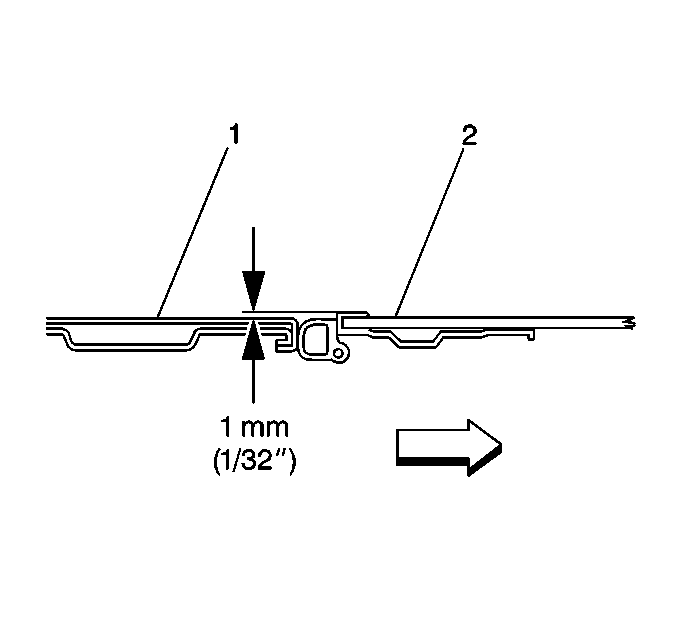
| • | Front of the sliding window panel (1), flush to 1.0 mm (0.040 in) below the roof panel (2) |
| • | Rear of the sliding window panel, flush to 1.0 mm (0.040 in) above the roof panel |
With the sliding window panel in the closed position, inspect the height of the window panel at the following locations:
| • | The front of the window panel |
| • | The rear of the window panel |
If the window panel height is not within the above specifications, perform the following adjustment procedure:
- With the window panel fully closed, slide the sunshade fully rearward.
- Remove the 3 screws from the front edge of the shield ring. Slide the shield ring rearward.
- In order to adjust any corner, complete the following steps:
- After loosening the 2 screws, move the window panel up or down by hand.
- Inspect the sliding window panel height.
- Repeat the adjustment procedures on the other corners as needed in order to meet the correct height specifications.
- Slide the shield ring forward.
- Install the 3 retaining screws.
- Operate the sliding window panel.
- Check the overall adjustment at all four corners.
Important: Adjust the sliding window panel height one corner at a time. Only adjust the corners that are not at the proper height. After adjusting each corner, inspect the height of the entire sliding window panel in order to determine if additional adjustment is required.
Important: DO NOT loosen all 3 of the screws on the side being adjusted.
| 3.1. | Loosen the window panel mounting screw nearest to the corner being adjusted. |
| 3.2. | Loosen the center mounting screw on the side being adjusted. |
Tighten
Tighten the 2 screws to 3 N·m (27 lb in).
Readjust the height as needed.
Tighten
Tighten the 3 screws to 3 lb in).
