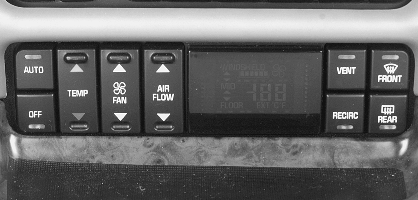
With this system you can control the heating, cooling and ventilation for your vehicle.

Automatic Operation
AUTO (Automatic): Press the AUTO button for automatic control of the inside temperature, the air delivery mode and the fan speed.- Press the AUTO button.
- Adjust the temperature to 75° F (24° C).
- Wait for the system to regulate. This may take from 10 to 30 minutes. Then adjust the temperature, if necessary.
Choosing the coldest or warmest temperature setting will not cause the system to heat or cool any faster. If you set the system at the warmest temperature setting, the system will remain in manual mode at that temperature and it will not go into automatic mode.
In cold weather, the system will start at reduced fan speeds to avoid blowing cold air into your vehicle until warmer air is available. The system will start out blowing air at the floor but may change modes automatically as the vehicle warms up to maintain the chosen temperature setting. The length of time needed for warm up will depend on the outside temperature and the length of time that has elapsed since your vehicle was last driven.
Do not cover the solar sensor located in the center of the instrument panel, near the windshield. For more information on the solar sensor, see "Sensors" later in this section.
Manual Operation
Pressing the FAN or AIR FLOW buttons cancels automatic operation and places the system in manual mode. Press the AUTO button to return to automatic operation.
TEMP (Temperature): To manually adjust the temperature inside the vehicle, push the TEMP arrow. Push the TEMP up arrow for warmer temperature settings and the TEMP down arrow for cooler temperature settings. The setting will be shown on the display. The display will return to the outside temperature after a few seconds.FAN: Pressing the FAN button will display and hold the current fan speed while in manual mode. If you want the fan to run at a lower speed, push the down arrow on the FAN button. If you want to increase the fan speed, push the up arrow on the FAN button. The fan indicators will also be shown on the display. If the airflow seems low when the fan is at the highest setting, the passenger compartment air filter may need to be replaced. For more information, see Passenger Compartment Air Filter .
AIR FLOW: Pressing the AIR FLOW button will display and hold the current setting while in manual mode.
Use the up and down arrows on the AIR FLOW button to cycle through the available modes.
WINDSHIELD-FLOOR: This mode directs most of the airflow to the windshield with some airflow to the outboard outlets (for the side windows) and the floor outlets.MID: This mode directs airflow through the instrument panel outlets.
FLOOR-MID: This mode directs airflow through both the floor and the instrument panel outlets. There is also a small amount of air directed to the windshield and the outboard outlets (for the side windows).
FLOOR: This mode directs most of the airflow to the floor outlets with some directed to the outboard outlets (for the side windows) and the windshield.
OFF: Press the OFF button once to turn off the passenger climate control, if it has been activated. Pressing the OFF button a second time will turn off the main system. The outside temperature will be shown on the display when the system is off.
VENT: Pressing the VENT button allows outside air to flow through your vehicle without the air conditioning compressor working. To turn off the VENT selection, push the VENT button again. Selecting the VENT and AUTO buttons at the same time allows the system to control the airflow automatically without using the air conditioning compressor or the recirculation mode.
RECIRC (Recirculation): Press this button to limit the amount of outside air coming into the vehicle. It can be used to prevent outside air and odors from entering your vehicle or to help heat or cool the air inside your vehicle more quickly. Press this button to turn the recirculation mode on or off. When the button is pressed, an indicator light will come on. The recirculation mode cannot be used with the FRONT defrost or VENT mode. On hot days, open the windows to let hot air escape; then close them. This helps to reduce the time it takes for your vehicle to cool down. It also helps the system to operate more efficiently. For quick cool down on hot days, press the AUTO button and the system will automatically enter recirculation mode and the temperature will be at the full cold position for maximum cooling. Using these settings together for long periods of time may cause the air inside of your vehicle to become too dry. To prevent this from happening, after the air in your vehicle has cooled, turn the recirculation mode off. The air conditioning system removes moisture from the air, so you may sometimes notice a small amount of water dripping underneath your vehicle while idling or after turning off the engine. This is normal.
Sensors
The solar sensor on your vehicle monitors the solar radiation and the air inside of your vehicle, then uses the information to maintain the selected temperature by initiating needed adjustments to the temperature, the fan speed and the air delivery system. The system may also supply cooler air to the side of the vehicle facing the sun. The recirculation mode will also be activated, as necessary. Do not cover the solar sensor located in the center of the instrument panel, near the windshield, or the system will not work properly.
Defogging and Defrosting
Fog on the inside of windows is a result of high humidity (moisture) condensing on the cool window glass. This can be minimized if the climate control system is used properly.
FRONT: Press the FRONT button to defrost the windshield by directing airflow toward the windshield and outboard outlets (for the side windows). To turn off FRONT, press the AUTO or AIR FLOW buttons. If the AIR FLOW up button is pressed while in the FRONT defrost mode, the system will direct the air toward the instrument panel outlets. If the AIR FLOW down button is pressed while in the FRONT defrost mode, the system will direct the air toward the floor, and the FRONT defrost mode will cancel. Do not drive the vehicle until all the windows are clear.Rear Window Defogger
The rear window defogger uses a warming grid to remove fog or frost from the rear window.
REAR: Press this button to turn the rear window defogger on or off. Be sure to clear as much snow from the rear window as possible. At speeds above 30 mph (48 km/h), the defogger will operate continuously until you press the REAR button again. After 10 minutes of driving below 30 mph (48 km/h), the defogger will turn off automatically. If you need additional warming time, push the button again. The system will then operate for five minutes before going off by itself. If your vehicle has heated outside rearview mirrors, the mirrors will heat to help clear fog or frost from the surface of the mirror when the rear window defogger button is pressed.Notice: Do not use a razor blade or sharp object to clear the inside rear window. Do not adhere anything to the defogger grid lines in the rear glass. These actions may damage the rear defogger. Repairs would not be covered by your warranty.
Passenger Temperature Control
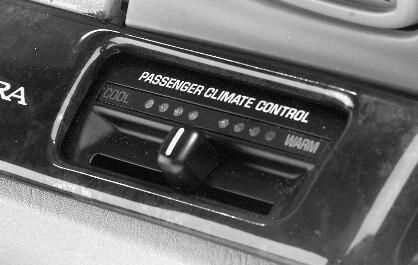
If your vehicle has the optional separate passenger's temperature control, then the driver and the right front passenger can select separate temperature settings. This feature allows the front passenger to select a temperature that is 5° F (3° C) warmer or cooler than the driver's selected temperature.

The lever for this feature is located on the right side of the instrument panel.
Slide the lever toward WARM for warmer air or toward COOL for cooler air. Press OFF on the main climate control system once to turn off the passenger's temperature control.
When this lever is moved, the current inside temperature will appear on the display for a few seconds, then the outside temperature will appear.
