NVG 126/226 Transfer Case Grating/Grinding Noise When 4WD is Engaged, Service 4WD Lamp On, DTC C0327 Set (Replace Clutch Pressure Plate Bearing Assembly and Clutch Lever)

| Subject: | NVG 126/226 Transfer Case Grating/Grinding Noise When 4WD is Engaged, Service 4WD Lamp On, DTC C0327 Set (Replace Clutch Pressure Plate Bearing Assembly and Clutch Lever) |
| Models: | 2004-2007 Buick Rainier |
| 2002-2008 Chevrolet TrailBlazer Models |
| 2002-2008 GMC Envoy Models |
| 2002-2004 Oldsmobile Bravada |
| 2005-2008 Saab 9-7X |
| with Four-Wheel Drive or All-Wheel Drive |
| and Active All-Wheel Drive (RPO NP4) or Active Two-Speed (NP8) Transfer Case |
| Built Prior to September 18, 2007 (NVG 126) or September 21, 2007 (NVG 226) |
This bulletin is being revised to update the correction information to include a procedure to reindex the transfer case encoder motor (actuator). This procedure is being provided to help reduce unnecessary warranty expenses. Please discard Corporate Bulletin Number 08-04-21-001A (Section 04 - Transmission/Transaxle).
Condition
Some customers may comment on a grinding type noise in the transfer case when 4WD is engaged in either AUTO or 4WD mode. This noise may also be accompanied by the SERVICE 4WD lamp being illuminated and DTC C0327 set.
This condition is more prevalent on vehicles where 4WD is continuously used.
Cause
This noise may be caused by a faulty clutch pressure plate bearing.
Correction
Do This | Don't Do This |
|---|---|
Replace the clutch pressure plate bearing assembly and clutch lever. Perform the transfer case encoder motor (actuator) indexing procedure. | Do not replace the transfer case encoder motor (actuator). |
A more robust clutch pressure plate bearing, inner plate and clutch lever has been released for service. Replace the clutch pressure plate bearing, inner plate and clutch lever. Refer to the Transfer Case Disassemble and Transfer Case Assemble procedures in SI. Former and new parts should not be intermixed during transfer case overhaul and they are to be used in sets only.
DO NOT replace the transfer case assembly unless extensive internal damage has occurred.
Important: When the clutch pressure plate bearing fails, it causes the clutch lever to over-travel, allowing the transfer case encoder motor (actuator) to rotate to an invalid position. Engineering has developed a tool and procedure to reindex the transfer case encoder motor (actuator) so it can be reused. Use the specific procedure listed below.
NVG 126 Transfer Case Encoder Motor (Actuator) Indexing Procedure
Tools Required:
| • | (1) EL-49741 9 Volt Encoder Motor (Actuator) Jumper Harness (Tool can be obtained from SPX/Kent Moore by calling 1-800-GM-TOOLS (1-800-468-6657)) |
| • | (2) J-35616-5 Terminal Test Adapter (Test Probe) |
| • | (1) 9 Volt Battery (obtain locally) |
- Remove the encoder motor (actuator) from the transfer case.
- Using the J-35616-5, attach the RED lead from the jumper harness to the Motor Control B terminal (pin E - wire color red) of the transfer case encoder motor (actuator) wiring harness connector.
- Using the J-35616-5, attach the BLACK lead from the jumper harness to the Motor Control A terminal (pin D - wire color black) of the transfer case encoder motor (actuator) wiring harness connector.
- Touch the battery terminals of the 9-volt battery to the battery terminals of the jumper harness. This will rotate the encoder motor shaft in either a clockwise or counterclockwise rotation depending on battery orientation.
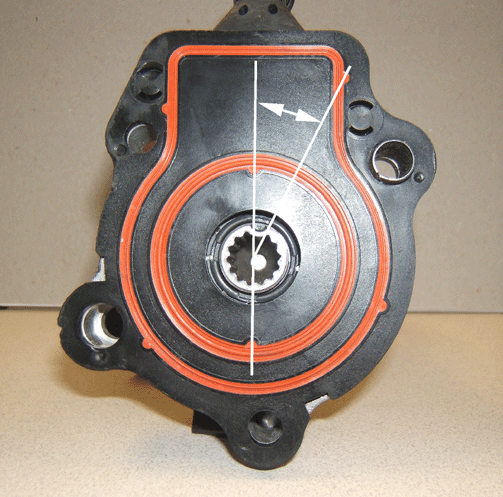
- Using the 9-volt battery, rotate the encoder motor (actuator) shaft until the keyway on the motor shaft is between the two reference lines as shown in the picture. This orientates the encoder motor (actuator) to NEUTRAL for ease of assembly.
- Install the encoder motor (actuator) on the control actuator lever shaft of the transfer case.
Note: If available, another option is to rotate the encoder motor (actuator) shaft until a shipping plug from a new encoder motor (actuator) can be installed.
NVG 226 Transfer Case Encoder Motor (Actuator) Indexing Procedure
Tools Required:
| • | (1) EL-49741 9 Volt Encoder Motor (Actuator) Jumper Harness (Tool can be obtained from SPX/Kent Moore by calling 1-800-GM-TOOLS (1-800-468-6657)) |
| • | (4) J-35616-5 Terminal Test Adapter (Test Probe) |
| • | (2) 9 Volt Battery (obtain locally) |
- Remove the encoder motor (actuator) from the transfer case.
- Using the J-35616-5, attach the RED lead from one of the jumper harnesses to the Battery Positive Voltage terminal (pin F - wire color orange) of the transfer case encoder motor (actuator) wiring harness connector.
- Using the J-35616-5, attach the BLACK lead from the jumper harness to the Lock Solenoid Control terminal (pin G - wire color tan) of the transfer case encoder motor (actuator) wiring harness connector.
- Attach a 9-volt battery to this harness. You will hear the encoder motor (actuator) unlock.
- Using the J-35616-5, attach the RED lead from the other jumper harness to the Motor Control B terminal (pin E - wire color red) of the transfer case encoder motor (actuator) wiring harness connector.
- Using the J-35616-5, attach the BLACK lead from the jumper harness to the Motor Control A terminal (pin D - wire color black) of the transfer case encoder motor (actuator) wiring harness connector.
- Touch the battery terminals of the second 9-volt battery to the battery terminals of the second jumper harness. This will rotate the encoder motor (actuator) shaft in either a clockwise or counterclockwise rotation depending on battery orientation.
- Using the 9-volt battery, rotate the encoder motor (actuator) shaft until the keyway on the motor shaft is between the reference lines as shown in the picture. This orientates the encoder motor (actuator) to NETURAL for ease of assembly.
- Wiggle the control actuator lever shaft of the transfer case by hand to find the low point of the cam.
- Install the encoder motor (actuator) on the control actuator lever shaft of the transfer case.
- After installation, the transfer case will perform a learn procedure upon a requested MODE change.
Note: If available, another option is to rotate the encoder motor (actuator) shaft until a shipping plug from a new encoder motor (actuator) can be installed.
Parts Information
Part Number | Description |
|---|---|
19178973 | Clutch Pressure Plate Bearing Assembly with Inner Plate |
19178970 | Clutch Lever |
24242560 (NVG 126) | Transfer Case |
24242561 (NVG 226) | Transfer Case |
For warranty claims, submit batteries as parts.
Warranty Information (excluding Saab U.S. Models)
For vehicles repaired under warranty, use the appropriate labor operation for the repair performed:
Labor Operation | Description | Labor Time |
|---|---|---|
K4400* | Transfer Case Assembly - R&R | Use Published Labor Operation Time |
K4410 | Transfer Case Assembly - Replace | Use Published Labor Operation Time |
* Includes time to perform the transfer case encoder motor (actuator) indexing procedure. | ||
Warranty Information (Saab U.S. Models)
For vehicles repaired under warranty, use:
Labor Operation | Description | Failed Object | Fault/Reason Code | Location Code | Warranty Type | Repair/Action Code | Labor Time |
|---|---|---|---|---|---|---|---|
4411001* | Transfer Case Assembly - R&R (Engine Code S) | 44100 | 47 | 0 | 01 | 01 | Use Published Labor Operation Time |
4411007* | Transfer Case Assembly - R&R (Engine Code M) | 44100 | 47 | 0 | 01 | 01 | Use Published Labor Operation Time |
4411009 | Transfer Case Assembly - Replace (Engine Code S) | 44100 | 47 | 0 | 01 | 01 | Use Published Labor Operation Time |
4411010 | Transfer Case Assembly - Replace (Engine Code M) | 44100 | 47 | 0 | 01 | 01 | Use Published Labor Operation Time |
* * Includes time to perform the transfer case encoder motor (actuator) indexing procedure. | |||||||
