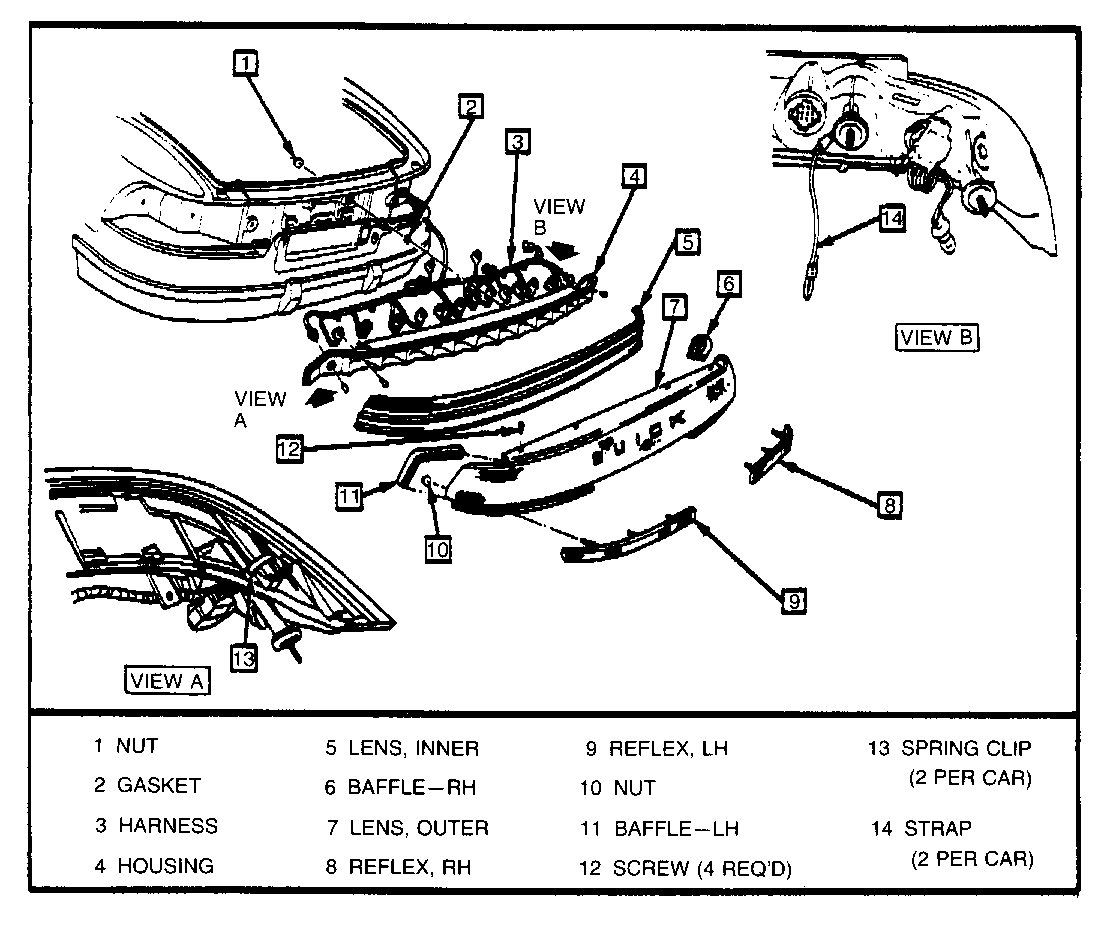
SERVICE MANUAL SUPPLEMENT TAIL LAMP REMOVAL/INSTALLATION

VEHICLES AFFECTED: 1988 BUICK REATTA
The following information supplements the 1988 Reatta Service Manual for the rear tail lamp assembly removal and installation procedures.
Rear Tail Lamp Assembly Removal
1. Remove the rear trim panel.
2. Remove the ten wing nuts (1) which retain the tail lamp assembly.
3. Place shop towels on the bumper, then carefully remove the assembly from the body and allow assembly to rest on the bumper by the straps (14).
4. Disconnect the lamp sockets and harness clips (3) from the tail lamp assembly.
5. Remove the straps (14) from the body.
6. Place the tail lamp on a protective surface.
7. Remove the four screws along the top of the flange of the lamp assembly.
8. Remove the two spring clips (13) from the lower bottom end of the lamp on the backside (NOTE: Clips hold the outer lens to the housing).
9. Pry the outer lens (7) from the inner lens (5) starting at one end and working to the opposite end. Progressively loosen each snap tab along the top and bottom as the outer lens is removed from the inner lens.
10. Remove the baffles (6),(ll) from both ends of the outer lens.
11. Remove the two reflex assemblies (8),(9) from the outer lens (7).
12. Pry the inner lens (5) from the housing (4) starting at one end and working to the opposite end. Progressively loosen each snap tab along the top and bottom as the inner lens is removed from the housing.
Rear Tail Lamp Assembly Installation
1. Inspect the butyl bead in the housing channel. If any section is missing butyl fill in these areas with prewarmed black butyl 3M Part Number 08632 or equivalent.
2. Clean up any excess butyl strings that are left lying on the housing.
3. Centre the inner lens (5) on the housing (4) using the location tabs.
4. Progressively press the inner lens (5) into the butyl of the housing. Start at the center and work outward toward one end until all snap tabs are engaged. Repeat for the other end of the lens.
5. Inspect the butyl bead in the inner lens channel. If any section is missing butyl, fill in these areas with prewarmed black butyl 3M Part Number 08632 (window weld Ribbon sealer) or equivalent.
6. Clean up any butyl strings that are left on the inner lens. If butyl strings are not removed from the inner lens face, they will be seen through the outer lens.
7. Install the two reflex assemblies (8),(9) to the outer lens.
8. Install the baffles (5),(ll) to both ends of the outer lens.
9. Centre the outer lens (7) on the inner lens (5) using locating tabs.
10. Progressively press the outer lens (7) into the butyl of the inner lens. Start at the center and work outward toward one end until all snap tabs are engaged. Repeat for the other end of the lens.
11. Install the four screws along the top of the flange of the lamp assembly.
12. Install the straps (14) to the body.
13. Install the two spring clips (13) to the lower bottom end of the lamp on the backside.
14. Install the lamp sockets and harness clips (3) to the tail lamp assembly.
15. Carefully install the tail lamp to the body.

General Motors bulletins are intended for use by professional technicians, not a "do-it-yourselfer". They are written to inform those technicians of conditions that may occur on some vehicles, or to provide information that could assist in the proper service of a vehicle. Properly trained technicians have the equipment, tools, safety instructions and know-how to do a job properly and safely. If a condition is described, do not assume that the bulletin applies to your vehicle, or that your vehicle will have that condition. See a General Motors dealer servicing your brand of General Motors vehicle for information on whether your vehicle may benefit from the information.
