CAMPAIGN: LEFT FRT. BRAKE PIPE INTERFER. W/CC SERVO BRACKET

Models: 1989 Riviera, Reatta and Toronado with Anti-Lock Brake System (JL9)
TO: ALL GENERAL MOTORS DEALERS
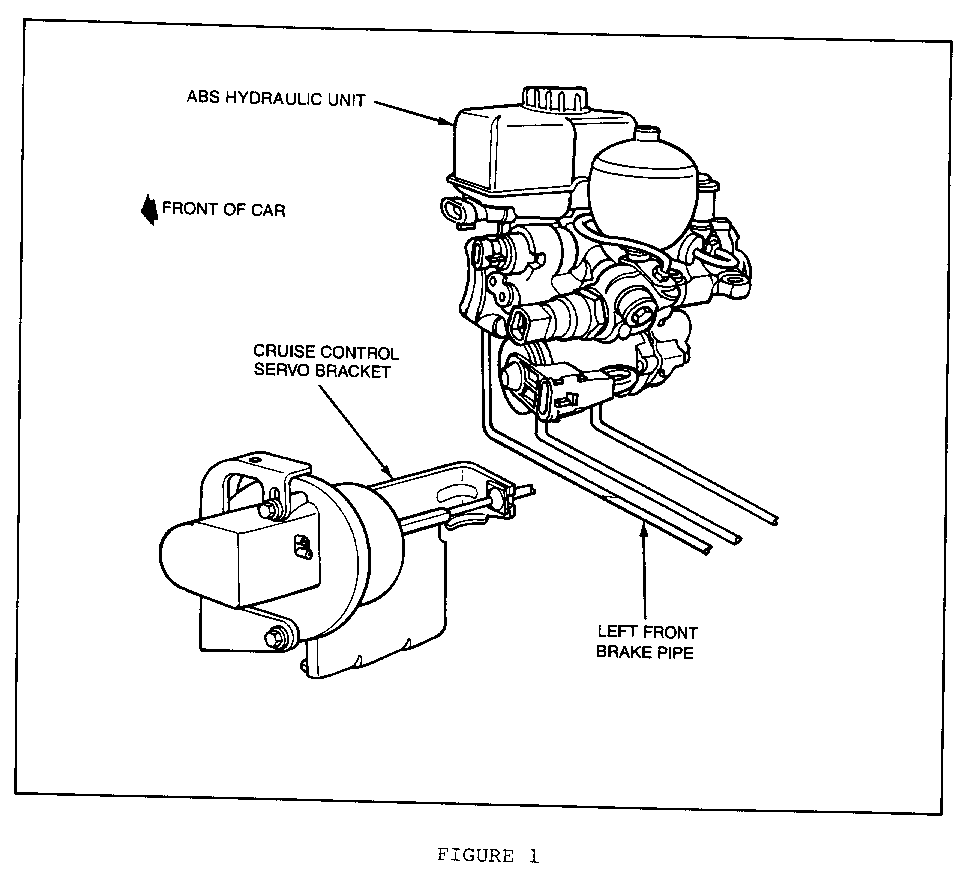
General Motors of Canada has determined that a defect which relates to motor vehicle safety exists in some 1989 Buick Riviera, Reatta and Oldsmobile Toronado models equipped with Anti-Lock Brake System (ABS). Involved vehicles may have been assembled with the left front brake pipe too close to the cruise control servo bracket. This condition could allow the left front brake line to contact the cruise control servo bracket. Over time, this contact could allow the brake line to wear through, causing a loss of brake fluid and a partial loss of braking capability. Part of the brake system will still work and allow the vehicle to be stopped, but over a greater distance. A partial loss of braking capability at a time when minimum stopping distance is required could result in a vehicle crash without prior warning.
To correct this condition, Dealers are to replace the left front brake pipe assembly on all vehicles involved according to the instructions in the Service Procedure section of this bulletin.
VEHICLES INVOLVED:
Certain 1989 Riviera, Reatta and Toronado model vehicles equipped with Anti-Lock Brake System (Option Code JL9), within the following vehicle breakpoints:
YEAR PLANT FROM THROUGH AND INCLUDING ---- ----- ---- ---------------------- Riviera 1989 Hamtramck SOP KU413033
Reatta 1989 Reatta Craft Centre SOP KB904725
Toronado 1989 Hamtramck SOP KU306630
All affected vehicles have been identified by the VIN listing provided to involved Dealers with this bulletin. Any Dealer not receiving a listing was not shipped any of the affected vehicles.
DEALER CAMPAIGN RESPONSIBILITY:
Dealers are to service all vehicles subject to this campaign at no charge to owners, regardless of mileage, age of vehicle, or ownership, from this time forward.
Whenever a vehicle subject to this campaign is taken into your new or used vehicle inventory, or it is in your Dealership for service in the future, you should take the steps necessary to be sure the campaign correction has been made before reselling or releasing the vehicle.
Owners of vehicles recently sold from your new vehicle inventory are to be contacted by the Dealer, and arrangements made to make the required modification according to instructions contained in this bulletin.
CAMPAIGN PROCEDURE:
Refer to Section 4 of the Service Policies and Procedures Manual for the detailed procedure on handling Product Campaigns. Dealers are requested to complete the campaign on all transfers as soon as possible.
OWNER NOTIFICATION:
All owners of record at the time of campaign release are shown on the attached computer listing and have been notified by first class mail from General Motors. The listings provided are for campaign activity only and should not be used for any other purpose.
PARTS INFORMATION:
Parts required to complete this campaign should be ordered through regular channels, as follows:
Part Number Description Quantity/Vehicle ----------- ----------- ---------------- 3521577 Pipe Assembly - Front Brake Left 1
PARTS AND LABOUR CLAIM INFORMATION:
Credit for the campaign work performed will be paid upon receipt of a properly completed campaign claim card, RAPID terminal or DCS transmission in accordance with the following:
Repair Code Description Time Allowance ----------- ------------ --------------- 2A Replace Left Front Brake Pipe Assembly 1.0
An allowance of $3.54 has been included in 2A for 1 litre of DOT 3 Brake Fluid.
Time allowance includes 0.1 hour for Dealer administrative detail associated with this campaign. Parts credit will be based on Dealer net plus 30% to cover parts handling.
SERVICE PROCEDURE:
CAUTION:
Before disconnecting any hydraulic lines, hoses, or fittings, be sure that the accumulator is fully depressurized. Failure to depressurize the hydraulic accumulator may result in personal injury or damage to painted surfaces.
The following steps are to be used to replace the left front brake pipe assembly. Vehicle should be located over a hoist:
1. With the ignition off, depressurize the hydraulic accumulator by pumping the brake pedal a minimum of 25 times using a pedal force of approximately 50 lbs. When a definite increase in pedal effort is felt, stroke the pedal a few additional times. This should remove all hydraulic pressure from the system.
2. Raise hood and install left fender cover.
3. To provide access to the brake pipe, remove all electrical connections to the hydraulic brake unit.
4. Loosen the left front brake fitting at the hydraulic brake unit. The left front brake pipe assembly is the forward most pipe on the bottom of the brake hydraulic unit (See Figure 1).
5. Remove the left front tire and wheel assembly and wheel covers, if so equipped. To provide adequate clearance, turn the front wheel to the left.
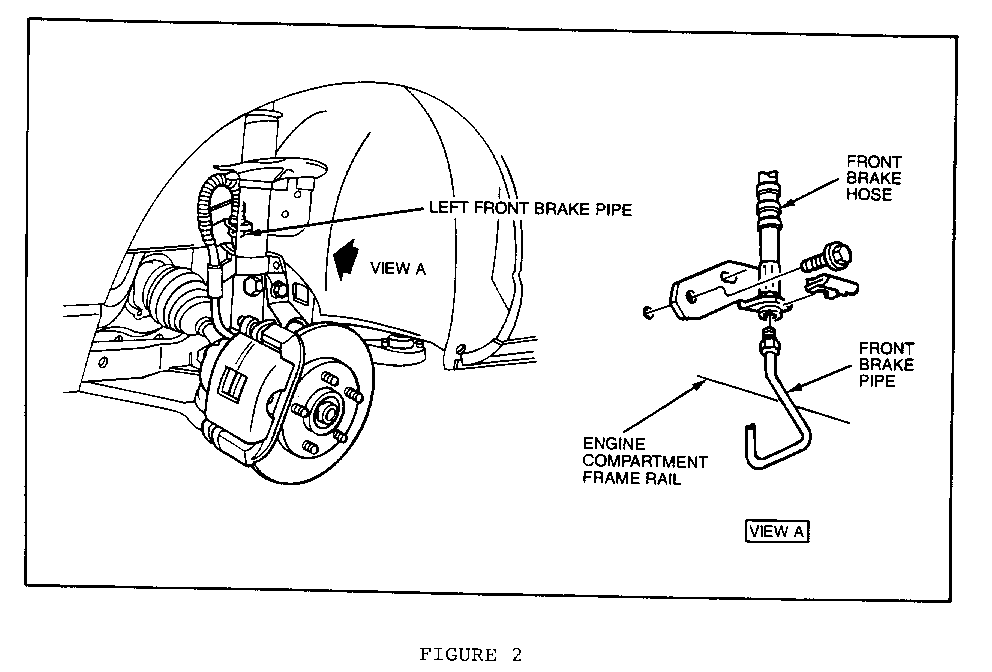
6. Loosen the left front brake line fitting at the hose end (See Figure 2).
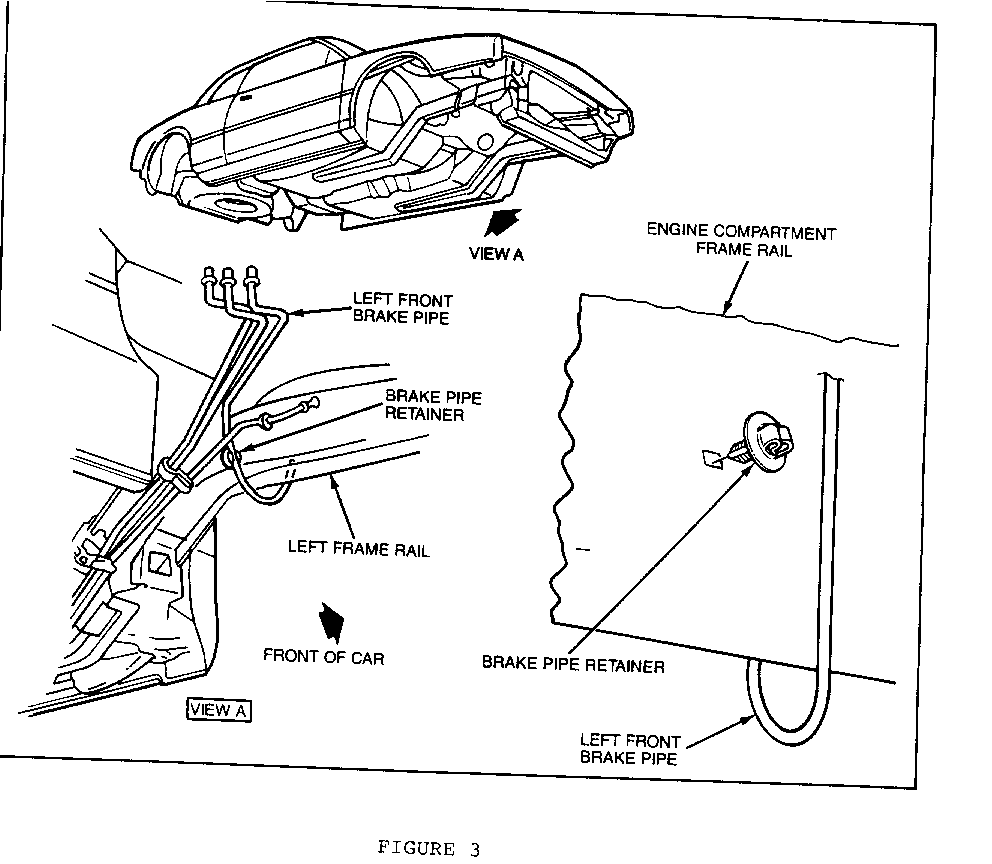
7. Remove the left front brake pipe assembly. The brake pipe is attached to a clip which is held in place to the inner fender in the engine compartment (See Figure 3). Remove the clip with the brake line assembly and attach it to the replacement brake pipe assembly (Part Number 3521577).
8. Route the new brake pipe assembly into position and finger tighten the fitting at the brake hydraulic unit. Verify that the left front brake pipe assembly is properly positioned before tightening.
9. Tighten the brake fitting at the left front wheel 15 N.m (11 lb. ft.).
10. Tighten the line at the brake hydraulic unit 12 N.m (9 lb. ft.).
11. Secure the left front brake pipe clip into the inner fender in the engine compartment.
12. Verify that brake lines do not contact the cruise control servo bracket or cruise cable. Verify that all brake pipes do not contact each other in the area of the brake hydraulic unit and cruise control servo bracket. Bend brake pipes away (rearward) from the left front pipe to maintain a minimum of 15 mm (.6 in.) clearance, if required.
13. Replace all electrical connections.
14. Bleed left front brake circuit. Follow proper bleeding procedure in Section 5E of the Service Manual.
15. Turn ignition on, check for leaks, and proper brake pedal "feel" and effort.
16. Replace left front tire and wheel assembly and wheel cover, if so equipped.
17. Install Campaign Identification Label and remove fender cover and close hood.
18. Verify that brake system is operating properly.
INSTALLATION OF CAMPAIGN IDENTIFICATION LABEL
Clean surface of radiator upper mounting panel and apply a Campaign Identification Label. Make sure the correct campaign number is inserted on the label. This will indicate that the campaign has been completed.
Dear General Motors Customer:
This notice is sent to you in accordance with the requirements of the Canada Traffic and Motor Vehicle Safety Act.
General Motors of Canada has determined that a defect which relates to motor vehicle safety exists in some 1989 Buick Riviera, Reatta and Oldsmobile Toronado models equipped with Anti-Lock Brake System (ABS). Involved vehicles may have been assembled with the left front brake pipe too close to the cruise control servo bracket. This condition could allow the left front brake line to contact the cruise control servo bracket. Over time, this contact could allow the brake line to wear through, causing a loss of brake fluid and a partial loss of braking capability. Part of the brake system will still work and allow the vehicle to be stopped, but over a greater distance. A partial loss of braking capability at a time when minimum stopping distance is required could result in a vehicle crash without prior warning.
To prevent this condition from occurring, it will be necessary to replace the left front brake pipe with a newly designed pipe assembly on your vehicle. This service will be performed at no charge to you.
Please contact your GM Dealer to arrange a service date. Instructions for making this correction have been sent to your GM Dealer. The labour time necessary to perform this service is approximately fifty-five (55) minutes. Please ask your Dealer if you wish to know how much additional time will be necessary to process your vehicle. This letter identifies your vehicle. Presentation of this letter to your Dealer will assist their Service personnel in completing the necessary correction to your vehicle in the shortest possible time.
Further assistance, if required, may be obtained from the General Motors Zone Office nearest you. Your vehicle Owner's Manual provides the location and phone number of each respective Zone Office.
We are sorry to cause you this inconvenience; however, we have taken this action in the interest of your continued satisfaetion with our products.


General Motors bulletins are intended for use by professional technicians, not a "do-it-yourselfer". They are written to inform those technicians of conditions that may occur on some vehicles, or to provide information that could assist in the proper service of a vehicle. Properly trained technicians have the equipment, tools, safety instructions and know-how to do a job properly and safely. If a condition is described, do not assume that the bulletin applies to your vehicle, or that your vehicle will have that condition. See a General Motors dealer servicing your brand of General Motors vehicle for information on whether your vehicle may benefit from the information.
