CAMPAIGN:RESTRICTED CATALYTIC CONVERTER (REPLACE CONVERTER)

MODELS: 1983 Oldsmobile, Pontiac Buick and Cadillacs with 4.1L (LC4) VIN (Code 4) engine and NB1
To: All Affected Dealers
DEFECT INVOLVED:
General Motors of Canada has determined that certain 1983 Buick Electra, LeSabre, Regal, Riviera; Oldsmobile Regency, Toronado; Pontiac Grand Prix; Cadillac Deville, Eldorado and Seville models equipped with 4.lL V-6 engines may develop a restricted catalytic converter resulting in poor engine performance or a no-start condition. (12 Vehicles). To prevent the possibility of this condition occurring on vehicles involved, the catalytic converter will require replacement.
VEHICLES INVOLVED:
1983 vehicles equipped with 4.lL V-6 engines and the 3C system (NBl).
All affected vehicles have been identified by the VIN listing provided to involved Dealers with this bulletin. Any Dealer not receiving a listing was not shipped any of the affected vehicles.
DEALER CAMPAIGN RESPONSIBILITY:
Dealers are to service all vehicles subject to this campaign at no charge to owners, regardless of mileage, age of vehicle, or ownership, from this time forward.
Whenever a vehicle subject to this campaiyn is taken into your new or used vehicle inventory, or it is in your Dealership for service in the future, you should take the steps necessary to be sure the campaign correction has been made before reselling or releasing the vehicle.
Owners of vehicles recently sold from your new vehicle inventory are to be contacted by the Dealer, and arrangements made to make the required modification according to instructions contained in this bulletin.
CAMPAIGN PROCEDURE:
Refer to Section 4 of the Service Policies and Procedures Manual for the detailed procedure on handling Product Campaigns. Dealers are requested to complete the campaign on all transfers as soon as possible.
OWNER NOTIFICATION:
All owners of record at the time of campaign release are shown on the attached computer listing and have been notified by first class mail from General Motors. The listings provided are for campaign activity only and should not be used for any other purpose.
PARTS INFORMATION:
Parts required for this modification should be ordered through regular channels.
Description Part Number ----------- ----------- Kit, Catalytic Converter with Upper Beads 25056983 (Includes Fill Hole Plug)
*Package, Lower Bed Bead 25056903 (As needed to Fill Converter)
Clamp, Converter Front Exhaust 15595206 (If needed)
Bolt, Intermediate Exhaust Pipe to Converter 11502877 (Two per Vehicle, if needed)
Bolt, Exhaust Hanger to Converter 11504596 (Two per Vehicles if needed)
* A lower Bed Bead Package, when used along with the beads removed from the old converter, will complete approximately ten (10) vehicles.
Additional fill hole plugs if required, may be ordered using part number 8998202.
SPECIAL TOOLS
A. Converter Bead Replacement Tool Kit
J-34155-1 Sifting Pan (1) J-34155-2 Storage Pans (2) J-34155-3 Funnel (1)
B. Converter Plug Installer
J-34118
Tools are the same ones used in the previous converter campaigns. Please see your DSM.
PARTS AND LABOUR CLAIM INFORMATION:
Credit for the campaign work performed will be paid upon receipt of a properly completed campaign claim card or RAPID terminal transmission in accordance with the following:
Repair Code Operation Time Allowance ----------- --------- -------------- 1A Inspect Catalytic .3
Converter 2A Inspect and replace 1.0 catalytic converter
Time allowance includes 0.1 hour for Dealer administrative detail associated with this campaign. Parts credit will be based on Dealer net plus 30% to cover parts handling.
SERVICE PROCEDURE
a. Inspection ---------- 1. Install seat and fender covers and raise vehicle on hoist.
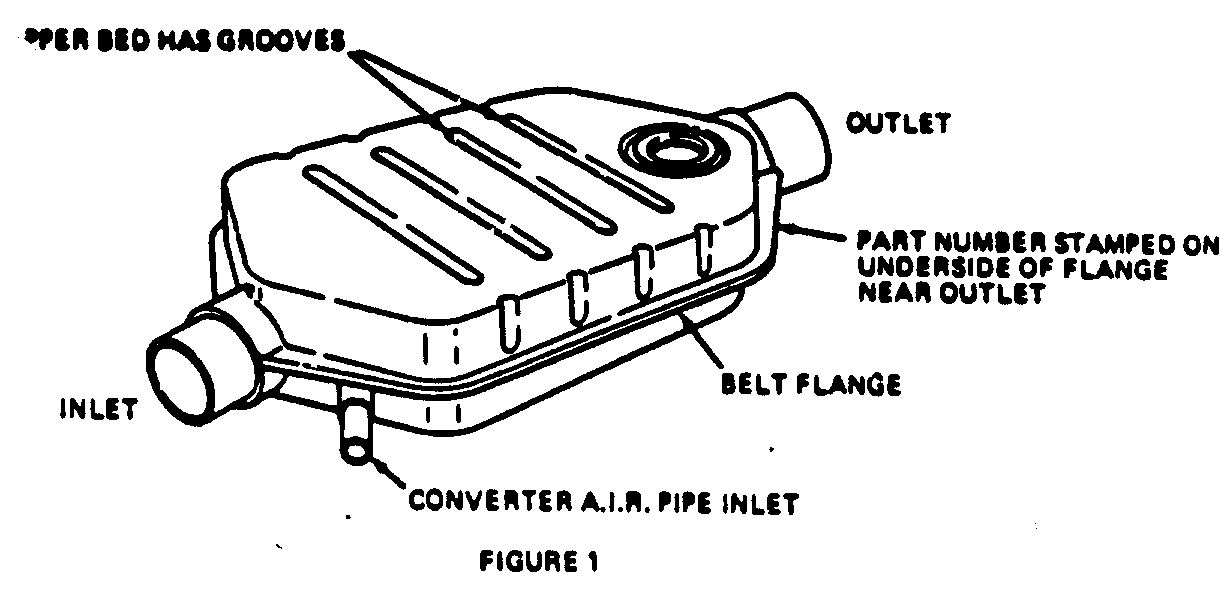
2. Determine part number of converter on vehicle. Refer to Figure 1 for location of catalytic converter part number.
STEP A. If converter is part number 25056620, it does not require replacement. Lower vehicle and install campaign identification label.
STEP B. If the converter is not identified aspart number 25056620, it should be replaced as instructed in this procedure.
CONVERTER REPLACEMENT
CAUTION:
------- The catalytic converter beads contain platinum, palladium, and/or rhodium. Additionally, the beads may be finely coated with lead compounds. Therefore, precautions should be taken to minimize dust generaLion during the replacement procedure. These precautions include:
Catalyst dust should be controlled by wetting with water prior to bead removal, as described in Step 4.
The use of a suitable dust mask, rubber gloves and safety glasses is recommended when handling catalyst beads.
Applicable OSHA standards should be reviewed. Allow converter to cool before handling.
1. Loosen clamp and disconnect AIR pipe from converter.
2. Disconnect intermediate exhaust pipe and hanger from rear of converter.
3. Remove clamp and disconnect converter from front exhaust pipe.
4. Stand the old converter upright on the inlet end and pour 16 ounces of water into the outlet end to control catalyst dust.
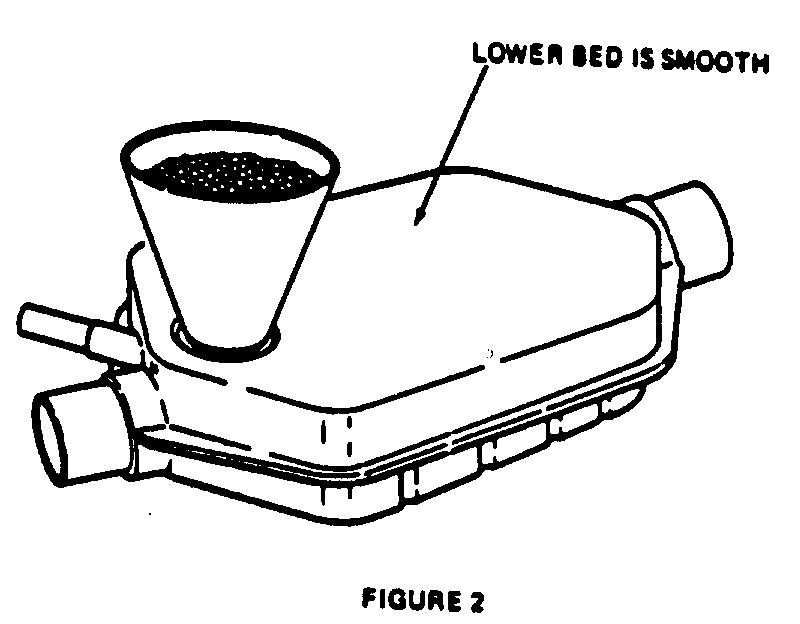
5. Using a hammer and chisel, remove the fill hole plug from the lower bed. the converter is the lower bed side.) see Figures 1 and 2.
6. Hold the converter over a clean pan (J-34155-2) and empty the catalyst beads by shaking. It may be necessary to tap the converter belt flange with a hammer to loosen the beads.
7. Pour the beads into a sifting pan (J-34155-1) and sift to remove undersized beads.
8. Prop the new converter up at a 45 degree angle with the lower bed fill hole at the top.
9. Using funnel J-34155-3, pour the sifted beads into the lower bed of the new converter. (see Figure 2) Tap belt flangs with rubber mallet to allow beads to settle. Continue filling and tapping until converter is full. If additional beads are required to completely fill the lower bed, it will be necessary to obtain a lower bed bead kit from the parts department.
Excess beads from the kit should be saved in a clean container for future use.
10. Lay the converter down on a flat surface with the lower bed fill hole on top.
11. Insert the fill plug into the lower bed fill hole. The fill plug outer rim must rest against the converter body.
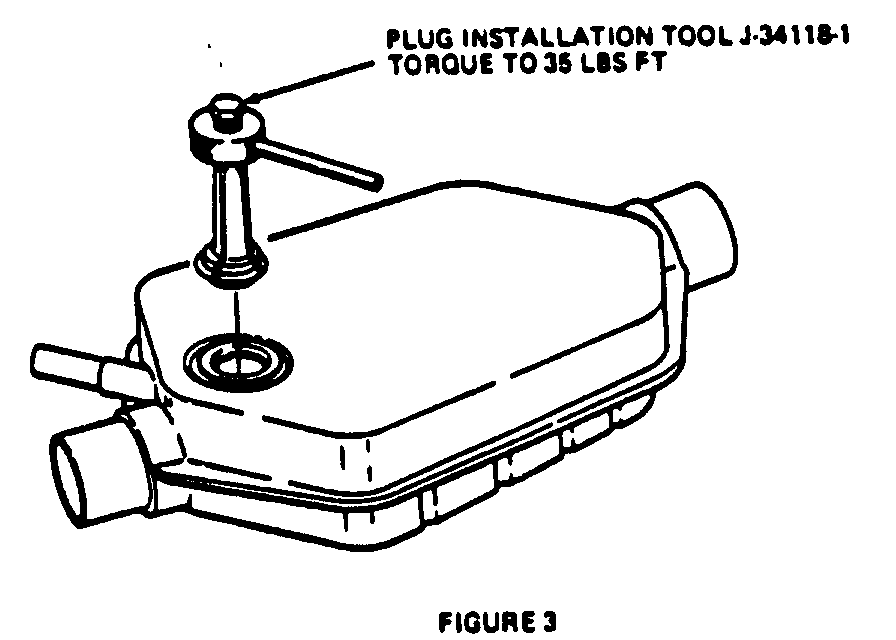
12. Insert tool J-34188 into fill plug and tighten to a torque 47 N.m (35 lb. ft.). (see Figure 3).
13. Install new convert in vehicle reversing removal procedure (Steps 1, 2 and 3) and using new bolts and clamp as required. Torque front clamp nuts to 35 N.m (26 lb. ft.), intermediate pipe to converter bolts to 20 N.m (15 lb. ft.) and hanger to converter bolts to 52 N.m (38 lb. ft.).
14. Lower vehicle.
INSTALLATION OF CAMPAIGN IDENTIFICATION LABEL
Clean surface of radiator upper mounting panel and apply a Campaign Identification Label. Make sure the correct campaign number is inserted on the label. This will indicate that the campaign has been completed.


General Motors bulletins are intended for use by professional technicians, not a "do-it-yourselfer". They are written to inform those technicians of conditions that may occur on some vehicles, or to provide information that could assist in the proper service of a vehicle. Properly trained technicians have the equipment, tools, safety instructions and know-how to do a job properly and safely. If a condition is described, do not assume that the bulletin applies to your vehicle, or that your vehicle will have that condition. See a General Motors dealer servicing your brand of General Motors vehicle for information on whether your vehicle may benefit from the information.
