BATTERY HEAT SHIELD ADDITION FOR SUGGESTED HIGH AMBIENT

MODELS AFFECTED: EARLY BUILT 1988 BUICK REGAL
Condition
The battery in the 1988 Regal may be subjected to high underhood temperatures when driven in very high outside temperatures, such as during summers in the Southwest. This could, under some circumstances, shorten the life expectancy of the battery.
Correction
This condition can be prevented by installing a heat shield and related closeout panels around the battery following the instructions below. This change will be on all production Regals after VIN J1429361.
NOTICE: Regals built after VIN J1425470 had all parts except the front closeout panel (Figure 3) installed. To be effective, all the parts must be installed. On Regals with VIN's from J1425470 to J1429361, only the closeout panel will have to be added.
1. Disconnect negative battery cable.
2. Remove diagonal brace (three bolts).
3. Remove air filter cover. Lift housing over stud and set aside.
4. Cover air intake openings with clean shop towels, to prevent any metal chips from entering during drilling.
5. Remove windshield washer bottle (two bolts), and set aside. It is not necessary to remove hose or electrical connector.
6. Disconnect positive battery cable.
7. Remove battery (one bolt).
8. Disconnect vacuum harness at vacuum storage tank, at the cruise control servo (if equipped), and at the engine vacuum source.
9. Install replacement vacuum harness. Use part number:
10094191 with cruise control 10094192 without cruise control
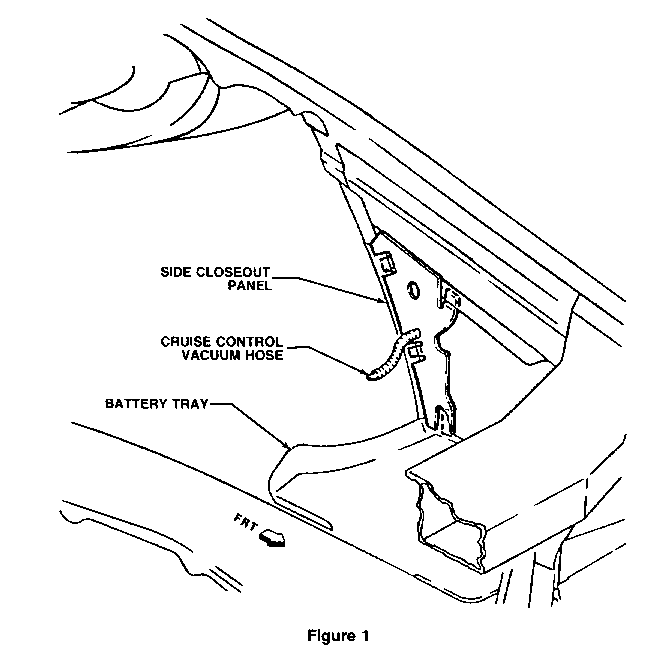
10. Install side closeout panel. Use Part Number 10097287. See Figure 1.
11. Remove wiring harness hold down clip.
12. Remove the four retention tabs from the front closeout panel (Part Number 10097286).
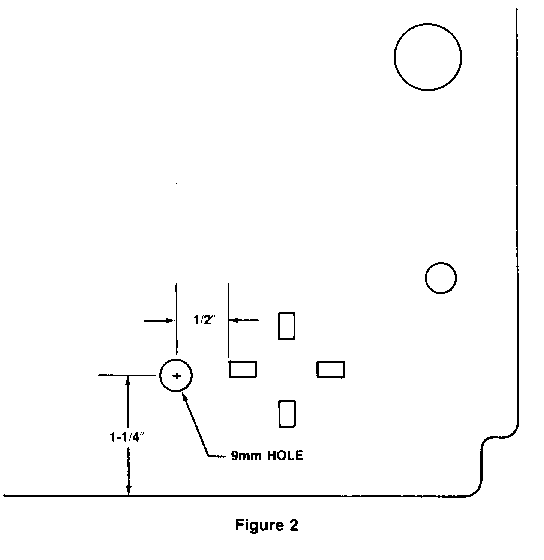
13. Drill 9mm hole in front closeout panel as shown in Figure 2.
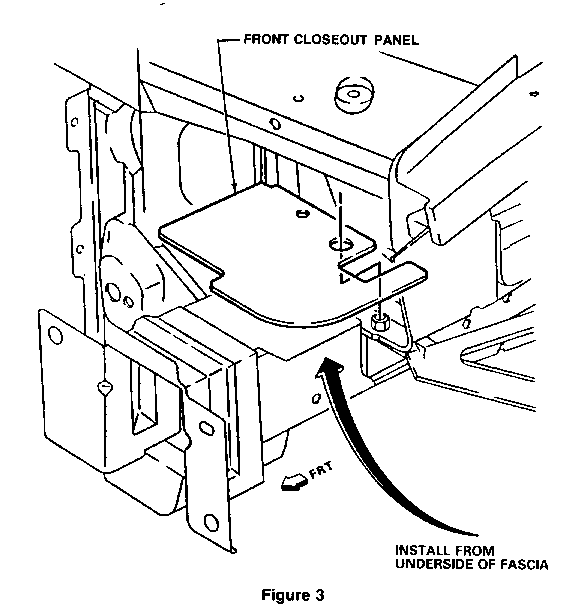
14. Install front closeout panel from underside of fascia. See Figure 3. Make sure large hole in panel locates over nut, as shown.
15. Reinstall wiring harness hold down clip.
16. Using a 7mm drill bit, and the front closeout panel as a template, drill a hole into the body side rail.
17. Fasten the front panel to the side rail with self-threading screw such as part number, 11503675, and torque to 10-12 N.m.
18. Reinstall battery.
NOTICE: Do not connect battery cables yet.
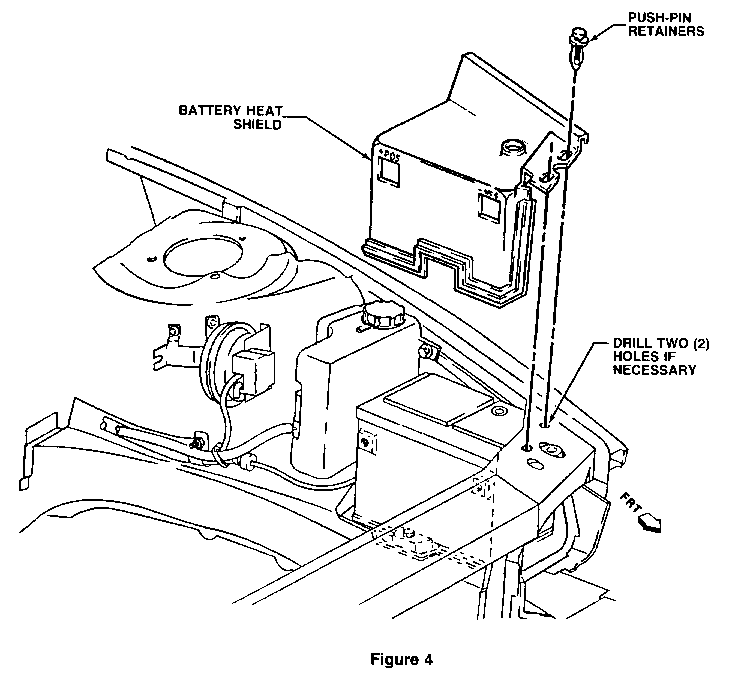
19. Install battery heat shield, Part Number 10097284. See Figure 4.
20. Reconnect positive battery cable.
21. If two holes are not already in the radiator support, drill two 5mm holes using the heat shield as a template. See Figure 4.
22. Fasten heat shield to radiator support with two push-pin retainers Part Number 14101262.
23. Reinstall windshield washer bottle, air filter housing, and diagonal brace.
24. Connect negative battery cable.
WARRANTY INFORMATION
Use Labor Operation Number: T1269 Labor Time: 0.8 Hours Trouble Code: 92
NOTICE: As previously noted, Regals with VIN's from J1425470 to J1429361 only need to have the front closeout panel added (Part Number 10097286). Installation of just the front closeout panel only requires perfoming Steps 11-17. Warranty infomation for Steps 11-17 is:
Labor Operation Number: T5165 Labor Time: 0.3 Hours Trouble Code: 92
***************************************************************************** *STG DISCLAIMER*
"THE TEMPLATE DISPLAYED IN THIS SERVICE PUBLICATION IS NOT INTENDED FOR USE" (Please refer to the actual publication for an accurate "TEMPLATE" to use in this service procedure.) *****************************************************************************


General Motors bulletins are intended for use by professional technicians, not a "do-it-yourselfer". They are written to inform those technicians of conditions that may occur on some vehicles, or to provide information that could assist in the proper service of a vehicle. Properly trained technicians have the equipment, tools, safety instructions and know-how to do a job properly and safely. If a condition is described, do not assume that the bulletin applies to your vehicle, or that your vehicle will have that condition. See a General Motors dealer servicing your brand of General Motors vehicle for information on whether your vehicle may benefit from the information.
