A/C ODOR AT START UP CLEANING PROCEDURE OUTLINED

VEHICLES AFFECTED: 1988-90 W-CARS, ALL ENGINES, ALL TRANSMISSIONS
CONDITION:
Odours emitted from the Air Conditioning system primarily at start up in hot, humid climates.
CAUSE:
Debris in the heater/evaporator case and/or microbial growth on the evaporator core.
CORRECTION:
Clean the evaporator core and install an afterblow module, using the following equipment and procedure.
PROCEDURE:
1. Raise vehicle and remove the rubber A/C drain tube.
2. Disconnect the negative battery cable.
3. On vehicles with V6 engines (VIN codes T & W), it will be necessary to rotate and secure the engine in the forward service position as specified in the Service Manual, page 6A5-2 (1989-90), 6A3-7 (1988).
4. On 1988 & 89 vehicles, remove the upper attachments (Pal Nuts) of the secondary metal dash panel and pull the panel forward.
5. Remove the upper and side splash shields of the R.H. fender well for access to the R.H.electrical centre and ECM.
6. Remove the A/C evaporator core from the vehicle. Use the appropriate Service Manual procedures on the removal of the evaporator core.
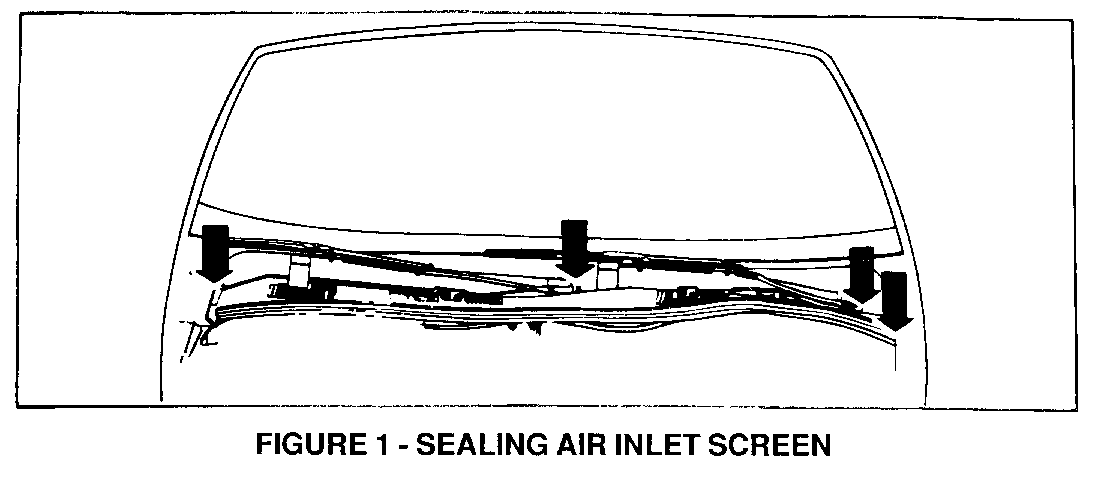
7. Check the heater/evaporator case and core for debris. Remove any debris that is present in the case or imbedded in the core. If a large amount of debris is present in the case, the air inlet screen will require sealing around the windshield wiper post holes and fender edges, as shown in Figure 1.
8. Seal the inlet and outlet pipe ends of the evaporator core, using duct tape or plastic plugs if available.
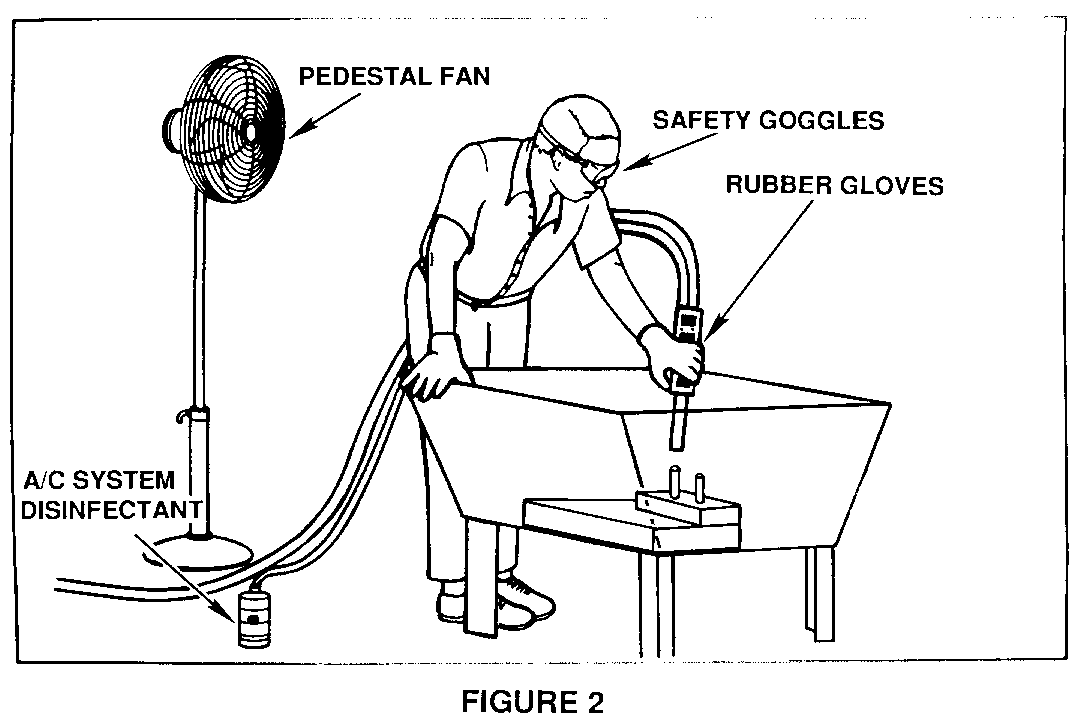
9. Put on rubber gloves and safety goggles.
10. Place the evaporator in a large sink, tub or basin.
11. Direct a spray of disinfectant toward the evaporator core face, taking care to ensure adequate coverage of the corners and edges, completely saturating the entire core.
12. Let the evaporator core soak for at least five (5) minutes.
13. If a tub or basin without a drain was used for the spraying of the disinfectant, remove the core and dispose of the disinfectant in a sanitary drain system. Rinse the tub or basin with water.
14. Rinse the evaporator core.
15. Allow the core to drain for a few minutes and then blow off the core with an air hose until core is dry. Remove tape or plugs from core pipes.
16. Reinstall the evaporator core into the vehicle. Do not install the lower heating A/C module cover at this time.
17. Before installing the lower heating A/C module cover, loosen the R.H. side of the foam seal around the drain tube and thread the green 18 ga. electrical wire under the seal and pull approximately five (5) feet of the wire to the engine side of the drain seal.
18. Seal the bottom of the heating A/C module.
19. Install the lower module cover threading the green wire into the engine compartment through the drain tube hole.
20. Install the remaining heating A/C module components. Do not install the dash components or close out panels at this time.
21. Route the green wire in the engine compartment along front of dash to R.H.side and then forward to the ECM. Secure the wire with tie bands to the heater pipe across the front of the dash and to the existing wiring harness forward to the ECM. Use a small amount of RTV sealant to seal the green electrical wire at the breakpoint area of the A/C drain plug seal.
THE FOLLOWING STEPS ARE THE INSTRUCTIONS FOR THE INSTALLATION OF THE AFTERBLOW MODULE
IMPORTANT: The afterblow module will enable the blower to run at high speed for five (5) minutes approximately fifty (50) minutes after the vehicle ignition is turner off, if the compressor was engaged for four (4) minutes or more during the last ignition cycle.
IMPORTANT: All the connections of the afterblow module harness to the vehicle wiring should be spliced, using the proper techniques shown in section BA of the appropriate Service Manual. The splices should be made using splice clips, solder and wrapping the splice wilh electrical tape. Do NOT use the instant connectors such as 3M's "SCOTCHLOK" brand.
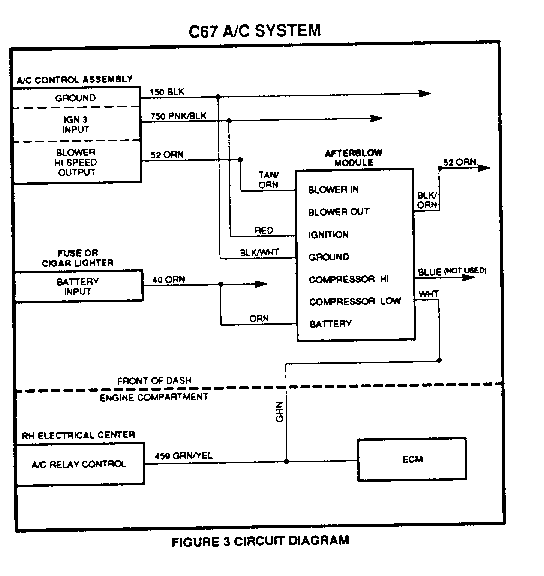
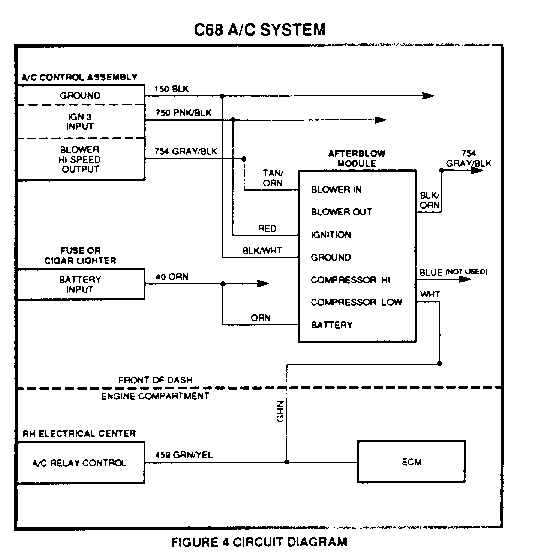
IMPORTANT: The circuit diagrams, shown in Figures 3 and 4, shows the circuit numbers generally used on the subject model year vehicles. However, to make sure of the correct circuits and wire colours are spliced into, refer to section 8A of the Service Manual.
22. Disconnect the afterblow module from the jumper harness and set the module aside.
23. C67 A/C SYSTEM: Splice the black/white wire (pin C) of the jumper harness into the black ground wire (circuit #150) in the black connector (cavity #12) of the A/C control assembly wiring.
C68 A/C SYSTEM: Splice the black/white wire (pin C) of the jumper harness into the black ground wire (circuit #150) in the grey connector (cavity #14) of the A/C control assembly wiring.
24. C67 A/C SYSTEM: Splice the red wire (pin B) of the jumper harness into the pink/black wire (circuit #750) of the black connector (cavity #4) of the A/C control assembly wiring.
C68 A/C SYSTEM: Splice the red wire (pin B) of the jumper harness into the pink/black wire (circuit #750) of the black connector (cavity #12) of the A/C control assembly wiring.
25. C67 A/C SYSTEM: Cut the orange blower Hi speed output wire (circult #52) of the black blower switch connector of the A/C control assembly wiring. Splice the tan/orange wire (pin F) of the jumper harness to the orange wire from the A/C control assembly. Splice the black/orange wire (pin G) of the jumper harness to the other end of the orange wire.
C68 A/C SYSTEM: Cut the grey/black wire (circuit #754) of the white connector (cavity #15) of the A/C control assembly wiring. Splice the tan/orange wire (pin F) of the jumper harness to the grey/black wire from the A/C control assembly. Splice the black/orange wire (pin G) of the jumper harness to the other end of the grey/black wire.
THE NEXT THREE STEPS ARE THE SAME FOR BOTH THE C67 AND C68 SYSTEMS
26. Splice the orange wire (pin A) of the jumper harness into the battery feed wire (circuit #40) at the fuse block or the cigarette lighter.
27. Splice the end of the green wire that is routed to the engine compartment to the white wire (pin E) of the jumper harness.
28. In the engine compartment, splice the green wire into the green/yellow (circuit #459) at either the A/C compressor relay (cavity #1) of the R.H.electrical centre or the ECM (cavity A12).
29. Connect the negative battery cable.
30. Test the afterblow module, per the following procedure.
31. Cut off the bare end of the blue wire (pin D) of the jumper harness, tape the end and fold and tape wire to the harness.
32. Mount the afterblow module in a convenient location under the dash using foam insulation as necessary to ensure a rattle free installation of the module.
33. Install the secondary dash panel, the splash shields and return engine to its proper position.
34. Finish the installation of the dash components and close out panels.
TO TEST THE AFTERBLOW MODULE, USE THE FOLLOWING PROCEDURE:
1. Start the engine.
2. Turn the A/C system to engage the compressor.
3. Connect a jumper wire to apply battery voltage to the open cavity pin H (green wire) of the afterblow module for at least thirty (30) seconds with the compressor engaged.
4. Turn the ignition key off.
5. The blower should come on after approximately ten (10) seconds for one (1) second and then go off.
6. Disconnect the jumper wire.
NOTICE: The afterblow module is not compatible with some non-factory installed theft alarm systems. The module current draw at key off position could trigger alarms that sense battery voltage changes or current drain.
ADVISE OWNER that the afterblow module will enable the blower motor to run at high speed for five (5) minutes approximately fifty (50) minutes after the vehicle ignition is turned off, if the A/C compressor was engaged for at least four (4) minutes or more during last ignition cycle.


General Motors bulletins are intended for use by professional technicians, not a "do-it-yourselfer". They are written to inform those technicians of conditions that may occur on some vehicles, or to provide information that could assist in the proper service of a vehicle. Properly trained technicians have the equipment, tools, safety instructions and know-how to do a job properly and safely. If a condition is described, do not assume that the bulletin applies to your vehicle, or that your vehicle will have that condition. See a General Motors dealer servicing your brand of General Motors vehicle for information on whether your vehicle may benefit from the information.
