CAMPAIGN: LOSS OF HEADLAMP OPERATION

SUBJECT: LOSS OF HEADLAMP OPERATION
MODELS: 1991 Pontiac Grand Prix Coupe Only
TO: ALL GENERAL MOTORS DEALERS
General Motors of Canada Limited has determined that a defect which relates to motor vehicle safety exists in certain 1991 Pontiac Grand Prix coupe model vehicles. These vehicles exhibit a condition in which the fog lamps, low beam headlamps and high beam headlamps can be operated simultaneously. This condition violates laws in most provinces which only permit the operation of four (4) white lights at the same time.
Additionally, all three sets of headlamps operating simultaneously may cause the headlamp circuit breaker to become overloaded and "trip" resulting in the loss of headlamp (high and low beam) and fog lamp operation.
To correct this condition, dealers are to install a new fog lamp relay, new circuit breaker and new circuit breaker terminals. The vehicle circuitry will also be modified to prevent the fog lamps and high beam headlamps from operating simultaneously.
VEHICLES INVOLVED:
Involved are certain 1991 Pontiac Grand Prix coupe model vehicles built within the following VIN breakpoints:
Year Model Plant Plant Code From Through ---- ----- ----- ---------- ---- ------- 1991 W-Car Fairfax "F" MF284000 MF301210
All affected vehicles have been identified by the VIN listing provided to involved dealers with this bulletin. Any dealer not receiving a listing was not shipped any of the affected vehicles.
DEALER CAMPAIGN RESPONSIBILITY:
All unsold new vehicles in dealer's possession and subject to this campaign must be held and inspected/repaired per the Service Procedure of this Campaign Bulletin before owners take possession of these vehicles.
Dealers are to perform this campaign on all involved vehicles at no charge to owners, regardless of kilometres traveled, age of vehicle, or ownership, from this time forward.
Whenever a vehicle subject to this campaign is taken into your new or used vehicle inventory, or it is in your dealership for service, you are to ensure the campaign correction has been made before selling or releasing the vehicle.
Owners of vehicles recently sold from your new vehicle inventory are to be contacted by the dealer, and arrangements made to make the required correction according to instructions contained in this bulletin.
In summary, whenever a vehicle subject to this campaign is taken into your new or used vehicle inventory, or is in your dealership for service in the future, please take the steps necessary to be sure the campaign correction has been made before selling or releasing the vehicle.
CAMPAIGN PROCEDURE:
Refer to Section 4 of the Service Policies and Procedures Manual for the detailed procedure on handling Product Campaigns. Dealers are requested to complete the campaign on all transfers as soon as possible.
OWNER NOTIFICATION:
All owners of record at the time of campaign release are shown on the attached computer listing and have been notified by first class mail from General Motors (see copy of owner letter included with this bulletin). The listings provided are for campaign activity only and should not be used for any other purpose.
PARTS INFORMATION:
Parts required to complete this campaign should be ordered through regular channels, as follows:
Part Number Description Quantity/Vehicle ----------- ----------- ---------------- 12141644 Headlamp Repair Kit 1
Kit Includes: 1 -20 amp Fuse 1 -Fog Lamp Relay 1 -Circuit Breaker # -Wire Terminals # -Wire Splice Clips
PARTS AND LABOUR CLAIM INFORMATION:
Credit for the campaign work performed will be paid upon receipt of a properly completed campaign claim card or DCS transmission in accordance with the following:
Repair Code Description Time Allowance ----------- ----------- -------------- 2A Install Headlamp Repair Kit 1.2
Time allowance includes 0. 1 hour for dealer administrative detail associated with this campaign. Parts credit will be based on dealer net plus 30% to cover parts handling.
SERVICE PROCEDURE:
1. Open hood and perform the following steps:
a. Disconnect negative battery cable and remove air cleaner.
b. Remove overflow bottle and set on top of engine.
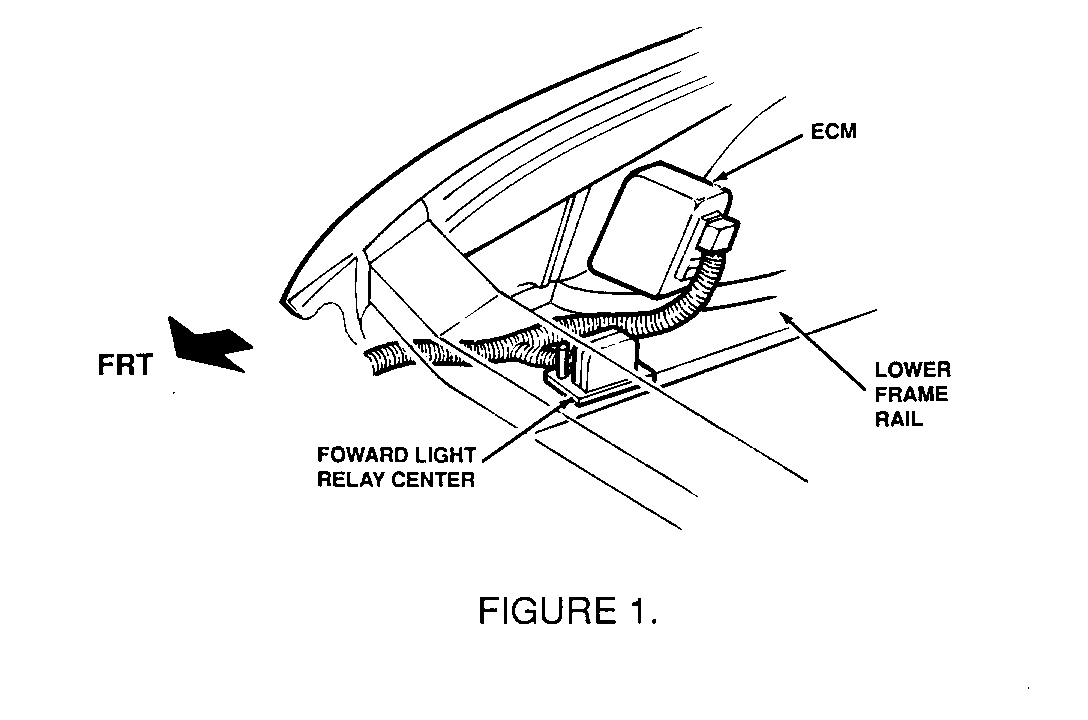
c. Remove 2 screws from Forward Light Relay Center located BELOW right side electrical center (see Figure 1) and pull out Forward Light Relay Center for access.
d. Replace fog lamp relay with new relay from kit.
e. Remove back of relay center.
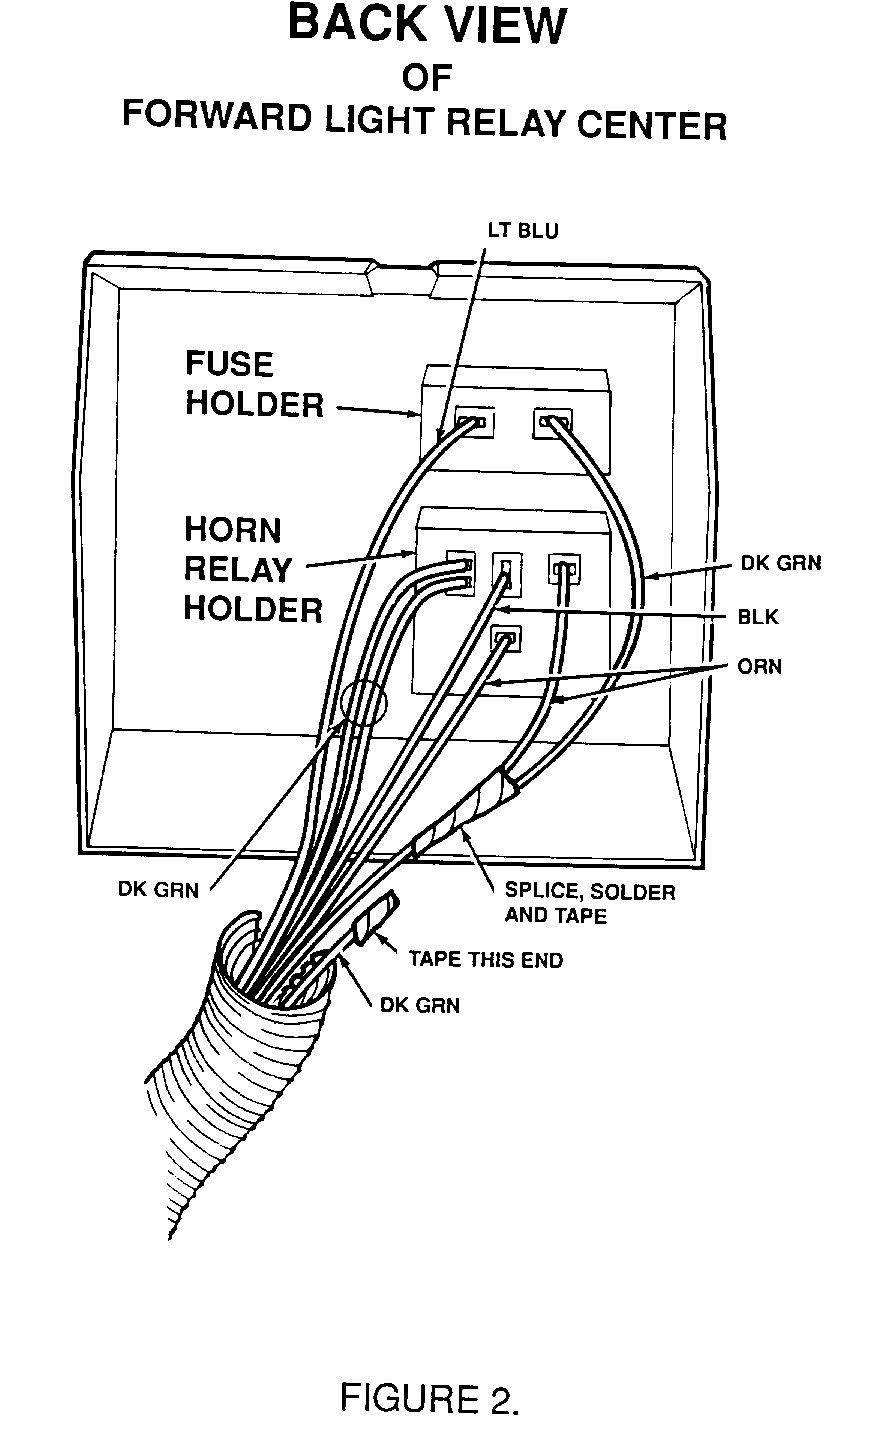
f. Cut dark green wire from back of fuse, leaving at least 4" of wire attached to the fuse. Tape the harness end of wire (see Figure 2).
g. Splice green wire into one of two orange wires from back of horn relay. Either orange wire can be used. Use splice clip from kit, SOLDER, and tape connection.
h. Replace back of relay center, and reinstall it to frame rail.
2. Open right-hand door and perform the following steps:
a. Open glove box door, remove fuse panel cover, and replace 15 amp "HORN" fuse with 20 amp fuse from kit. Replace fuse panel cover and close the glove box door.
b. Remove right-hand sound insulator panel.
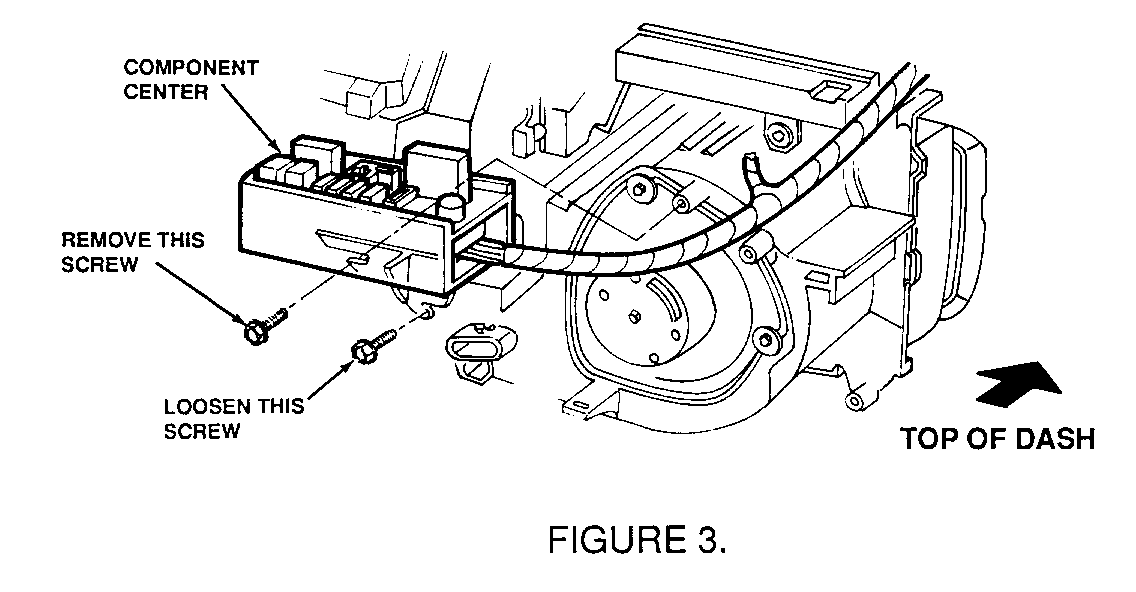
c. Remove component center (see Figure 3). There are two (2) 5.5 mm screws underneath. Remove front screw and loosen the rear screw. Slide component center out and slide back of center off to expose wires.
d. Locate and remove 20 amp headlight circuit breaker. There are two dark green and one red wire going to this breaker.
e. Remove two terminals from component center. Cut wires as close to terminals as possible. Strip wires, and crimp and SOLDER two new terminals from kit to wires. Reinstall connectors into component center. If necessary, pull on harness to gain extra wire length so the wires are not stretched.
Notice: IT IS VERY IMPORTANT THAT NEW TERMINALS BE SOLDERED. A circuit breaker operates by opening when heat builds up to a certain level. The terminals and wire are used as a heat sink for the circuit breaker. Unsoldered terminals may build up heat, opening the circuit breaker, and causing the headlights to flash.
f. Install new circuit breaker.
g. Reinstall component center. Using rear screw as a guide, slide center onto screw, position center and install front screw. Tighten both screws securely.
3. Connect negative battery cable and verify that fog lamps and horn operate properly.
- Operate horn.
- Turn headlamps on low beam.
- Turn fog lamp switch on. Fog lamps should light.
- Turn headlamps to high beam. Fog lamps should go out.
- Turn headlamps back to low beam. Fog lamps should come back on.
- Turn fog lamp switch off. Fog lamps should go off.
4. Reinstall air cleaner and overflow bottle. Make certain coolant hose is correctly located and is not close to engine pulleys or belts.
5. Reinstall right-hand sound insulator panel.
6. Perform idle learn procedure as follows:
a. Place transaxle in park or neutral.
b. Connect Tech 1 "Scan" tool.
c. Select "IAC System", then select "Idle Learn" in "Misc. Test" mode.
d. Proceed with idle learn as directed.
7. Install Campaign Identification Label.
INSTALLATION OF CAMPAIGN IDENTIFICATION LABEL
Clean surface of radiator upper mounting panel and apply a Campaign Identification Label. Make sure the correct campaign number is inserted on the label. This will indicate that the campaign has been completed.


General Motors bulletins are intended for use by professional technicians, not a "do-it-yourselfer". They are written to inform those technicians of conditions that may occur on some vehicles, or to provide information that could assist in the proper service of a vehicle. Properly trained technicians have the equipment, tools, safety instructions and know-how to do a job properly and safely. If a condition is described, do not assume that the bulletin applies to your vehicle, or that your vehicle will have that condition. See a General Motors dealer servicing your brand of General Motors vehicle for information on whether your vehicle may benefit from the information.
