ILLUMIN. ENTRY, SEAT BELT & DOOR AJAR MESS. ALL STAY ON

SUBJECT: ILLUMINATED ENTRY L'GHTS, SEAT BELT RESTRAINT SOLENOIDS, DOOR AJAR MESS. ALL STAY ON (DIAGNOSIS/REPAIR)
VEHICLES AFFECTED: 1990-92 "W" MODELS (PONTIAC)
THIS BULLETIN SUPERSEDES AND REPLACES PRODUCT SERVICE BULLETIN 91 -2-213 (DATED JUNE 15/91). THIS BULLETIN IS BEING REVISED TO ADD 1992 MODEL YEAR.
CONDITIONS:
---------- 1. Illuminated Entry Lights remain on with ignition off (1990-92 Grand Prix Sedans).
2. Seat Beit Restraint Solenoids remain on, ignition off (All Grand Prix Sedans).
3. Drivers Information Centre; Door Ajar Warning Message stays on, ignition on (1 990-92 Grand Prix STE Sedan Only).
The above conditions may cause battery drain.
Note: The above conditions will not affect the normal operation of the seat belts.
CAUSE:
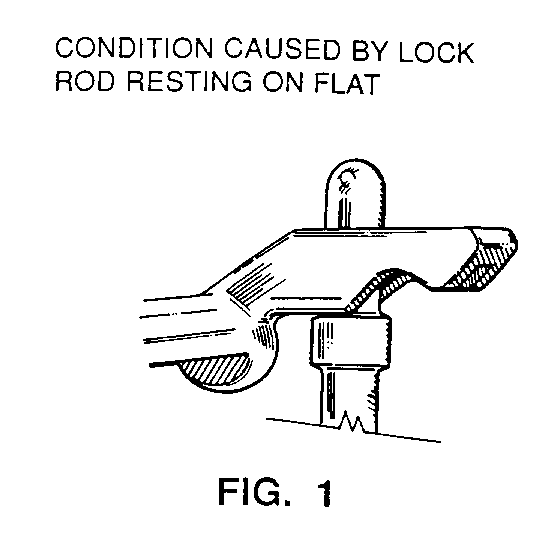
----- Interference between the outside handle to lock rod and the lever on the outside handle. See Figure 1.
Important: All the above conditions are intermittent in nature because door slam or operating the outside handle may reset the condition.
DIAGNOSIS FOR CONDITION 1
o 1990-92 Grand Prix Sedan Left Front Door Only 1990-92 Grand Prix Sedan STE Both Front Doors
o Sit inside the vehicle and lock the doors. Actuate the inside door handles individually. If the interior lights come on and stay on after the inside handle has been actuated, follow the procedure below:
DIAGNOSIS FOR CONDITION 2
o Same as number 1 except, after actuating the inside handles individually, listen for an audible click from the solenoids deactivating within 3 to 5 seconds after the handle is released. If you do not hear the seat belt solenoids click during this time, one of the handles may be hung up.
DIAGNOSIS FOR CONDITION 3
o Same as 2 and 3 except Drivers information Centre Door Ajar Warning message stays on, ignition on.
CORRECTION:
---------- 1. Remove trim panel.
2. Remove water deflector.
3. Disengage retaining clip at lower end of the outside handle to lock rod and remove.
4. Remove two retaining nuts on outside handle and remove from door.
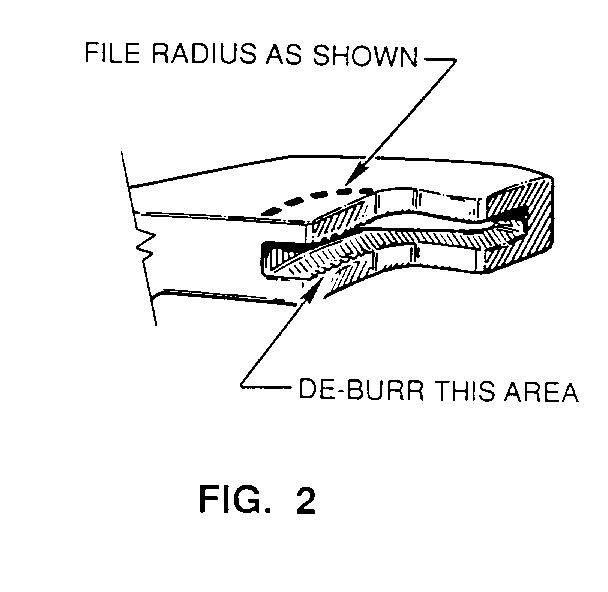
5. File radius as shown in Figure 2.
6. De-burr the inside edges of the handle where the rod fits through, sand all surfaces smooth that were filed.
7. Touch up all filed surfaces to stop corrosion, this will also insure proper operation.
8. Reinstall door handle.
9. Reinstall outside handle to lock rod by adjusting nut on lower end of rod until knob of attaching nut is between one and two turns lower than the hole in the lever of the lock, snap nut into hole and engage clip onto lever and rod assembly.
10. Check for proper operation, reinstall water deflector and trim panel.
For vehicles repaired under warranty use:
Labour Time: 0.6 Hour Per Side
General Motors bulletins are intended for use by professional technicians, not a "do-it-yourselfer". They are written to inform those technicians of conditions that may occur on some vehicles, or to provide information that could assist in the proper service of a vehicle. Properly trained technicians have the equipment, tools, safety instructions and know-how to do a job properly and safely. If a condition is described, do not assume that the bulletin applies to your vehicle, or that your vehicle will have that condition. See a General Motors dealer servicing your brand of General Motors vehicle for information on whether your vehicle may benefit from the information.
