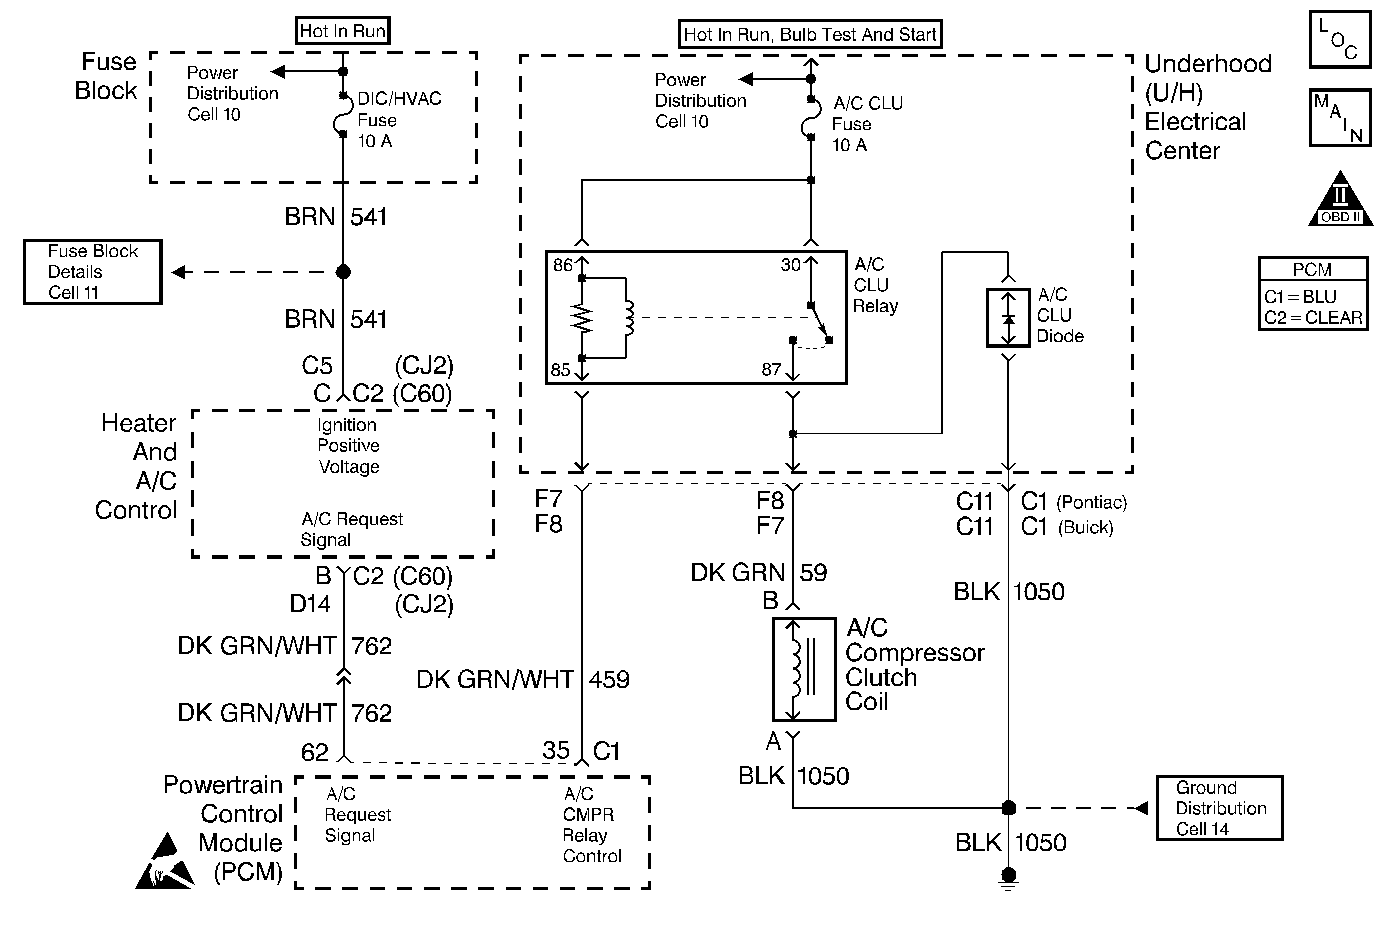
Circuit Description
When an A/C mode is selected, the A/C control head or the A/C programmer supplies a 12 volt signal to the PCM A/C request input. The A/C compressor clutch relay is controlled by the PCM. The PCM provides a ground path for the A/C relay coil. When the A/C compressor relay is engaged battery voltage is supplied to the compressor clutch coil. The PCM will enable the A/C compressor clutch whenever the engine is running and the A/C has been requested unless one or more of the following conditions are present:
| • | Throttle angle is greater than 96%. |
| • | A/C head pressure is greater than 440 psi (4.6 volts) or less than 35 psi (0.4 volt) (as determined by the A/C refrigerant pressure sensor). |
| • | Ignition 1 voltage is below 10.5 volts. |
| • | Engine speed is greater than 4300 RPM for longer than 1 second. |
| • | Engine speed is greater then 5400 RPM for any amount of time. |
| • | ECT is greater than 124°C (255°F). |
| • | IAT is less than 5°C (41°F). |
Any of the conditions described above will inhibit A/C compressor relay operation.
Diagnostic Aids
Check for the following conditions:
| • | Poor connection at the PCM. Inspect harness connectors for backed out terminals, improper mating, broken locks, improperly formed or damaged terminals, and poor terminal to wire connection. |
| • | Damaged harness. Inspect the wiring harness for damage. |
| • | If the harness appears to be OK, disconnect the PCM, turn the ignition ON and observe a voltmeter connected to the A/C relay control circuit at the PCM harness connector while moving connectors and wiring harnesses related to the A/C relay. A change in voltage will indicate the location of the malfunction. |
Check for conditions that will disable A/C operation:
| • | Throttle angle is greater than 96%. |
| • | A/C head pressure is greater than 440 psi (4.6 volts) or less than 35 psi (0.4 volt) (as determined by the A/C refrigerant pressure sensor). |
| • | Ignition 1 voltage is below 10.5 volts. |
| • | Engine speed is greater than 3700 RPM for longer than 5 seconds. |
| • | Engine speed is greater then 4400 RPM for any amount of time. |
| • | ECT is greater than 124°C (255°F). |
Step | Action | Value(s) | Yes | No | ||||||||
|---|---|---|---|---|---|---|---|---|---|---|---|---|
1 | Was the Powerrtrain On-board-Board Diagnostic (OBD) System Check performed? | -- | Go to Powertrain OBD System Check | |||||||||
2 | Are any PCM or HVAC DTC(s) stored? | -- | Diagnose the applicable DTC(s). Refer to Powertrain Control Module Diagnostic Trouble Codes. | |||||||||
3 |
Important: The following conditions must be met before continuing with this step:
Is the A/C Clutch engaged? | -- | ||||||||||
4 |
Is the A/C compressor clutch engaged? | -- | Refer to Diagnostic Aids | |||||||||
5 | With the A/C mode still selected, observe the A/C Request display on the scan tool. Does the A/C Request display YES? | -- | ||||||||||
6 | Observe the A/C pressure sensor display on the scan tool. Does the A/C pressure sensor indicate a voltage between the specified values? | 0.4V - 4.6V | Go to A/C Controls Diagnosis, in Heater, Ventilation, and Air Conditioning | |||||||||
7 |
Is high side refrigerant pressure within the specified values? | 35 psi - 440 psi | Go to Refrigerant Recovery and Recycling, Adding Oil Evacuation and Recharging Procedures in Heater, Ventilation and Air Conditioning | |||||||||
8 |
Was a problem found? | 5 ohms | ||||||||||
9 |
Does the voltage measure near the specified value? | 0V | ||||||||||
10 |
Was a problem found? | -- | ||||||||||
11 | Locate and repair short to voltage in the A/C refrigerant pressure signal circuit. Refer to Repair Procedures in Electrical Diagnosis. Is action complete? | -- | -- | |||||||||
12 | Check the A/C Clutch fuse. Is the fuse blown? | -- | ||||||||||
13 |
Is the test light ON? | -- | ||||||||||
14 |
Is the test light ON? | -- | ||||||||||
15 |
Is the test light ON? | -- | ||||||||||
16 |
Is the A/C compressor clutch engaged? | -- | ||||||||||
17 |
Is the test light ON? | -- | ||||||||||
18 |
Is the test light ON? | -- | ||||||||||
19 |
Was a problem found? | -- | ||||||||||
20 |
Is the test light ON? | -- | ||||||||||
21 |
Does the test light flash? | -- | ||||||||||
22 |
Was a problem found? | -- | ||||||||||
23 |
Is the test light ON? | -- | ||||||||||
24 |
Was a problem found? | -- | ||||||||||
25 |
Does the A/C Request display Yes? | -- | Go to A/C Controls Diagnosis in Heater, Ventilation, and Air Conditioning | |||||||||
26 |
Is the A/C compressor clutch engaged? | -- | ||||||||||
27 |
Is the A/C compressor clutch engaged? | -- | ||||||||||
28 | Locate and repair short to voltage in the A/C compressor clutch control circuit (CKT 59). Refer to Repair Procedures in Electrical Diagnosis. Is action complete? | -- | -- | |||||||||
29 | Probe the A/C Compressor Relay Control Circuit in the Underhood Electrical Center with a test light to ground. Is the test light ON? | -- | ||||||||||
30 |
Is the test light ON? | -- | ||||||||||
31 | Locate and repair short to ground in the B+ feed circuit to cavity 30 in the relay connector. Refer to Repair Procedures in Electrical Diagnosis. Is action complete? | -- | -- | |||||||||
32 | Locate and repair the following circuit condition(s):
Refer to Repair Procedures in Electrical Diagnosis. Is action complete? | -- | -- | |||||||||
33 | Locate and repair the open in the B+ feed to cavity 30 in the A/C relay connector. Refer to Repair Procedures in Electrical Diagnosis. Is action complete? | -- | -- | |||||||||
34 | Locate and repair the open in the B+ feed to the A/C compressor clutch coil. Refer to Repair Procedures in Electrical Diagnosis. Is action complete? | -- | -- | |||||||||
35 | Locate and repair the open in the A/C compressor clutch ground. Refer to Repair Procedures in Electrical Diagnosis. Is action complete? | -- | -- | |||||||||
36 | Locate and repair the open in the B+ feed to cavity 85 in the A/C relay connector. Refer to Repair Procedures in Electrical Diagnosis. Is action complete? | -- | -- | |||||||||
37 | Locate and repair the short to voltage in the A/C relay control circuit. Refer to Repair Procedures in Electrical Diagnosis. Is action complete? | -- | -- | |||||||||
38 | Locate and repair the short to voltage in the A/C compressor clutch feed circuit. Refer to Repair Procedures in Electrical Diagnosis. Is action complete? | -- | -- | |||||||||
39 | Locate and repair the short to ground in the A/C relay control circuit. Refer to Repair Procedures in Electrical Diagnosis. Is action complete? | -- | -- | |||||||||
40 | Replace the A/C compressor clutch coil. Refer to Heater, Ventilation and Air Conditioning. Is action complete? | -- | -- | |||||||||
41 | Replace the A/C Refrigerant Pressure Sensor. Is action complete? | -- | ||||||||||
42 | Replace the A/C relay. Is action complete? | -- | -- | |||||||||
43 | Replace the PCM. Important: Replacement PCM must be programmed. Refer to Powertrain Control Module Replacement/Programming. Is action complete? | -- | -- | |||||||||
44 |
Important: The following conditions must be met before continuing with this step:
Is the A/C clutch engaged? | -- | System OK |
