Alcohol/Contaminants-in-Fuel Diagnosis Without Special Tool
Water contamination in the fuel system may cause driveability conditions such as hesitation, stalling, no start, or misfires in one or more cylinders. Water may collect near a single fuel injector, at the lowest point in the fuel rail, and cause a misfire in that cylinder. If the fuel system is contaminated with water, inspect the fuel system components for rust, or deterioration.
Alcohol concentrations of more than 10 percent in the fuel can be detrimental to fuel system components. Alcohol contamination may cause fuel system corrosion, deterioration of rubber components, and subsequent fuel filter restriction. Fuel contaminated with alcohol may cause driveability conditions such as hesitation, lack of power, stalling, or no start. Some types of alcohol are more detrimental to fuel system components than others.
Alcohol in Fuel Testing Procedure
The fuel sample should be drawn from the bottom of the tank so that any water present in the tank will be detected. The sample should be bright and clear. If alcohol contamination is suspected then use the following procedure to test the fuel quality.
- Using a 100 ml (3.38 oz) specified cylinder with 1 ml (0.034 oz) graduation marks, fill the cylinder with fuel to the 90 ml (3.04 oz) mark.
- Add 10 ml (0.34 oz) of water in order to bring the total fluid volume to 100 ml (3.38 oz) and install a stopper.
- Shake the cylinder vigorously for 10-15 seconds.
- Carefully loosen the stopper in order to release the pressure.
- Re-install the stopper and shake the cylinder vigorously again for 10-15 seconds.
- Put the cylinder on a level surface for approximately 5 minutes in order to allow adequate liquid separation.
If alcohol is present in the fuel, the volume of the lower layer, which would now contain both alcohol and water, will be more than 10 ml (0.34 oz). For example, if the volume of the lower layer is increased to 15 ml, this indicates at least 5 percent alcohol in the fuel. The actual amount of alcohol may be somewhat more because this procedure does not extract all of the alcohol from the fuel.
Particulate Contaminants in Fuel Testing Procedure
The fuel sample should be drawn from the bottom of the tank so that any water present in the tank will be detected. The sample should be bright and clear. If the sample appears cloudy, or contaminated with water, as indicated by a water layer at the bottom of the sample, use the following procedure to diagnose the fuel:
- Using an approved fuel container, draw approximately 0.5 liter (0.53 quart) of fuel.
- Place the cylinder on a level surface for approximately 5 minutes in order to allow settling of the particulate contamination.
- Particulate contamination will show up in various shapes and colors. Sand will typically be identified by a white or light brown crystals. Rubber will appear as black and irregular particles.
- Observe the fuel sample. If any physical contaminants or water are present, clean the fuel system. Refer to Fuel System Cleaning
Alcohol/Contaminants-in-Fuel Diagnosis With Special Tool
Fuel quality can affect vehicle performance. Gasoline and gasoline blends that are contaminated or contain excessive amounts of alcohol can affect vehicle driveability, fuel economy, fuel system components and emissions. Excessive alcohol in the fuel may cause fuel system corrosion, deterioration of rubber components, and subsequent fuel filter restriction. Some types of alcohol are more detrimental to fuel system components than others. Ethanol is commonly used in gasoline, but in concentrations of no more than 10 percent. Some fuels, such as E85, contain a very high percentage of ethanol. Fuel with more than 10 percent ethanol may cause driveability conditions in vehicles such as hesitation, lack of power, stalling, or no start. If excessive alcohol in the fuel is suspected, then use the following procedure to test the fuel quality:
Test Procedure
- Turn ON the J 44175 Fuel Composition Tester.
- Verify the fuel composition tester is operational by measuring the AC frequency output with a DMM. Refer to Measuring Frequency in Wiring Systems. A frequency without a fuel sample in the test cell indicates that the tester is working correctly.
- Install the J 34730-1A Fuel Pressure Gage. Refer to Fuel Pressure Gage Installation and Removal .
- Close the bleed valve on the fuel pressure gage.
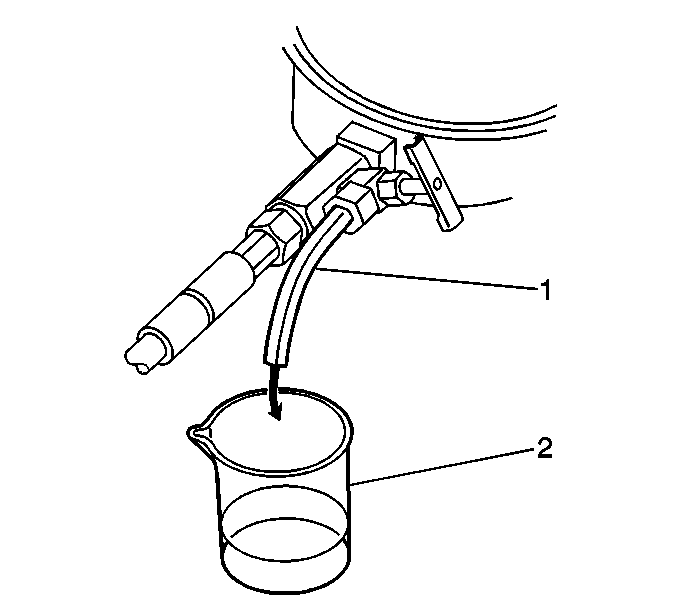
- Place the bleed hose (1) of the fuel pressure gage into the 100 ml beaker (2).
- Command the fuel pump ON with a scan tool.
- Slowly open the bleed valve on the fuel pressure gage, until an adequate fuel sample is obtained.
- If water appears in the fuel sample, replace the fuel in the vehicle. Refer to Fuel System Cleaning .
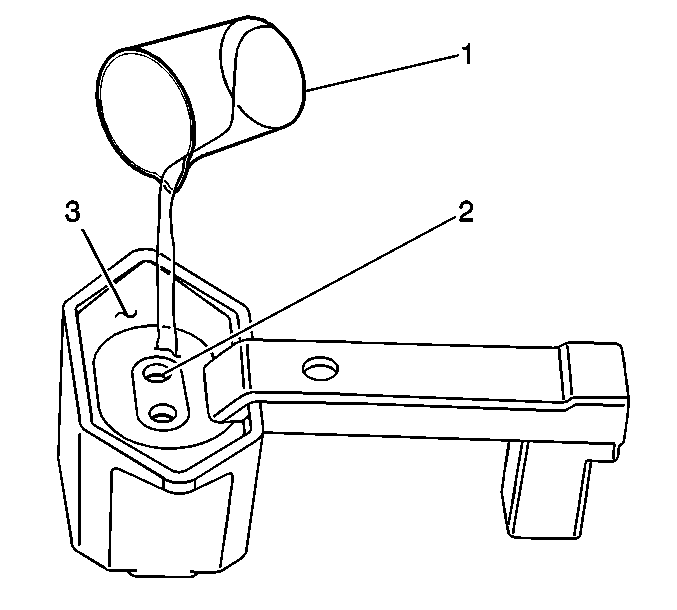
- Pour the fuel sample from the beaker (1) into theJ 44175 , until the level of the fuel is at the top of each fuel test port (2).
- Observe the diagnostic LEDs on the fuel composition tester.
- Measure the output frequency of the fuel composition tester.
- Subtract 50 from the reading on the DMM to obtain the percentage of alcohol in the fuel sample. Refer to the examples in the following table.
- If the fuel sample contains more than 10 percent ethanol, replace the fuel in the vehicle .

Important: Bleed the fuel pressure gage a few times in order to obtain an accurate fuel sample.

Important: DO NOT allow any substances other than gasoline, ethanol/gasoline blends, air, or acetone into the test ports of the fuel composition tester. Contaminants in the fuel composition tester could result in a misdiagnosis.
If the red fuel diagnostic LED is illuminated, a fuel contamination condition exists. Refer to Fuel System Cleaning .
-- | Frequency (Hz) | Subtract 50 | Ethanol Percent |
|---|---|---|---|
Example A | 50 Hz | -50 | 0% |
Example B | 65 Hz | -50 | 15% |
Example C | 129 Hz | -50 | 79% |
