For 1990-2009 cars only
Radiator Replacement LTD/U20XE, LE5/U24XE
Removal Procedure
Warning: With a pressurized cooling system, the coolant temperature in the radiator can be considerably higher than the boiling point of the solution at atmospheric pressure. Removal of the surge tank cap, while the cooling system is hot and under high pressure, causes the solution to boil instantaneously with explosive force. This will cause the solution to spew out over the engine, the fenders, and the person removing the cap. Serious bodily injury may result.
- Turn the ignition OFF.
- Disconnect the battery negative cable. Refer to Battery Negative Cable Disconnection and Connection.
- Remove the front bumper fascia. Refer to Front Bumper Fascia Replacement.
- Drain the cooling system. Refer to Cooling System Draining and Filling.
- Remove the air cleaner outlet duct.
- Remove the radiator air side baffle and radiator air lower baffle. Refer to Radiator Air Lower Baffle and Deflector Replacement.
- Remove the air conditioning compressor and the condenser hose and the air conditioning evaporator hose. Refer to Air Conditioning Compressor and Condenser Hose Replacement and Air Conditioning Evaporator Hose Assembly Replacement.
- Remove the radiator inlet hose from the radiator.
- Remove the radiator outlet hose from the radiator.
- Remove the engine coolant fan motor wiring harness from the radiator.
- Raise and support the vehicle. Refer to Lifting and Jacking the Vehicle.
- Remove the bracket of the power steering fluid cooler. Refer to Power Steering Fluid Cooler Replacement.
- Remove the transmission fluid cooler inlet hose and transmission fluid cooler outlet hose from the radiator. Refer to Fluid Cooler Inlet Hose Replacement and Fluid Cooler Outlet Hose Replacement.
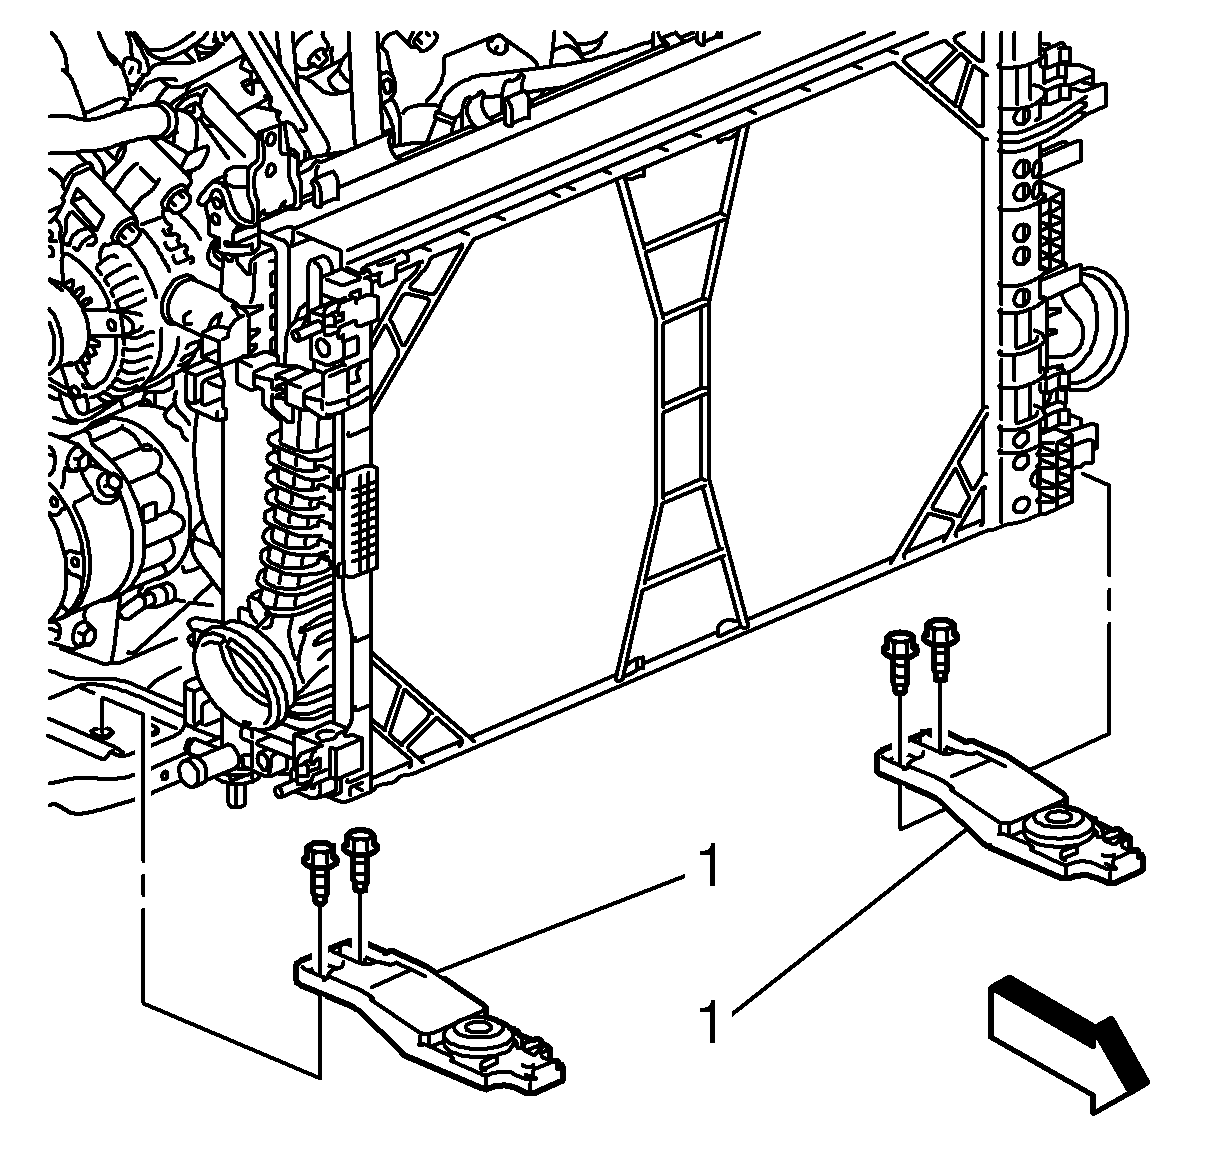
- With the aid of an assistant remove the radiator support brackets (1).
- Remove the radiator wiring harness connectors.
- Remove the radiator.
- Remove the engine coolant fan shroud from the radiator. Refer to Engine Coolant Fan Shroud Replacement.
| • | Vehicles equipped with LTD/U20XE. Refer to Air Cleaner Outlet Duct Replacement. |
| • | Vehicles equipped with LE5/U24XE. Refer to Air Cleaner Outlet Duct Replacement. |
Note: Secure the air conditioning condenser with cable ties.
Note: Secure the power steering fluid cooler with cable ties.
Note: Secure the transmission fluid cooler pipe with cable ties.


Installation Procedure
Caution: Refer to Fastener Caution in the Preface section.
- Install the engine coolant fan shroud to the radiator. Refer to Engine Coolant Fan Shroud Replacement.
- With the aid of an assistant install the radiator.
- Install the radiator support bracket (1).
- Install the radiator wiring harness connectors.
- Install the radiator outlet hose to the radiator.
- Install the radiator inlet hose to the radiator.
- Install the engine coolant fan motor wiring harness to the radiator.
- Install the transmission fluid cooler inlet hose and transmission fluid cooler outlet hose to the radiator. Refer to Fluid Cooler Inlet Hose Replacement and Fluid Cooler Outlet Hose Replacement.
- Install the air conditioning compressor and the condenser hose and the air conditioning evaporator hose. Refer to Air Conditioning Compressor and Condenser Hose Replacement and Air Conditioning Evaporator Hose Assembly Replacement.
- Install the bracket of the power steering fluid cooler. Refer to Power Steering Fluid Cooler Replacement.
- Install the radiator air side baffle and the radiator air lower baffle.
- Install the air cleaner outlet duct.
- Install the front bumper fascia. Refer to Front Bumper Fascia Replacement.
- Connect the battery negative cable. Refer to Battery Negative Cable Disconnection and Connection.
- Fill the Cooling system. Refer to Cooling System Draining and Filling.


Tighten
25 N·m (15 lb ft).
| • | Vehicles equipped with LTD/U20XE. Refer to Air Cleaner Outlet Duct Replacement. |
| • | Vehicles equipped with LE5/U24XE. Refer to Air Cleaner Outlet Duct Replacement. |
