CAMPAIGN: REAR SHOULDER BELT PENDULUM INTERFERENCE

Models: 1990 Eldorado, Seville and Riviera
General Motors of Canada has determined that a defect which relates to motor vehicle safety exists in some 1990 Cadillac Eldorados, Sevilles and Buick Rivieras. These vehicles have been assembled with misaligned rear seat shoulder belt retractor assemblies. This condition may result in pendulum interference causing the belt to remain in the locked position or to travel freely without locking. In the event of a panic stop or collision, if the shoulder belt retractor inertia lock does not engage (lock),it could increase the likelihood of injury to a rear seat occupant. However, the lap belt does function as intended.
To correct this condition, dealers are to inspect and, if necessary, realign the rear shoulder belt retractor assembly on suspect vehicles per the Vehicles Involved and Service Procedure sections of this bulletin.
VEHICLES INVOLVED:
Some 1990 Cadillac Eldorados, Sevilles and Buick Rivieras within the following VIN ranges require this campaign.
Eldorado SOP Through LU604413 Seville SOP Through LU803330 Riviera SOP Through LU404105
All affected vehicles have been identified by the VIN listing provided to involved dealers with this bulletin. Any dealer not receiving a listing was not shipped any of the affected vehicles.
DEALER CAMPAIGN RESPONSIBILITY:
Dealers are to service all vehicles subject to this campaign at no charge to owners, regardless of mileage, age of vehicle, or ownership, from this time forward.
Whenever a vehicle subject to this campaign is taken into your new or used vehicle inventory, or it is in your dealership for service in the future, you should take the steps necessary to be sure the campaign correction has been made before reselling or releasing the vehicle.
Owners of vehicles recently sold from your new vehicle inventory are to be contacted by the dealer, and arrangements made to make the required modification according to instructions contained in this bulletin.
CAMPAIGN PROCEDURE:
Refer to Section 4 of the Service Policies and Procedures Manual for the detailed procedure on handling Product Campaigns. Dealers are requested to complete the campaign on all transfers as soon as possible.
OWNER NOTIFICATION:
All owners of record at the time of campaign release are shown on the attached computer listing and have been notified by first class mail from General Motors. The listings provided are for campaign activity only and should not be used for any other purpose.
PARTS INFORMATION:
Special Tools
As indicated in the Service Procedure section of this bulletin, it is necessary to use a special magnet (Kent-Moore #J-38755) to properly perform the inspection and repair procedures required to correct this condition.
This special magnet will be shipped to involved dealers at no cost. ONLY THIS MAGNET SHOULD BE USED.
PARTS AND LABOUR CLAIM INFORMATION:
Credit for the campaign work performed will be paid upon receipt of a properly completed campaign claim card, RAPID terminal or DCS transmission in accordance with the following:
Repair Code Description Time Allowance ----------- ----------- -------------- 1A Inspect Both Rear Shoulder .3 Belt Retractor Assemblies Only
2A Realign one Rear Shoulder Belt .6 Retractor Assembly (Inspection of both Included)
3A Realign Both Rear Shoulder Belt .9 Retractor Assemblies (Inspection Included)
Time allowance includes 0.1 hour for dealer administrative detail associated with this campaign. Parts credit will be based on dealer net plus 30% to cover parts handling.
SERVICE PROCEDURE:
Tools Required: 18 mm deep well socket and ratchet Razor blade or sharp knife Torque wrench Special Magnet (see note) Extension for ratchet and torque wrench may be necessary Masking tape
The magnet has a graphite-like coating which will rub off. Wrap sides of magnet with one layer of masking tape to protect interior trim surfaces. TAKE SPECIAL CARE WHEN USING, TRANSPORTING, AND STORING MAGNET. This magnet is very strong and could easily be lost by attaching itself to a nearby metal object.
INSPECTION PROCEDURE:
NOTICE: Both right and left rear seat shoulder belt retractor assemblies must be inspected to determine if repair is required.
1. Pull and release the shoulder belt. The belt should move in and out freely. If the belt does not move, proceed to Step 6 to repair.
2. Position the magnet against outside of retractor cover, toward outboard side, and approximately centre fore and aft. Slide the magnet down between cover and quarter trim panel until it rests on the shelf. See Figure 1.
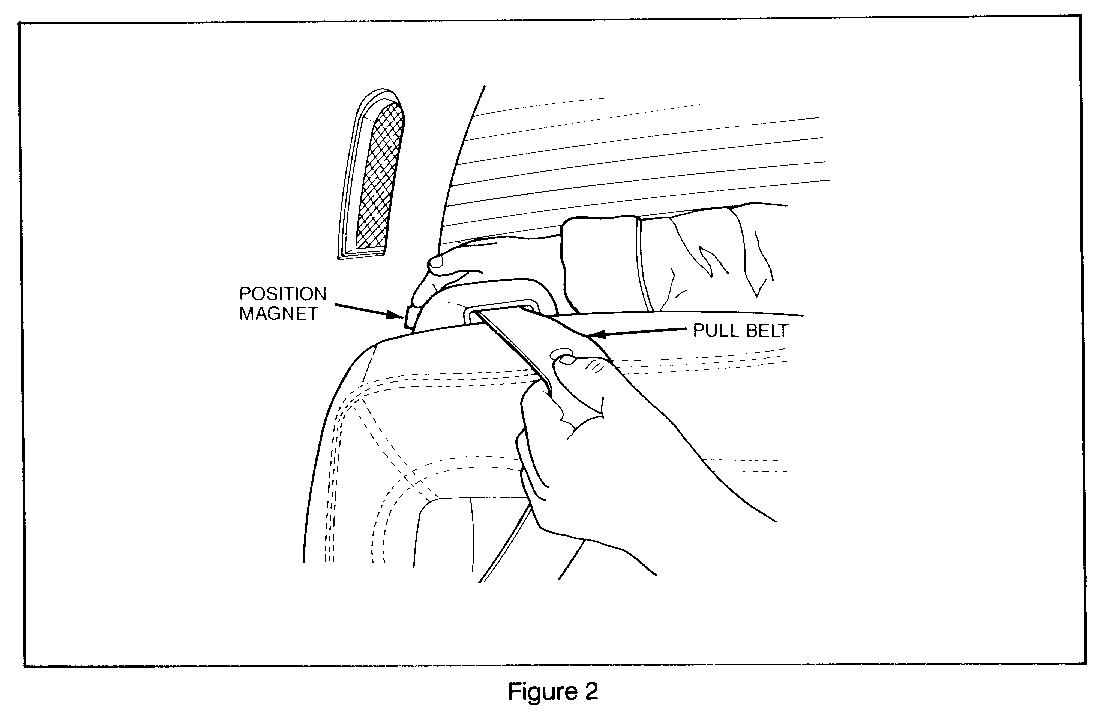
3. Pull the shoulder belt. The belt should be locked. If the shoulder belt does not lock, slide magnet around slowly while pulling on the belt. Keep the magnet against the side of the cover. See Figure 2.
If the belt cannot be made to lock, proceed directly to Step 6 to repair.
4. Remove magnet. Pull and release shoulder belt. The belt should again move in and out freely.
5. If the belt does not function as described in Steps 1, 3 and 4, the retractor assembly must be remounted per the following repair procedure.
If the belt does function as described in Steps 1, 3 and 4, proceed directly to Step 17 and install Campaign Completion label.
REPAIR PROCEDURE:
This procedure should be followed only for those belts which did not function properly during the inspection procedure. A second technician is required for Step 14.
6. Open trunk.
7. Remove nut and washer retaining the shoulder belt retractor assembly onto shelf. Nut and washer are located under the shelf and are accessible through the trunk. Reference the 1990 Cadillac Service Information Manual, Section 10-11. Do not remove retractor assembly at this time.
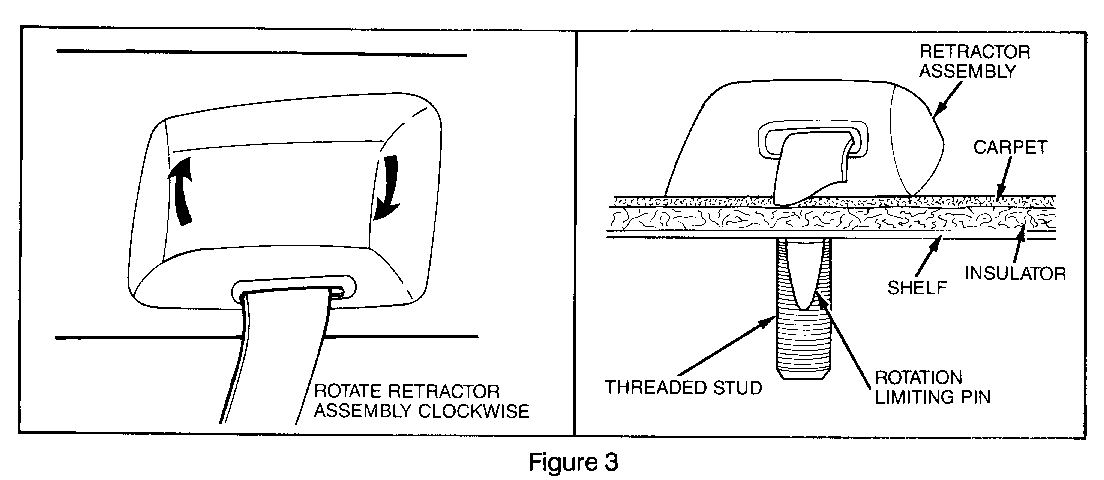
8. Rotate the belt and cover assembly clockwise as far as it will go. A rotation limiting pin and the threaded mounting stud will allow minimal rotation. Do not raise the retractor off the shelf while rotating; the rotation limiting pin should remain engaged. See Figure 3.
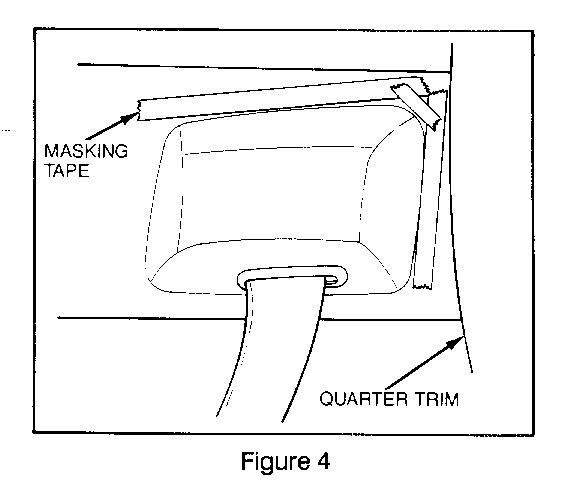
9. Holding the retractor cover in position, outline the rear and outboard sides of the cover by applying masking tape to the shelf along the edge of the cover. See Figure 4.
10. Remove the retractor assembly.
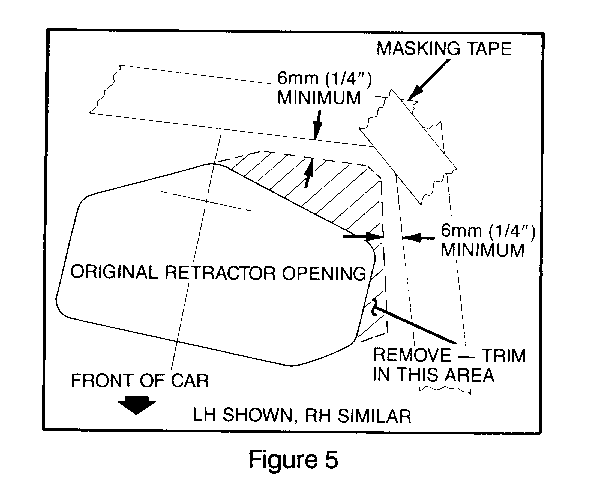
11. Using a razor blade or sharp knife, cut away the carpeted shelf and insulator around the retractor opening on the rear and outboard sides, as shown in Figure 5. Be sure to stay 5-6mm (1/4") inside the outline of the retractor cover so that the larger opening will not be exposed.
12. Reassemble retractor to shelf, making sure the belt is not twisted. Seat the assembly onto the shelf and ensure that the rotation limiting pin is secured.
13. Again, rotate the assembly clockwise as far as it will go. See Figure 3.
14. With another technician holding the retractor in position, reinstall the retractor nut and washer. It is important to hold the retractor down and prevent rotation during tightening so that the retractor remains clear of the shelf trim. Torque nut to 25-45 N.m (18.5-33 lbs. ft.).
15. Verify that the retractor is functioning properlv by again performing the inspection with the special magnet described in Steps 1 through 4. If the belt still does not function as described in Steps 1, 3 and 4, repeat repair procedure (Steps 12 through 15).
16. Close trunk.
17. Install Campaign Completion Label.
INSTALLATION OF CAMPAIGN IDENTIFICATION LABEL
Clean surface of radiator upper mounting panel and apply a Campaign Identification Label. Make sure the correct campaign number is inserted on the label. This will indicate that the campaign has been completed.


General Motors bulletins are intended for use by professional technicians, not a "do-it-yourselfer". They are written to inform those technicians of conditions that may occur on some vehicles, or to provide information that could assist in the proper service of a vehicle. Properly trained technicians have the equipment, tools, safety instructions and know-how to do a job properly and safely. If a condition is described, do not assume that the bulletin applies to your vehicle, or that your vehicle will have that condition. See a General Motors dealer servicing your brand of General Motors vehicle for information on whether your vehicle may benefit from the information.
