Generator Noise at Idle, Slow Speeds (Replace Heater Inlet/Outlet Pipe Assms)

| Subject: | Generator Noise (Whine/Hum/Moan/Vibration) in Passenger Compartment at Idle, Slow Speeds, Decelerating or Parking Maneuvers (Replace Heater Inlet & Outlet Pipe Adapter Bolts and/or Heater Inlet & Outlet Pipe Adapter Assemblies and Heater Inlet Hose Assembly) |
| Models: | 1999 Buick Riviera |
| 1999-2001 Buick Park Avenue and Ultra (Built Prior to VIN Breakpoint 14171337) |
| 2000-2001 Buick LeSabre (Built Prior to VIN Breakpoint 1U149421 -- Hamtramck Plant) |
| 2000-2001 Buick LeSabre (Built Prior to VIN Breakpoint 14171337 -- Orion Plant) |
| 2000- 2001 Pontiac Bonneville (Built Prior to VIN Breakpoint 14171337) |
This bulletin is being revised to update model and parts information, repair procedures and labor times. Please discard Corporate Bulletin Number 99-06-03-005 (Section 6 -- Engine/Propulsion System).
This bulletin is being issued to provide additional information regarding the generator noise condition described below. The heater inlet and outlet pipe adapter bolts were implemented into production in March, 1999 in order to reduce the generator noise condition. However, as part of our continuing effort to further reduce the generator noise condition and to ensure a high level of customer satisfaction, new heater inlet and outlet pipe adapters are now available from GMSPO.
In addition, for the 1999 Park Avenue/Ultra ONLY, a new heater inlet hose assembly is also available from GMSPO.
Heater Inlet/Outlet Pipe Adapters
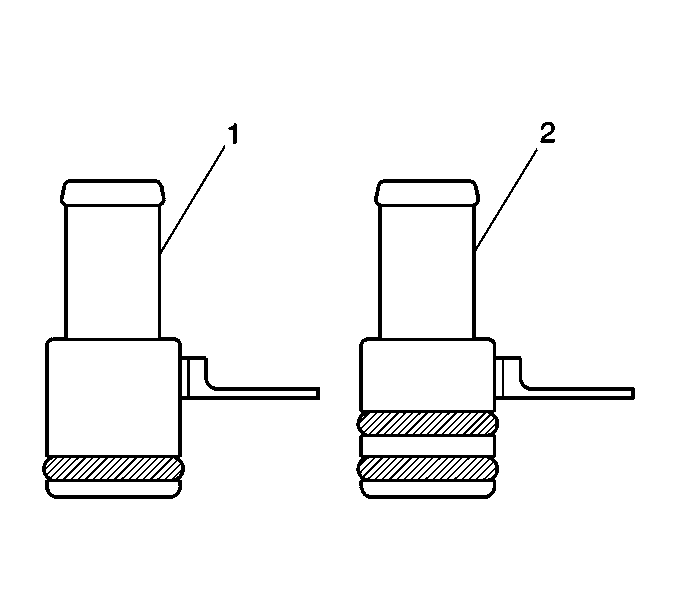
- Old Style
- New Style
Condition
Some customers may comment about a magnetic whine/noise/hum/moan/vibration that can be heard inside the passenger compartment. This condition may be more pronounced at idle, slow speeds, decelerating and during parking lot maneuvers.
Cause
This condition may be caused by the normal magnetic pulses from the generator being transmitted into the passenger compartment by way of the heater inlet and outlet fasteners, adapters and hoses that are attached to the bracket shared by the generator mounting.
Correction 1 -- Replace Heater Inlet and Outlet Pipe Adapters and Bolts and for Park Avenue/Ultra ONLY -- Replace the Heater Inlet Hose Assembly
For vehicles built BEFORE the following VIN breakpoints that have NOT had Service Bulletin 99-06-03-005 incorporated:
Year | Model | Location | VIN Breakpoints |
|---|---|---|---|
1999 | Riviera | Orion Plant | All Vehicles |
1999 | Park Avenue, Ultra | Orion Plant | X4358574 |
2000 | LeSabre | Hamtramck Plant | YU104447 |
2000 | LeSabre | Orion Plant | Y4352574 |
Caution: As long as there is pressure in the cooling system, the temperature can be considerably higher than the boiling temperature of the solution in the radiator without causing the solution to boil. Removal of the heater inlet and/or outlet pipe adapters and/or hoses while the engine is hot and cooling system pressure is high, will cause the solution to boil instantaneously -- possibly with explosive force -- spewing the solution over the engine, fenders and the person removing the adapters and/or hoses. Under certain conditions, the ethylene glycol in the engine coolant could be ignited.
Caution: An electric fan under the hood can start up even when the engine is not running and can injure you. Keep hands, clothing and tools away from any underhood electric fan.
Repair Procedure
Tools Required
| • | J 38185, Spring Hose Clamp Pliers |
| • | J 37097-A, Hose Clamp Remover/Installer |
Parts Required
| • | P/N 12569584 -- Heater Inlet Pipe Adapter Assembly |
| • | P/N 12569648 -- Heater Outlet Pipe Adapter Assembly |
| • | P/N 11517999 -- Heater Inlet & Outlet Pipe Adapter Bolt/Screw (Two) |
| • | P/N 25699450 -- Heater Inlet Hose Assembly (For 1999 Park Avenue/Ultra ONLY) |
- Drain the cooling system.
- Remove the heater inlet and outlet pipe adapter bolts (2 and 5) from the heater inlet and outlet pipe adapters (3 and 4).
- Remove the heater inlet and outlet pipe adapters (3 and 4) from the engine.
- Mark the position of the heater pipe adapter bracket on the heater hose.
- On 1999 Park Avenue/Ultra ONLY:
- On 1999 Park Avenue/Ultra ONLY:
- Align the bracket of the new heater pipe adapter with the mark on the heater hose.
- Apply a thin layer of lubricant, such GM Goodwrench® Rubber Lubricant, P/N 12345884 (in Canada, use P/N 5728223), or equivalent to the O-rings of the heater inlet and outlet pipe adapters.
- Install the heater inlet and outlet pipe adapters (3 and 4) to the engine.
- Install two new heater inlet and outlet pipe adapter bolts (2 and 5), P/N 11517999.
- Fill the cooling system.
Refer to the Draining and Filling Cooling System procedures in the Engine Cooling sub-section of the Service Manual.
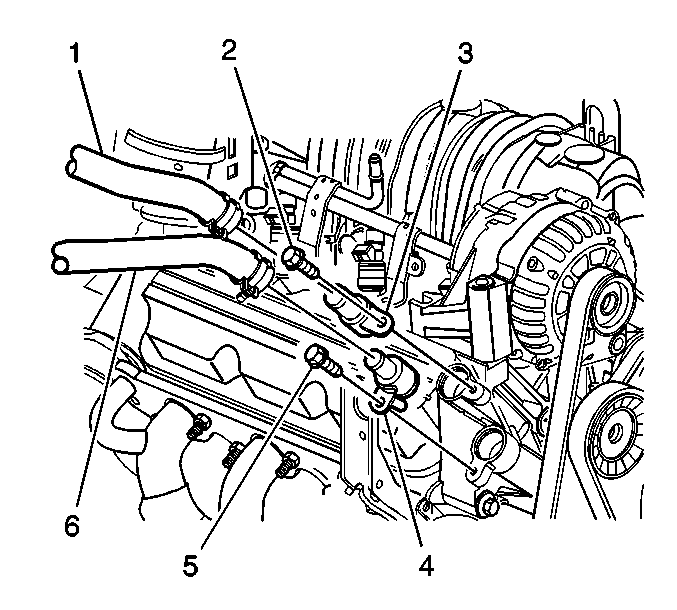
Remove the heater inlet and outlet pipe adapters (3 and 4) from the heater hoses (1 and 6) using the J 38185, Spring Hose Clamp Pliers.

| 5.1. | Remove the hose clamp from the heater inlet hose at the heater core using the J 37097-A, Hose Clamp Remover/Installer. |
| 5.2. | Remove the heater inlet hose assembly. |
| 5.3. | Remove the hose clamps from the hose assembly. |
| 6.1. | Transfer the adapter bracket mark from the old hose to the new heater inlet hose assembly, P/N 25699450. |
| 6.2. | Install the hose clamps to the new hose assembly. |
| 6.3. | Install the new hose assembly to the heater core. |
| 6.4. | Install the hose clamp to the heater inlet hose at the heater core using the J 37097-A, Hose Clamp Remover/Installer. |
| 7.1. | Install the new heater inlet pipe adapter (3), P/N 12569584, and the new heater outlet pipe adapter (4), P/N 12569648, to the heater hoses. |
| 7.2. | Reposition the heater hose clamps using the J 38185, Spring Hose Clamp Pliers. |
Ensure the pipe adapters are properly seated.
Important: Do not exceed the specified torque. The isolation bolts are intended to eliminate the hard interface between the generator mounting bracket and the heater inlet and outlet pipe adapters. After tightening the bolts, ensure the hose has movement.
Tighten
Tighten the two new heater inlet and outlet pipe adapter bolts to 10 N·m
(89 lb in).
Refer to the Draining and Filling Cooling System procedures in the Engine Cooling sub-section of the Service Manual.
Correction 2 -- Replace Heater Inlet and Outlet Pipe Adapters and for Park Avenue/Ultra ONLY -- Replace the Heater Inlet Hose Assembly
For the following vehicles:
Year | Model | Location | VIN Breakpoints |
|---|---|---|---|
1999 | Park Avenue, Ultra | Orion Plant | Built AFTER X4358573 |
2000 | Park Avenue, Ultra | Orion Plant | All Vehicles |
2000 | LeSabre | Hamtramck Plant | Built AFTER YU104446 |
2000 | LeSabre | Orion Plant | Built AFTER Y4352573 |
2001 | Park Avenue, Ultra | Orion Plant | Built BEFORE 14171337 |
2001 | LeSabre | Hamtramck Plant | Built BEFORE 1U149421 |
2001 | LeSabre | Orion Plant | Built BEFORE 14171337 |
2001 | Bonneville | Orion Plant | Built BEFORE 14171337 |
Caution: As long as there is pressure in the cooling system, the temperature can be considerably higher than the boiling temperature of the solution in the radiator without causing the solution to boil. Removal of the heater inlet and/or outlet pipe adapters and/or hoses while the engine is hot and cooling system pressure is high, will cause the solution to boil instantaneously -- possibly with explosive force -- spewing the solution over the engine, fenders and the person removing the adapters and/or hoses. Under certain conditions, the ethylene glycol in the engine coolant could be ignited.
Caution: An electric fan under the hood can start up even when the engine is not running and can injure you. Keep hands, clothing and tools away from any underhood electric fan.
Repair Procedure
Tools Required
| • | J 38185, Spring Hose Clamp Pliers |
| • | J 37097-A, Hose Clamp Remover/Installer |
Parts Required
| • | P/N 12569584 -- Heater Inlet Pipe Adapter Assembly |
| • | P/N 12569648 -- Heater Outlet Pipe Adapter Assembly |
| • | P/N 25699450 -- Heater Inlet Hose Assembly (For 1999 Park Avenue/Ultra ONLY) |
- Drain the cooling system.
- Remove the heater inlet and outlet pipe adapter bolts (2 and 5) from the heater inlet and outlet pipe adapters (3 and 4).
- Remove the heater inlet and outlet pipe adapters (3 and 4) from the engine.
- Mark the position of the heater pipe adapter bracket on the heater hose.
- On 1999 Park Avenue/Ultra ONLY:
- On 1999 Park Avenue/Ultra ONLY:
- Align the bracket of the new heater pipe adapter with the mark on the heater hose.
- Apply a thin layer of lubricant, such GM Goodwrench® Rubber Lubricant, P/N 12345884 (in Canada, use P/N 5728223), or equivalent to the O-rings of the heater inlet and outlet pipe adapters.
- Install the heater inlet and outlet pipe adapters (3 and 4) to the engine.
- Install the two heater inlet and outlet pipe adapter bolts (2 and 5).
- Fill the cooling system.
Refer to the Draining and Filling Cooling System procedures in the Engine Cooling sub-section of the Service Manual.
Remove the heater inlet and outlet pipe adapters (3 and 4) from the heater hoses (1 and 6) using the J 38185, Spring Hose Clamp Pliers.
| 5.1. | Remove the hose clamp from the heater inlet hose at the heater core using the J 37097-A, Hose Clamp Remover/Installer. |
| 5.2. | Remove the heater inlet hose assembly. |
| 5.3. | Remove the hose clamps from the hose assembly. |
| 6.1. | Transfer the adapter bracket mark from the old hose to the new heater inlet hose assembly, P/N 25699450. |
| 6.2. | Install the hose clamps to the new hose assembly. |
| 6.3. | Install the new hose assembly to the heater core. |
| 6.4. | Install the hose clamp to the heater inlet hose at the heater core using the J 37097-A, Hose Clamp Remover/Installer. |
| 7.1. | Install the new heater inlet pipe adapter (3), P/N 12569584, and the new heater outlet pipe adapter (4), P/N 12569648, to the heater hoses. |
Align the new heater pipe adapter bracket with the mark on the heater hose.
| 7.2. | Reposition the heater hose clamps using the J 38185, Spring Hose Clamp Pliers. |
Ensure the pipe adapters are properly seated.
Important: Do not exceed the specified torque. The isolation bolts are intended to eliminate the hard interface between the generator mounting bracket and the heater inlet and outlet pipe adapters. After tightening the bolts, ensure the hose has movement.
Tighten
Tighten the two heater inlet and outlet pipe adapter bolts to 10 N·m
(89 lb in).
Refer to the Draining and Filling Cooling System procedures in the Engine Cooling sub-section of the Service Manual.
Parts Information
Part Number | Description | Qty |
|---|---|---|
11517999 | Bolt/Screw, Heater Inlet & Outlet Pipe Adapter | 2 |
12569584 | Adapter Assembly - Heater Inlet Pipe | 1 |
12569648 | Adapter Assembly - Heater Outlet Pipe | 1 |
25699450 | Hose - Heater Inlet (For 1999 Park Avenue/Ultra ONLY) | 1 |
Parts are currently available from GMSPO.
Warranty Information
For vehicles repaired under warranty, use:
Labor Operation | Description | Labor Time |
|---|---|---|
D2732 For 1999 Riviera, 2000 and 2001 LeSabre and Bonneville | Heater Pipe Inlet Adapter Assembly - Replace | 0.4 hr |
Add | Heater Pipe Outlet Adapter Asm - Replace | 0.2 hr |
D2732 For 2000 and 2001 Park Avenue/Ultra | Heater Pipe Inlet Adapter Asm - Replace | 0.4 hr |
Add | Heater Pipe Outlet Adapter Asm - Replace | 0.2 hr |
D2774 For 1999 Park Avenue, Ultra ONLY | Heater Pipe Inlet Hose Asm - Replace | 0.7 hr |
Add | Heater Pipe Inlet & Outlet Adapter Asm - Replace | 0.2 hr |
