WINDNOISE INFORMATION (INFORMATIONAL)

SUBJECT: WINDNOISE (INFORMATIONAL)
MODELS AFFECTED: 1991-93 ROADMASTER
This bulletin replaces Bulletin 92-10-66. Please discard Bulletin 92-10-66.
Customer comments regarding windnoise may be addressed by using the procedures on the individual items listed in this bulletin.
Proper diagnosis may be made with a variety of tools and methods including stethoscopes, dust guns, sonic instruments, visual inspections, dollar bill method etc. It is important to remember that windnoise can best be described as air leaking from inside of the vehicle outward while traveling at highway speeds. Turbulence or windrush is best described as air passing over and around body openings and moldings.
Prior to any repairs, the front and rear door auxiliary weatherstrips and door primary opening weatherstrips should be visually inspected for proper gaps, fits, weatherstrip contact, and sealing. The vehicle should also be road tested to determine location and degree of windnoise/turbulence on the vehicle.
The recommended materials to be used with the following procedures are:
3M AUTO BEDDING +GLAZING - PART NUMBER 08509
3M ULTROPRO AUTO BODY SEALANT (CLEAR) - PART NUMBER 08302
3M STRIP CAULK - PART NUMBER 08578
AMERICAN SURE SEAL BEDDING COMPOUND - PART NUMBER CGB
AMERICAN SURE SEAL STRIP CAULK (BLACK) - PART NUMBER BSC
KENT AUTO BEDDING AND GLAZING COMPOUND - PART NUMBER 10255
GM URETHANE ADHESIVE KIT - PART NUMBER 12345633
GM GOODWRENCH RTV SILICONE RUBBER - PART NUMBER 12345336
KENT TRACING POWDER - PART NUMBER 20065
3M and AMERICAN SURE SEAL INC. can be purchased locally.
KENT PRODUCTS distribution can be obtained by calling 1-800-654-6333.
"We believe these sources and their product to be reliable. There may be additional manufacturers of such products. General Motors does not endorse, indicate any preference for or assume any responsibility for the products from these firms or for any such items which may be available from other sources."
CORRECTIONS:
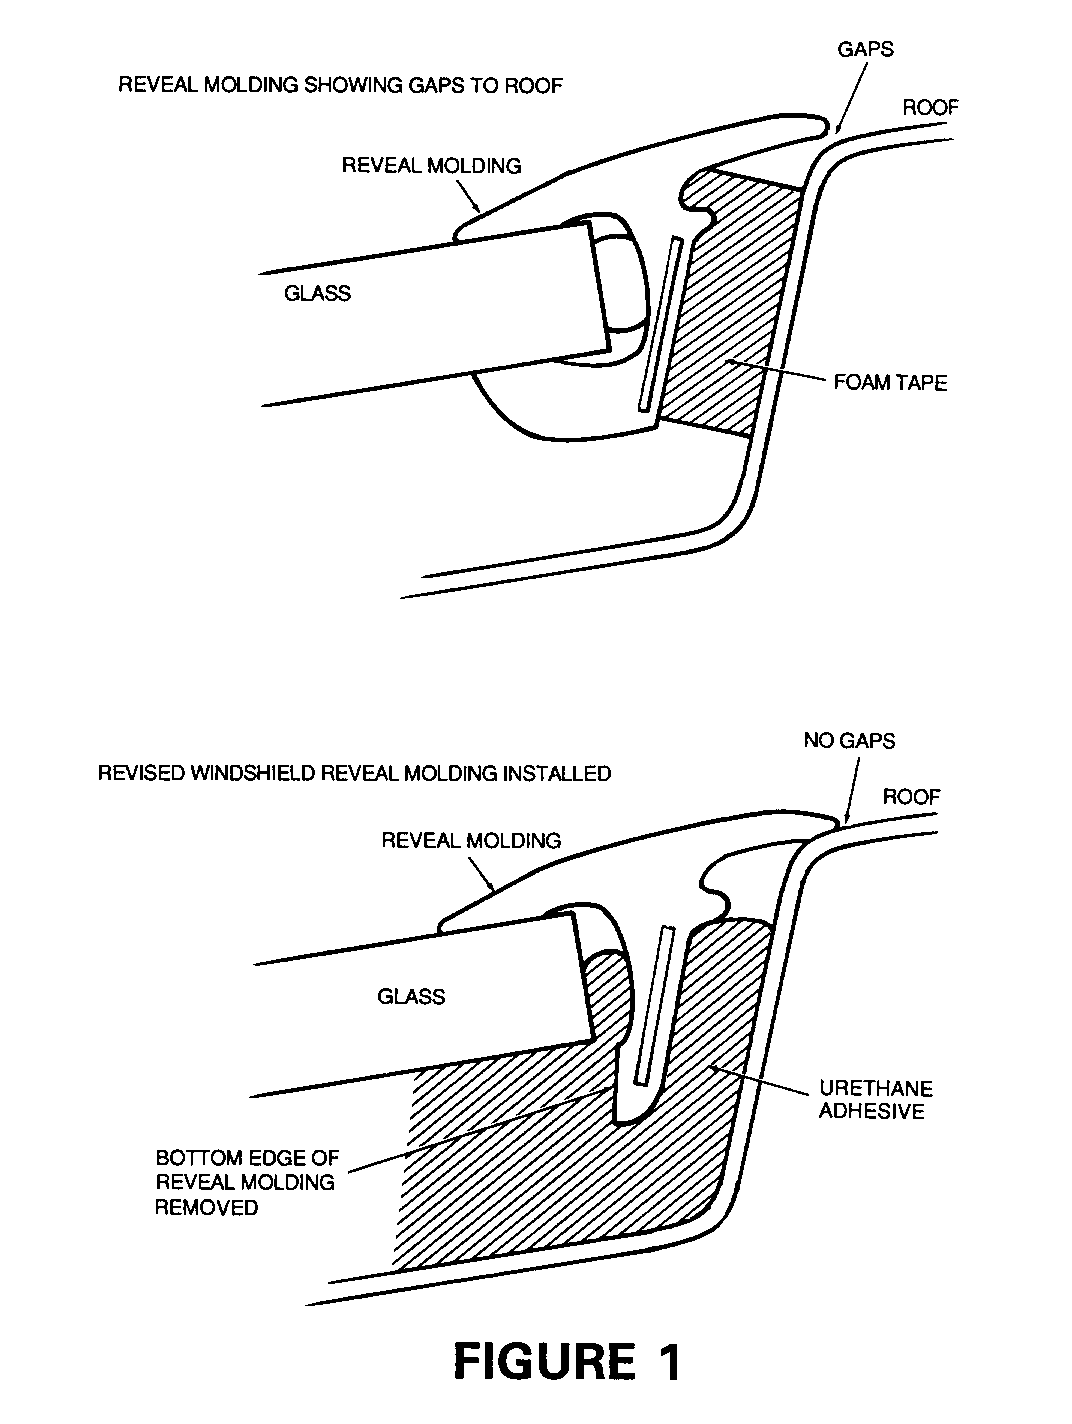
----------- I. Windshield upper reveal molding gaps to the roof.
NOTE: This procedure may require a new molding depending on difficulty of removal. Windshield upper reveal molding P/N 16616066.
Windshield upper reveal molding gaps to the roof may be corrected by following the procedure listed below.
1. Loosen and remove (partially) both RH and LH auxiliary weatherstrips.
2. Remove both windshield side reveal moldings.
3. Grasp the windshield upper reveal molding end and rotate forward while removing from cavity.
4. Remove the foam tape from the molding if present from the back side of the molding.
5. Trim the lower lip off the reveal molding as shown in (Figure #1).
6. Dry fit the molding to the opening.
7. Remove adhesive from cavity if necessary.
8. Apply urethane P/N 12345633 into the cavity up to the bottom side of the windshield.
9. Install molding.
10. Tape the molding to the body using masking tape.
11. Allow urethane to cure over night before removing tape.
12. Remove any excess squeeze out of urethane from the glass and the body after tape is removed.
WARRANTY INFORMATION:
Labor Operation No.: T1939
Labor Time: 0.7 Hr.
See Figure 1
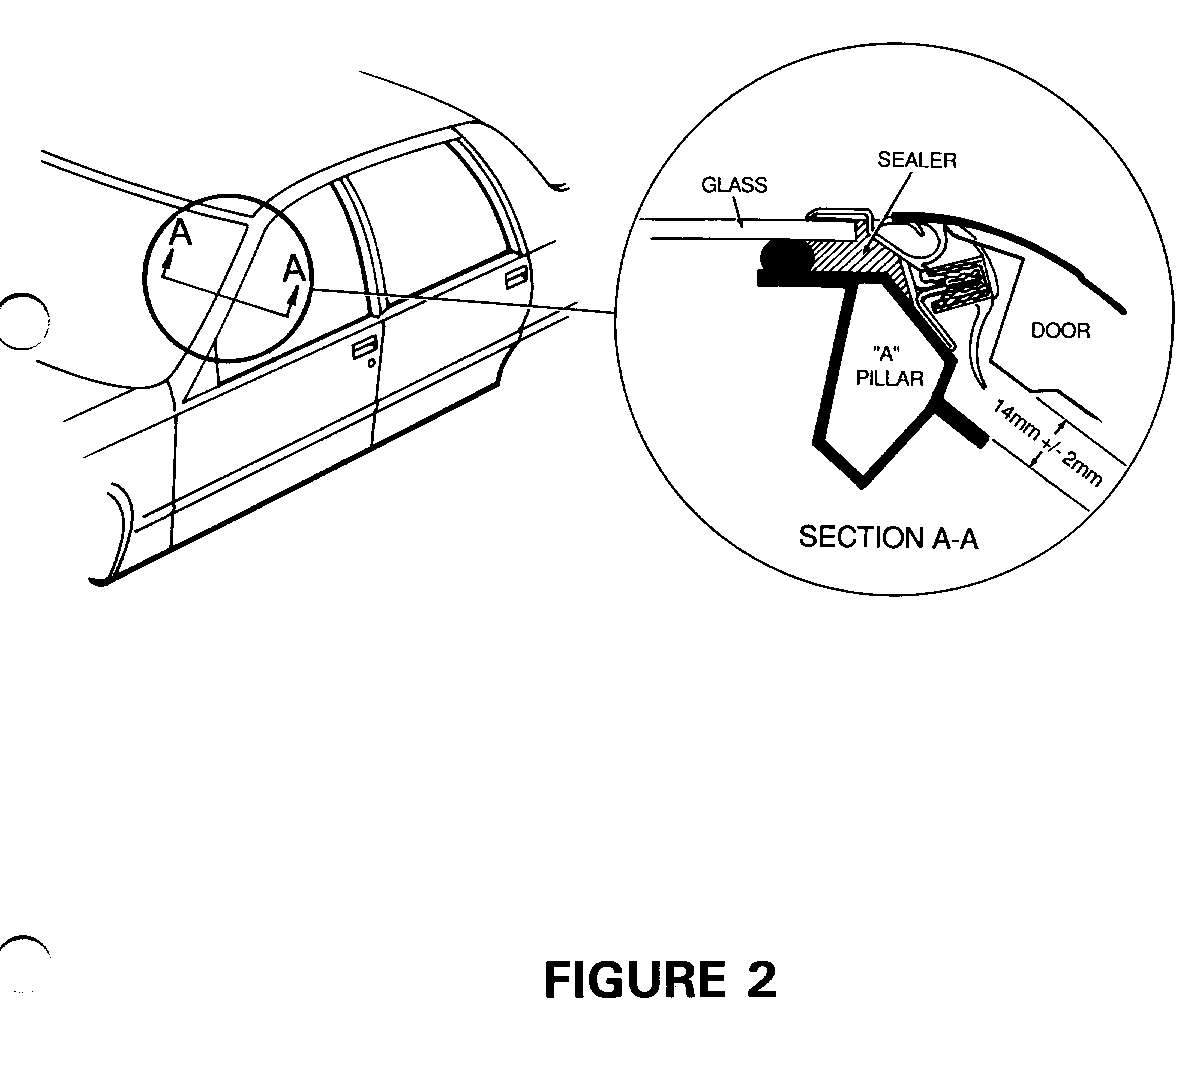
II. Wind rush due to gap at windshield side reveal molding to glass, left and or right side.
1. Remove auxiliary weatherstrip to access the windshield side reveal molding retaining screws.
2. Remove the retaining screws and the molding.
3. Holding the windshield side reveal molding in position, flush the molding to the glass. Determine how much elongation of the screw holes in the molding is necessary to position the molding flush to the glass.
4. Using a small rattail file, elongate the retaining holes in the direction and length needed to position the molding flush to the glass.
5. Put a light film of oil on the inner surface of the windshield side reveal molding to facilitate future serviceability.
6. Fill the void between the glass and the inside surface of the windshield side reveal molding with RTV sealant or equivalent. (See Figure 2 Section A-A).
7. Reinstall the windshield side reveal molding and retaining screws per Section 10-2 of the Service Manual.
8. Using strip caulk, fill the cavity at the top of the windshield side reveal molding to the upper windshield reveal molding.
IMPORTANT: Be careful not to trap the primary seal under the auxiliary seal when reinstalling the auxiliary seal.
WARRANTY INFORMATION:
Labor Operation No.: T1898
Labor Time: 0.3 Hr. 0.2 Hr. For Other Side
See Figure 2
III. Windnoise due to air leak at primary weatherstrip to door frame.
1. Adjust the door inboard to obtain necessary contact to the door frame.
NOTE: In some cases it may be necessary to slightly bend the primary weatherstrip retaining flange outboard to obtain good contact to the door.
IV. Windshield side reveal molding gaps to door.
Adjust the door inboard so there is slight contact of the door frame along the A-pillar to the windshield side reveal molding.
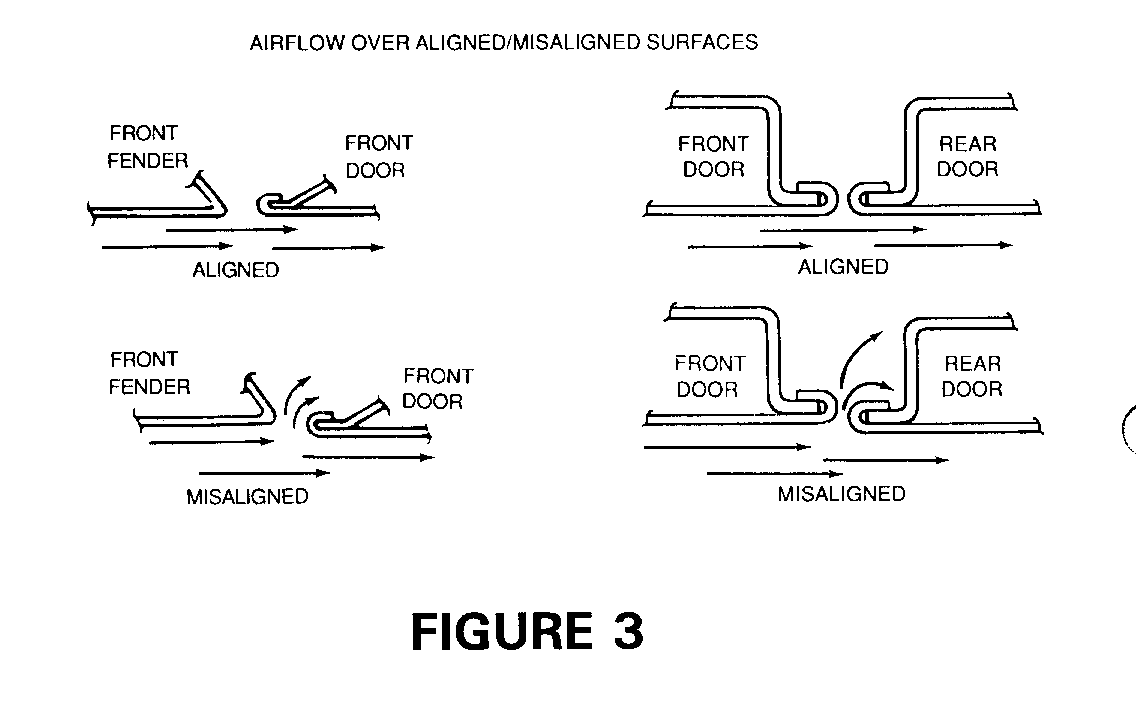
V. Front edge of the front door may be outboard slightly of the front fender.
Adjust the front edge of the front door inboard of the front fender. Flush to 1.5 mm inboard. (See Figure 3).
NOTE: In rare instances it may be necessary to adjust the front fender outboard to obtain a proper fit.
VI. Front edge of the rear door may be outboard slightly of the front door.
Adjust the front edge of the rear door inboard of the front door. Flush to 1.5 mm inboard (See Figure 3).
WARRANTY INFORMATION:
Door Assembly Align: Labor Operation No.: B4000 Right Front Labor Time: 0.6 Hr. Labor Operation No.: B4001 Left Front Labor Time: 0.6 Hr. Labor Operation No.: B4400 Right Rear Labor Time: 0.3 Hr. Labor Operation No.: B4401 Left Rear Labor Time: 0.3 Hr.
See Figure 3
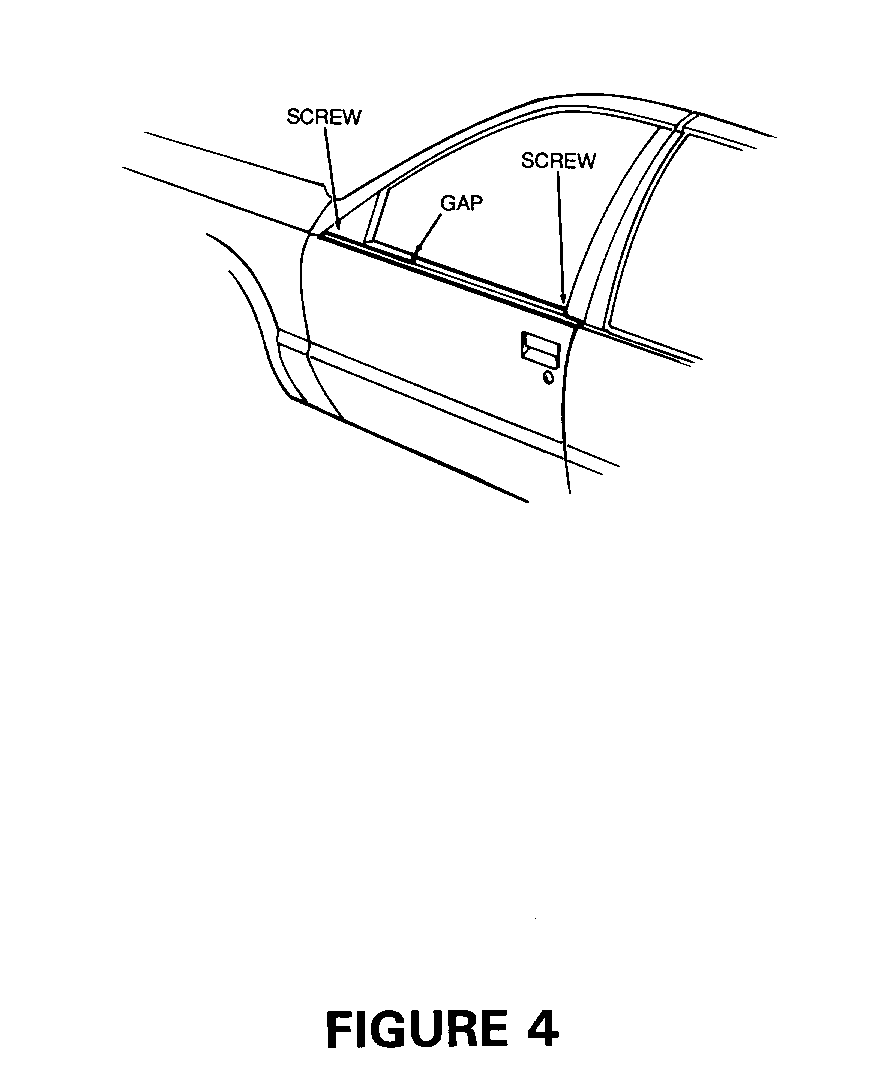
VII. Windrush due to front door window belt molding gap to front door window reveal molding. Gap between the two moldings can be seen right behind the mirror.
1. Loosen the front and rear screws of the front door belt reveal molding (See Figure 4).
2. Tap the belt molding forward to close the gap to the front reveal.
3. Retorque the screws.
WARRANTY INFORMATION;
Labor Operation No.: B7840 Right Labor Time: 0.2 Hr. Per Door Labor Operation No.: B7841 Left
See Figure 4
VIII. Windnoise at front door window run channel to door frame.
1. Lower door glass.
2. Remove the window run channel from the retainer in the header of the door frame by pulling down and outboard on the run channel.
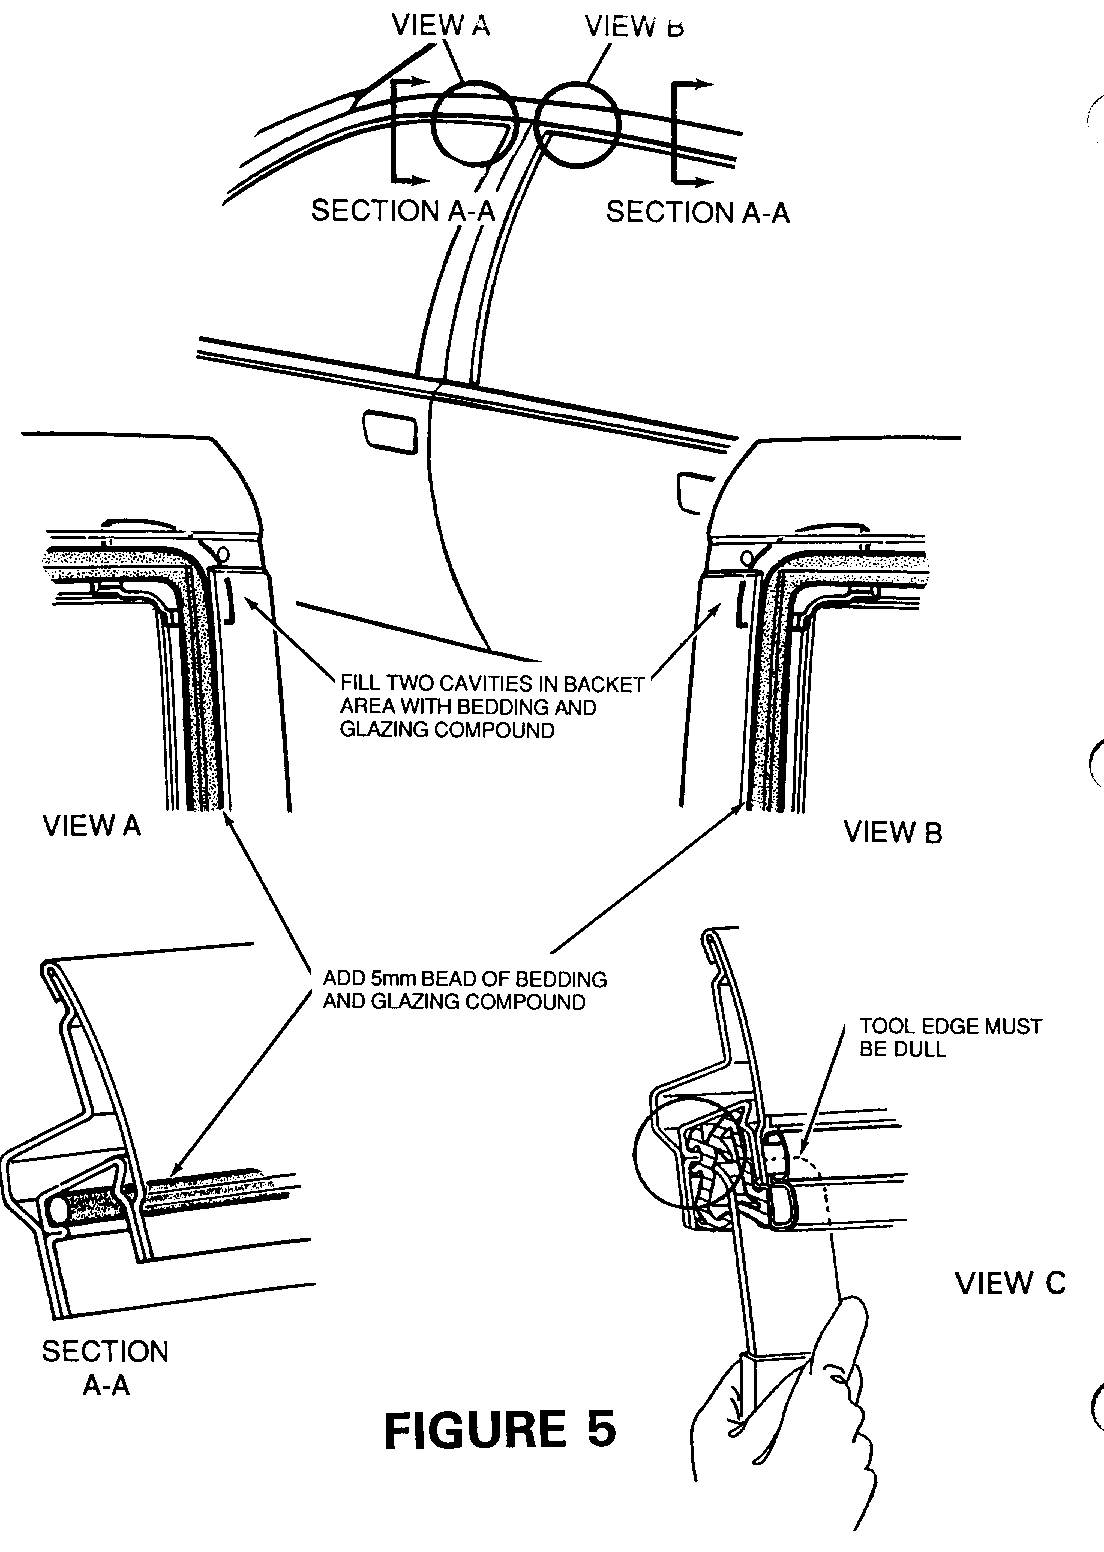
3. Using bedding and glazing compound, run a 5 mm bead around the inboard edge of the retainer (See Figure 5 Section A-A).
4. Using bedding and glazing compound, fill the two cavities in the upper rear corner of the door frame (See Figure 5 View A).
5. Spray window run channel with glass cleaner, for ease of installation.
6. Reinstall the window run channel, using a flat bladed tool to ensure that the run channel is fully seated in the retainer (See Figure 5 View C).
IX. Windnoise at rear door window run channel to door frame.
1. Lower the door glass.
2. Remove the front, top and rear portion of the run channel from the retainer from the door frame by pulling down and outboard on the run channel.
3. Using bedding and glazing compound, run a 5 mm bead around entire inboard edge of the retainer (See Figure 5 Section A-A ).
4. Using bedding and glazing compound, fill the cavities in the bracket area of the upper front corner of the door header and at the top of the division post. (See Figure 5 View B).
5. Spray the window run channel with glass cleaner for ease of installation.
6. Reinstall the window run channel using a flat bladed tool to insure that the run channel is fully seated in the retainer (See Figure 5 View C).
WARRANTY INFORMATION:
Labor Operation No.: T1899
Labor Time: 0.3 Hr. 0.2 Hr. Each Additional Door
See Figure 5
X. Windnoise at rear door stationary glass seal to door frame.
1. Remove the rear door stationary glass per Section 10 of the Service Manual.
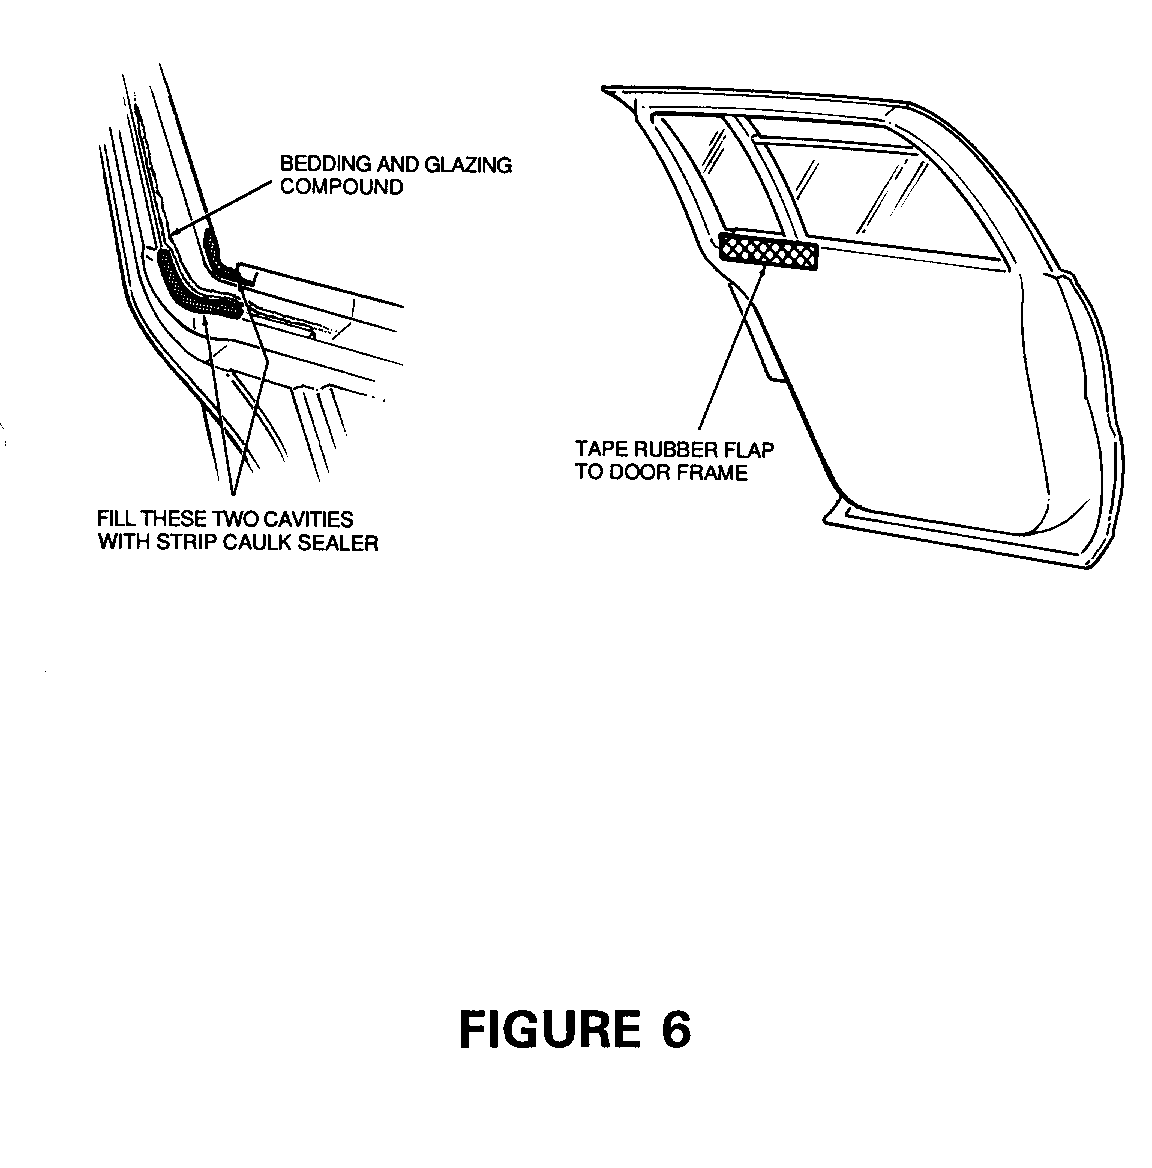
2. Starting at the top of the division post and continuing rearward to the bottom of the stationary glass opening, apply a bead of bedding and glazing compound to the inboard edge of the retainer (See Figure 6).
3. Fill the two cavities at the lower corner of the stationary glass channel with strip caulk sealer (See Figure 6).
4. Reinstall stationary glass.
5. After the glass is reinstalled, tape the rubber flap to the door as shown in (Figure 6) to close off any openings.
NOTE: When reinstalling stationary glass, care should be taken to ensure that the stationary glass seal is parallel with the belt line molding. The seal flap around the perimeter of the stationary glass must be outboard of the reveal molding.
WARRANTY INFORMATION:
Labor Operation No.: C0400 Right
Labor Time: 1.0 Hr. Per Door
Labor Operation No.: C0401 Left
See Figure 6
XI. Windrush due to gap condition at B-pillar seal to rear door.
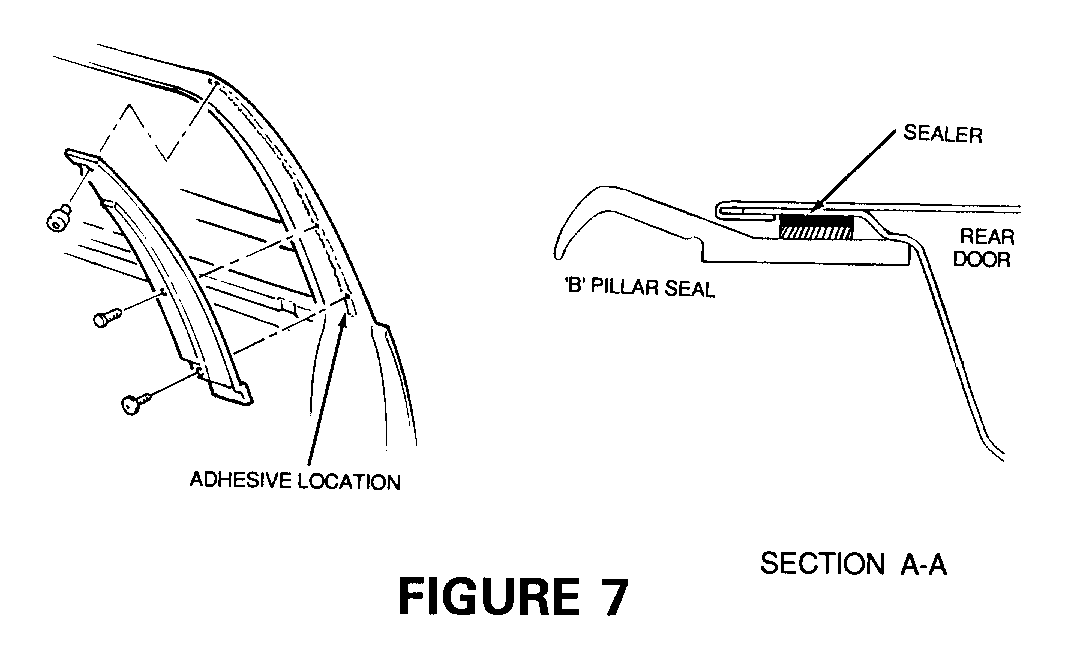
1. Remove retaining screws and B-pillar seal.
2. Apply a bead of 3M ULTROPRO AUTOBODY-SEALANT CLEAR (OR EQUIVALENT) to the door frame as shown in (Figure 7).
3. Reinstall B-pillar seal.
WARRANTY INFORMATION:
Labor Operation No.: C1600 Right
Labor Time: 0.2 Per Door
Labor Operation No.: C1601 Left
See Figure 7
NOTE: Individual labor allowances have been provided for each operation in this bulletin. However, the total time for all operations should not exceed 5.1 hours. The difference in total time and cumulated individual time is due to redundant or overlapping operations, which are not allowed.
Parts are currently available from GMSPO.
General Motors bulletins are intended for use by professional technicians, not a "do-it-yourselfer". They are written to inform those technicians of conditions that may occur on some vehicles, or to provide information that could assist in the proper service of a vehicle. Properly trained technicians have the equipment, tools, safety instructions and know-how to do a job properly and safely. If a condition is described, do not assume that the bulletin applies to your vehicle, or that your vehicle will have that condition. See a General Motors dealer servicing your brand of General Motors vehicle for information on whether your vehicle may benefit from the information.
