REAR MAIN OIL SEAL OIL SEAL REPLACEMENT

Models Affected: 1983 and early 1984 Skyhawks Equipped with 2.0L L-4 Engines (Vin Code P)
NOTICE: This information supersedes bulletin 84-6-4. Please discard previous bulletin and replace it with this one. The second page and part numbers were omitted from original text.
A new, one (1) piece rear crankshaft oil seal has been released to replace the two (2) piece seal used in all 1983 2.0L L-4 engines. The use of the two (2) piece seal should be discontinued for service and the new one (1) piece seal should be utilized for all future repairs of these engines. Early production 1984 engines were assembled using the one (1) piece seal. Therefore, if a rear oil seal in these models needs replacement, the above mentioned seal should be used. The new seal is available from WDDGM under part #14081761 which includes seal, installation tool and instrument sheet.
BEFORE REPLACING A REAR MAIN OIL SEAL CARE SHOULD BE TAKEN IN DETERMINING THE EXACT SOURCE OF LEAK.
The following installation procedure should be used when replacement of the rear oil seal is necessary.
REMOVAL
1. Remove engine and mount on repair stand in inverted position with coolant and oil drained.
2. Remve oil pan and oil pump asm.
3. Remove front cover. Lock chain tensioner with pin (Do Not Force).
4. Rotate crankshaft until timing marks on cam and crank sprockets line up.
5. Remove camshaft bolt, cam sprocket, and timing chain.
6. Rotate crankshaft to horizontal position.
7. Remove rod bearing nuts, caps and bearings.
NOTICE: Care must be taken so that caps and/or bearings are not mixed.
8. Remove main bearing bolts, caps and bearings.
9. Remove crankshaft.
10. Remove oil seal and clean sealant from grooves (both cap and case.)
11. Clean crankshaft seal area with solvent to remove excess sealant.
NOTICE: Care should be taken to avoid damage on surface.
INSTALIATION
1. Apply light coat of sealant P/N 1052357 or equivalent to O.D. of seal (approx. 1.0mm bead).
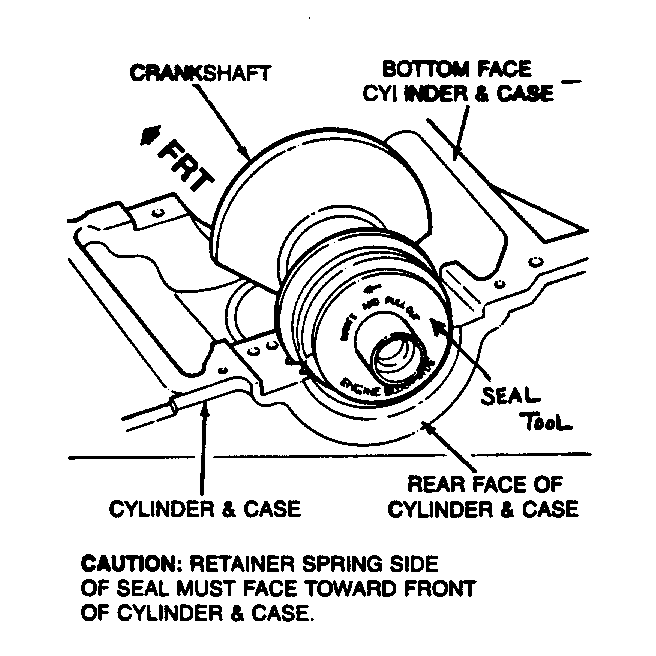
2. Place seal tool assembly on rear area of crankshaft.
3. Position seal tool so that arrow points toward cylinder and case assembly (Fig. 1).
4. Place crankshaft in engine with tool in place.
5. Remove tool and discard.
6. Put light coat of oil on crankshaft journals.
7. Seal rear main bearing split-line surface and replace cap and main bearing. (Use sealant P/N 1052357 or equivalent).
8. Replace balance of caps and main bearings. Tighten to 85-100 N.m (64-75 ft. lbs.) torque.
9. Replace rod bearings and caps. Tighten to 46-54 N.m (34-50 ft. lbs.) torque.
10. Install oil pump making sure mating surface is free of foreign material. Tighten to 35-47 N.m (26-35 ft. lbs.) torque.
11. Align crank sprocket timing mark and install cam sprocket and timing chain. Tighten bolts to 90-115 N.m (66-85 ft. lbs.) torque.
12. Clean, seal and install oil pan and front cover.

General Motors bulletins are intended for use by professional technicians, not a "do-it-yourselfer". They are written to inform those technicians of conditions that may occur on some vehicles, or to provide information that could assist in the proper service of a vehicle. Properly trained technicians have the equipment, tools, safety instructions and know-how to do a job properly and safely. If a condition is described, do not assume that the bulletin applies to your vehicle, or that your vehicle will have that condition. See a General Motors dealer servicing your brand of General Motors vehicle for information on whether your vehicle may benefit from the information.
