For 1990-2009 cars only
Rear Bumper Fascia Replacement Pontiac
Tools Required
J 38778 Door Trim Pad Clip Remover
Removal Procedure
- Open the liftgate.
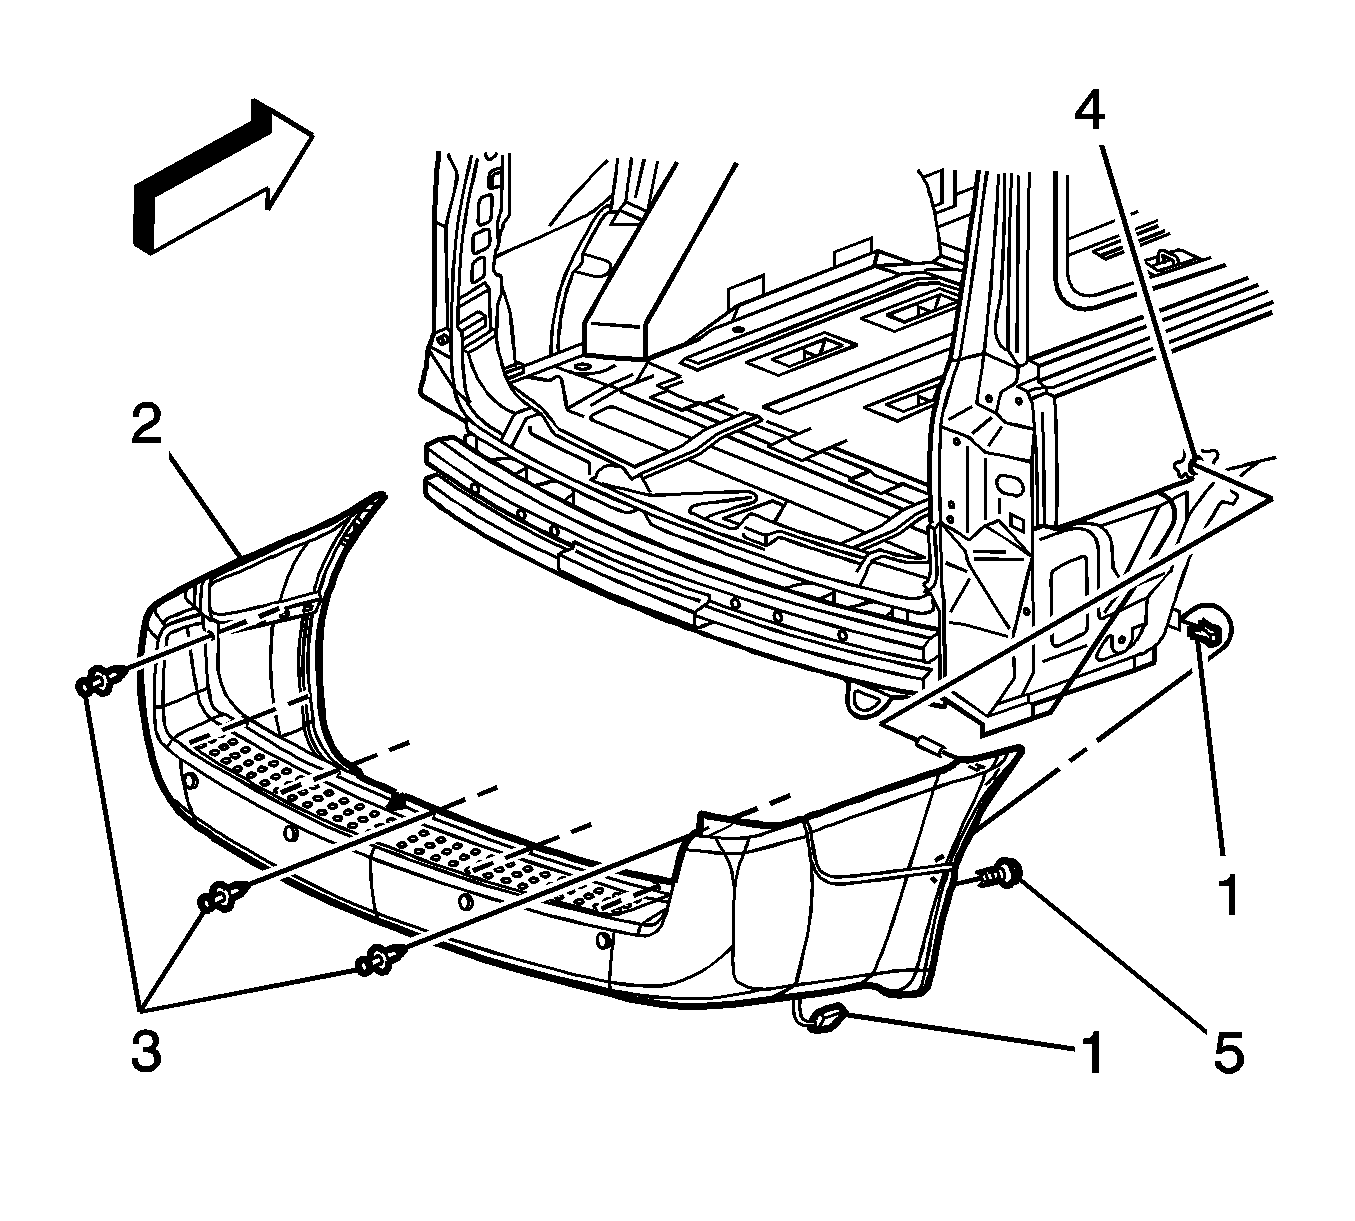
- Disconnect the electrical connection (1) for the rear object sensor harness, if equipped.
- Use the J 38778 in order to remove the push-in retainers (3) from the upper and lower rear bumper fascia.
- Remove the screws (5) at the right and left wheel well from the rear bumper fascia.
- Remove the palnut from the rear bumper fascia outer retainer.
- Remove the rear bumper fascia (2) from the vehicle.
- Remove the rear parking assist (RPA) sensors, if equipped. Refer to Rear Object Sensor Replacement .
- Transfer the rear object sensors to the new rear bumper fascia, if equipped.

Installation Procedure
- Install the RPA sensor to the rear bumper fascia, if equipped. Refer to Rear Object Sensor Replacement .
- Align the rear bumper fascia (2) to the rear bumper fascia outer support.
- Align the rear bumper fascia outer retainer (4) to the body.
- Install the palnut to the rear bumper fascia outer retainer.
- Install the push-in retainers (3) to the upper and lower rear bumper fascia.
- Install the screws (5) at the right and left wheel well to the rear bumper fascia.
- Connect the electrical connection (1) to the rear object sensor harness, if equipped.
- Close the liftgate.

Notice: Refer to Fastener Notice in the Preface section.
Tighten
Tighten the palnut to 2 N·m (18 lb in).
Tighten
Tighten the rear bumper fascia wheel well screws to 3 N·m (26 lb in).
Rear Bumper Fascia Replacement Buick
Tools Required
J 38778 Door Trim Pad Clip Remover
Removal Procedure
- Open the liftgate.
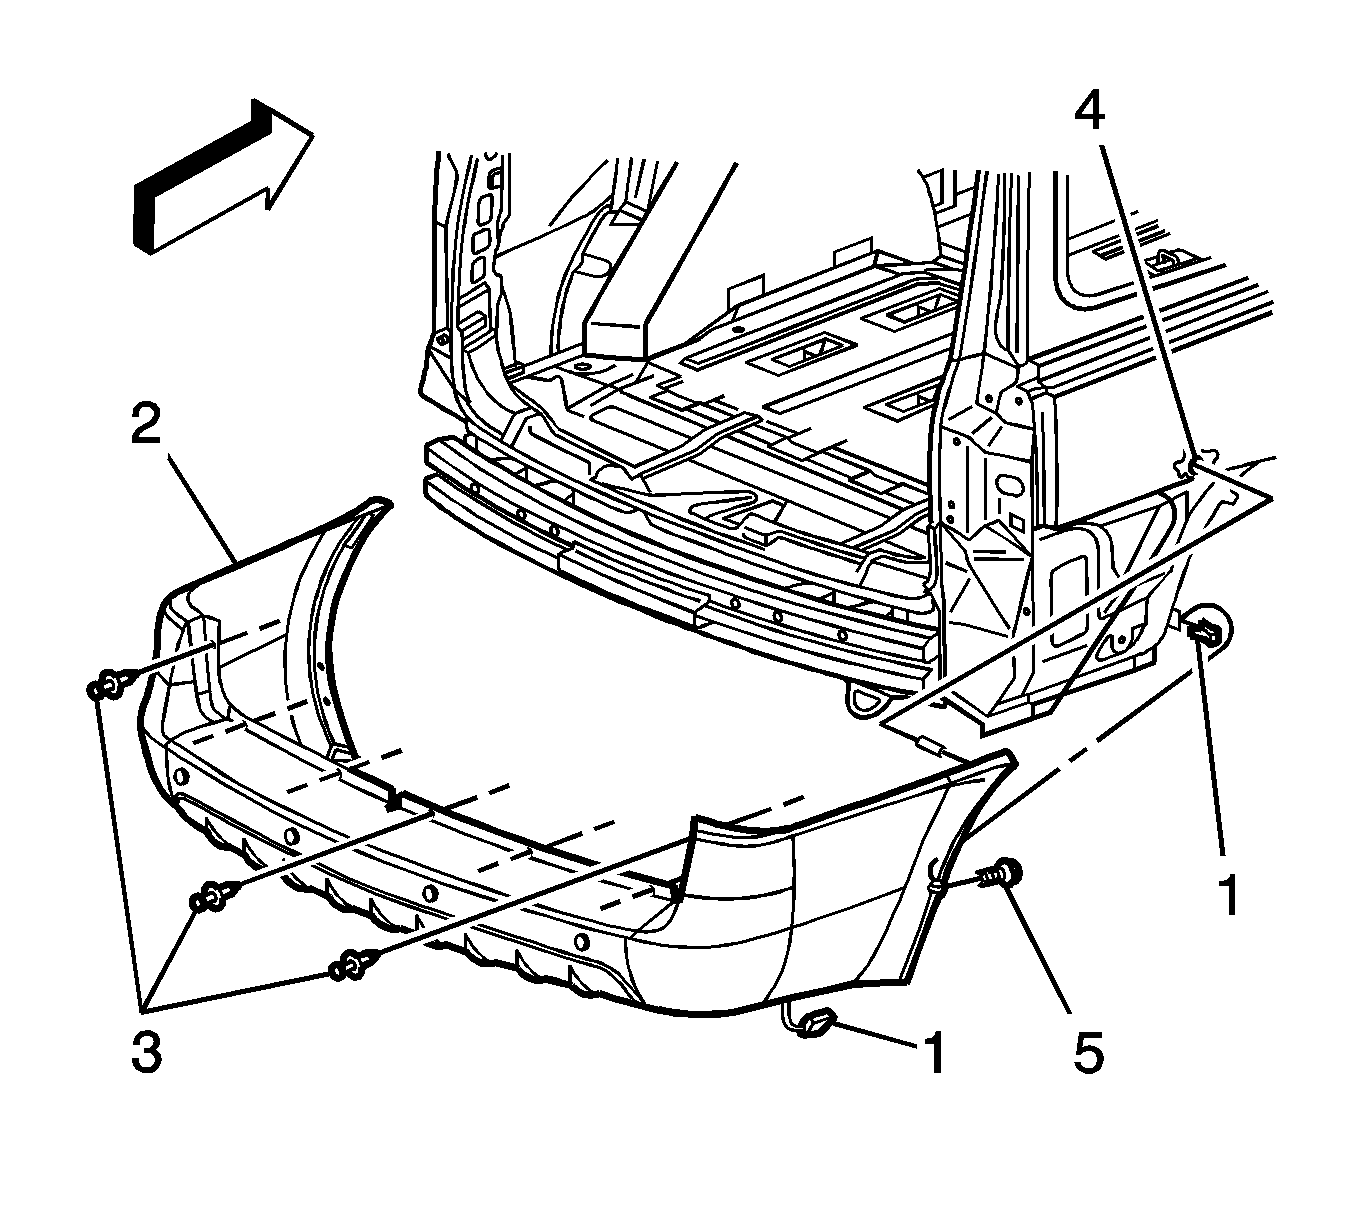
- Disconnect the electrical connection (1) for the rear object sensor harness, if equipped.
- Use the J 38778 in order to remove the push-in retainers (3) from the upper rear bumper fascia.
- Remove the screws (5) at the right and left wheel well from the rear bumper fascia.
- Remove the palnut from the rear bumper fascia outer retainer.
- Remove the rear bumper fascia (2) from the vehicle.
- Remove the rear parking assist (RPA) sensors, if equipped. Refer to Rear Object Sensor Replacement .
- Transfer the rear object sensors to the new rear bumper fascia, if equipped.

Installation Procedure
- Install the RPA sensor to the rear bumper fascia, if equipped. Refer to Rear Object Sensor Replacement .
- Align the rear bumper fascia (2) to the rear bumper fascia outer support.
- Align the rear bumper fascia outer retainer (4) to the body.
- Install the palnut to the rear bumper fascia outer retainer.
- Install the push-in retainers (3) to the upper rear bumper fascia.
- Install the screws (5) at the right and left wheel well to the rear bumper fascia.
- Connect the electrical connection (1) to the rear object sensor harness, if equipped.
- Close the liftgate.

Notice: Refer to Fastener Notice in the Preface section.
Tighten
Tighten the palnut to 2 N·m (18 lb in).
Tighten
Tighten the rear bumper fascia wheel well screws to 3 N·m (26 lb in).
Rear Bumper Fascia Replacement Chevrolet
Tools Required
J 38778 Door Trim Pad Clip Remover
Removal Procedure
- Open the liftgate.
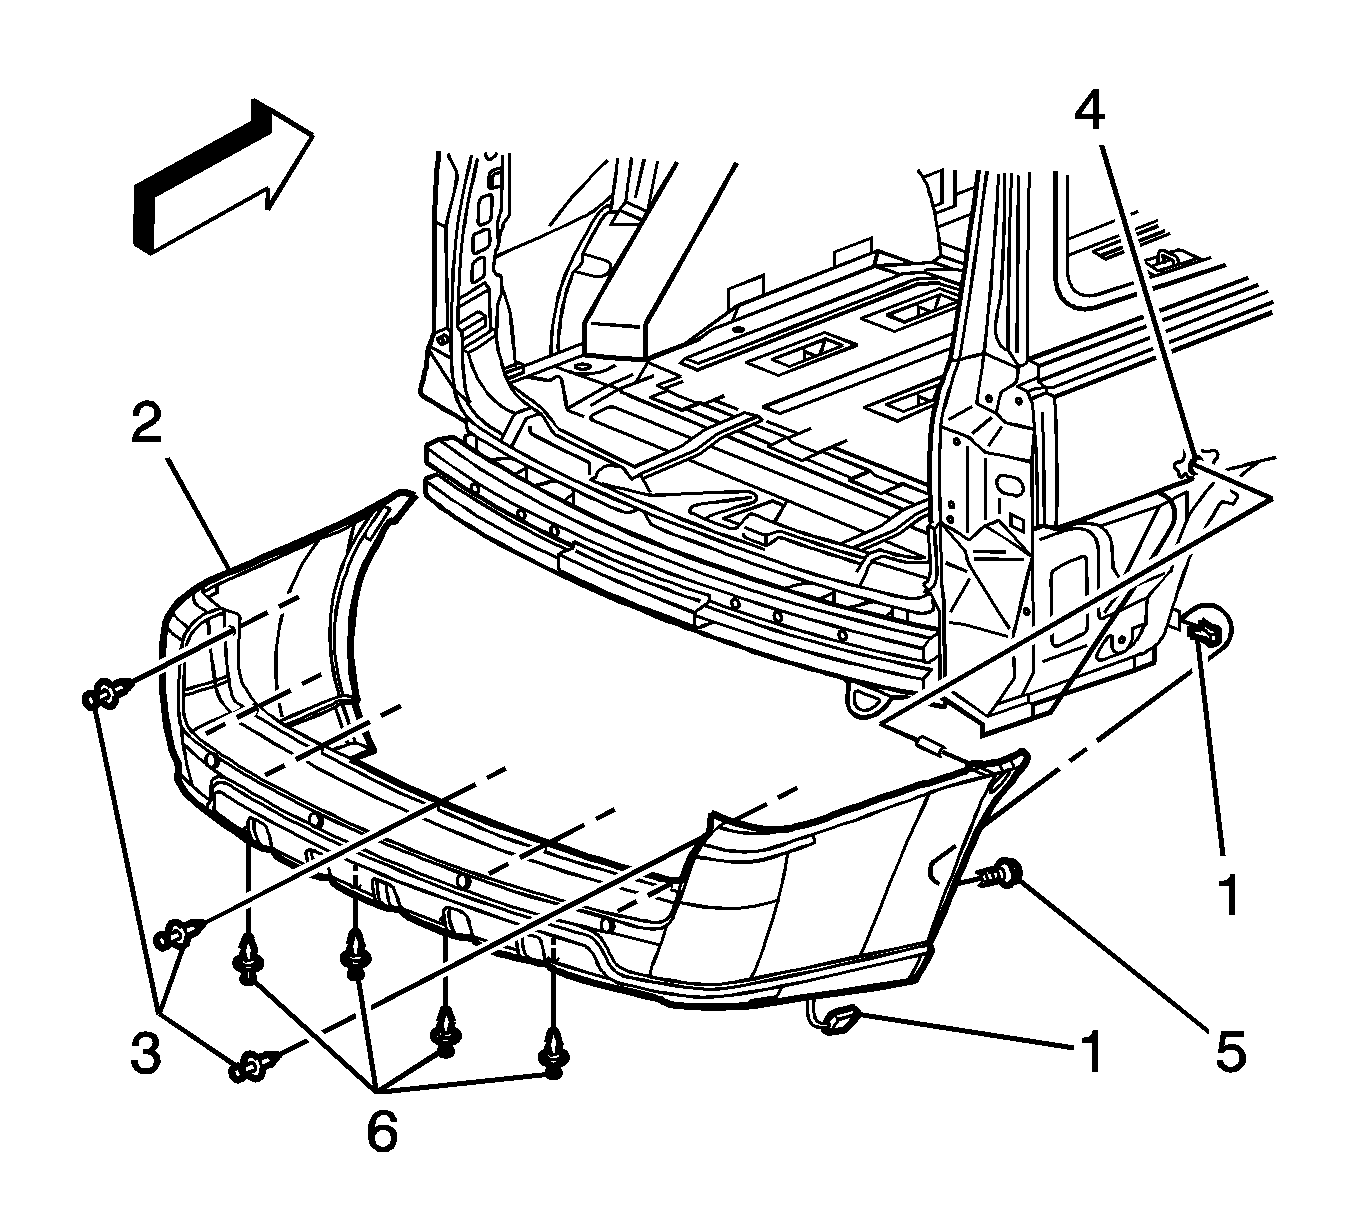
- Disconnect the electrical connection (1) for the rear object sensor harness, if equipped.
- Use the J 38778 in order to remove the push-in retainers (3) from the upper and lower (6) rear bumper fascia.
- Remove the screws (5) at the right and left wheel well from the rear bumper fascia.
- Remove the palnut from the rear bumper fascia outer retainer.
- Remove the rear bumper fascia (2) from the vehicle.
- Remove the rear parking assist (RPA) sensors, if equipped. Refer to Rear Object Sensor Replacement .
- Transfer the rear object sensors to the new rear bumper fascia, if equipped.

Installation Procedure
- Install the RPA sensor to the rear bumper fascia, if equipped. Refer to Rear Object Sensor Replacement .
- Align the rear bumper fascia (2) to the rear bumper fascia outer support.
- Align the rear bumper fascia outer retainer (4) to the body.
- Install the palnut to the rear bumper fascia outer retainer.
- Install the push-in retainers (3) to the upper and lower (6) rear bumper fascia.
- Install the screws (5) at the right and left wheel well to the rear bumper fascia.
- Connect the electrical connection (1) to the rear object sensor harness, if equipped.
- Close the liftgate.

Notice: Refer to Fastener Notice in the Preface section.
Tighten
Tighten the palnut to 2 N·m (18 lb in).
Tighten
Tighten the rear bumper fascia wheel well screws to 3 N·m (26 lb in).
