RATTLE NOISE FROM FOLDING TOP ROOF BOWS ON TURNS-SER. PROC.

SUBJECT: RATTLE NOISE FROM FOLDING TOP ROOF BOWS ON TURNS
MODELS AFFECTED: 1987-1993 ALLANTES
Some 1987-1993 Allantes may have a rattle noise from the folding top roof bows when making a turn or cornering maneuver. The rattle noise sounds like something small is rolling from one bow to the other. The noise is often caused by a small piece of rivet(s) or other debris left inside the number two and/or three bow after a folding top fabric replacement. The rivets are drilled out as part of the replacement procedure, and they will cause a rattle if left inside the bows. The procedure described in this bulletin can be used to correct the rattle condition. As a preventive measure, dealer and trim shop technicians should remove rivet pieces as part of the folding top fabric replacement procedure. This step has been added to the replacement procedure outlined in the 1993 Allante Service Information Manual.
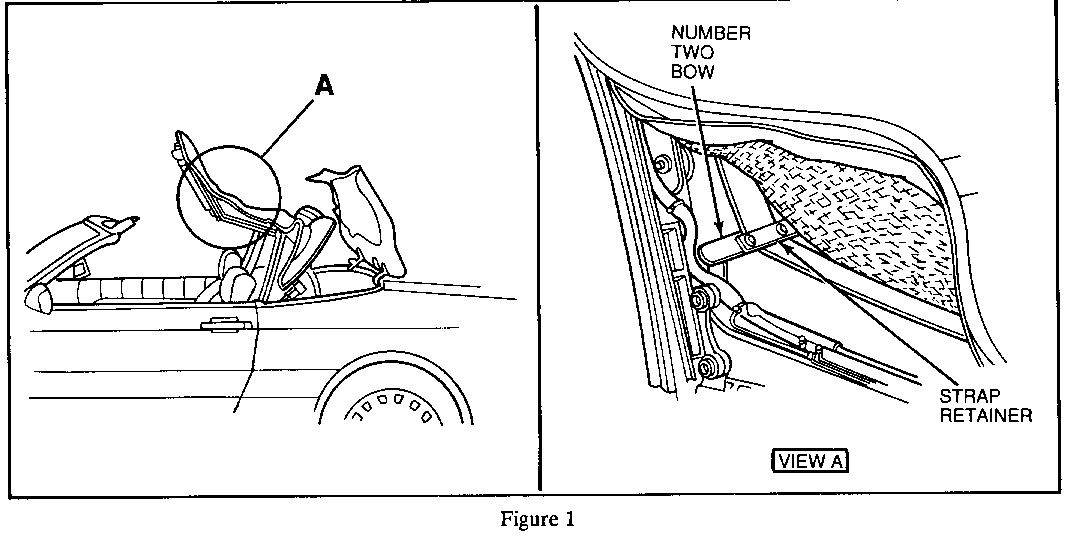
1. Raise the folding top partially out of the stowage well and lift top fabric to gain access to the left-hand backlight strap retainer on top of the number two bow. Refer to Figure 1.
2. Remove the screws holding the left backlight strap retainer to the number two bow. Pry out the plastic plugs from the screw holes in the bow being careful not to damage these pieces.
3. Repeat steps 2 and 3 for the right-hand backlight strap retainer on top of the number two bow.
4. Starting at either the right or left side of the number two bow, inject compressed air through the outer screw hole while plugging the inner hole with your finger. In doing this you're trying to blow the rivet pieces out the screw holes in the opposite end of the bow. Switch sides and repeat injecting compressed air.
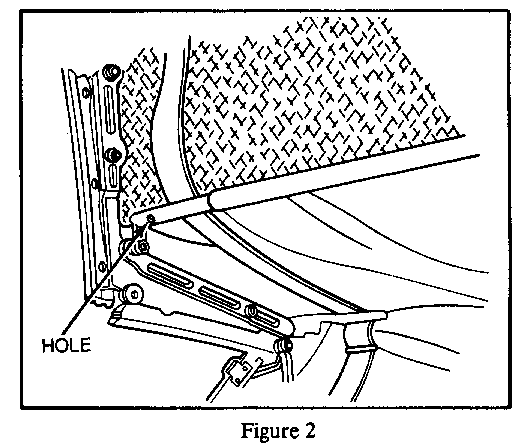
NOTICE: As a running change during the 1992 model year, pierced holes were added on the underside of the number two and three bows to assist in rivet extraction. Refer to Figure 2. When available, use these holes to inject compressed air while sealing the upper two screw holes with your fingers.
CAUTION:
Before injecting compressed air into the roof bow, drape a large cloth or plastic sheet over the opposite side of the folding top to contain any rivet pieces or other debris dislodged from the bow. Failure to adequately contain dislodged rivet pieces or debris may result in personal injury or injury to others. Always wear safety glasses when working with compressed air.
5. Repeat step 4 for the number three bow.
NOTICE: There are no backlight strap retainers to remove on the number three bow but there are the same screw holes as on the number two bow.
CAUTION:
Before injecting compressed air into the roof bow, drape a large cloth or plastic sheet over the opposite side of the folding top to contain any rivet pieces or other debris as they are dislodged from the bow. Failure to adequately contain dislodged rivet pieces or debris may result in personal injury or injury to others. Always wear safety glasses when working with compressed air.
6. Secure the folding top in the fully raised position, and test ride the vehicle to check if the rattle condition is corrected. If the compressed air succeeded in removing the rivet pieces, reinstall backlight strap retainers. If compressed air was not successful, proceed to step 7.
7. Again position the folding top in the partially raised position, and lift the top fabric to gain access to the left-hand backlight strap retainer screw holes on top of the number two bow. Refer to Figure 1.
8. Cover the driver seat and surrounding interior carpet and trim with protective cloth or plastic. Insert a protective cloth between the left end of the number two bow and the folding top fabric. Insert another piece of protective cloth between the left end of the number three bow and the folding top fabric. These are protective measures for the sealer to be applied in step 12.
NOTICE: If working on a 1992 model or later, check for the presence of holes on the underside of the number two and three ends. Refer to Figure 2. If holes are present, apply a piece of tape over the holes to block them off.
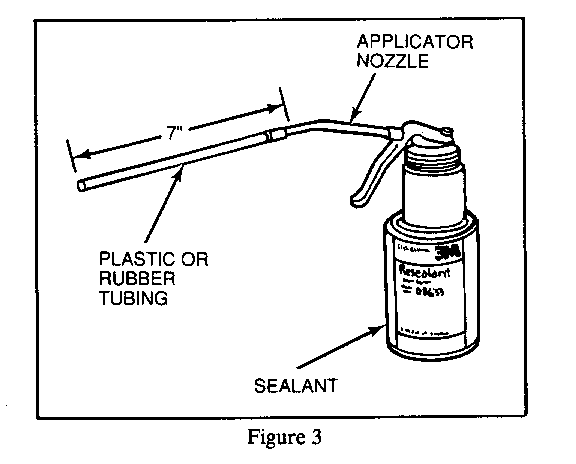
9. Attach 6-7 inches of small diameter plastic tubing to the nozzle of the 3M Windo-Weld Resealant applicator gun, 3M P/N 08994, or equivalent. Refer to Figure 3.
10. Holding the applicator gun over a waste container, squeeze the trigger slowly until the sealant. almost reaches the end of the tubing and then release. The tube is now primed for use.
11. At the left-hand end of the number two bow, insert the plastic tubing into the inner screw hole on the top side of the bow. Insert the tubing in the direction of center of car, and make sure the tube extends at least 1-1/2 - 2 inches into the bow.
12. Squeeze the applicator gun trigger about 1/2 stroke to inject a very small amount of 3M Windo-Weld Resealant, 3M P/N 08633, or equivalent into the bow.
NOTICE: 3M Windo-Weld Resealant flows very easily, and adding too much will result in the material dripping out of the roof bow ends. Excess sealant rubs off like "rubber cement" when dry; so if any material drips or smears on the car, it is better to let the resealant dry and then rub off.
13. Repeat step 11 for the number three bow.
14. Drive the car and make one or two hard right and left turns causing the rivet piece(s) to roll into the sealant and stick. The sealant will harden in several hours permanently capturing the rivets.
15. Reinstall the right and left backlight strap retainers on the number two bow.
16. Check the roof bow ends for signs of sealant leakage. If okay, remove the protective cloth or plastic. If leakage is detected, temporarily seal the bow ends with tape and then remove the protective cloth or plastic. Once the sealant hardens, the tape can be removed.
NOTICE: On 1992 and later models with holes pierced on the underside of the number two and three bows, leave the tape applied in step 8 over the holes until the sealer hardens overnight.
For warranty purposes use Labor Operation T6622 at .7 hour.


General Motors bulletins are intended for use by professional technicians, not a "do-it-yourselfer". They are written to inform those technicians of conditions that may occur on some vehicles, or to provide information that could assist in the proper service of a vehicle. Properly trained technicians have the equipment, tools, safety instructions and know-how to do a job properly and safely. If a condition is described, do not assume that the bulletin applies to your vehicle, or that your vehicle will have that condition. See a General Motors dealer servicing your brand of General Motors vehicle for information on whether your vehicle may benefit from the information.
