Vibration/Noise From Auto/Manual Shifter During Drive/Gear Shifts (Replace Front Prop Shaft To Transmission Flange Retaining Bolts)

| Subject: | Vibration/Noise From Auto/Manual Shifter During Drive/Gear Shifts (Replace Front Prop Shaft To Transmission Flange Retaining Bolts) |
| Models: | 2003 Cadillac CTS -- Built Prior To 30146320 |
Condition
Some customers with automatic/manual transmissions may comment on a vibration/noise from the shifter when driving or during gear shifts.
Cause
This condition may be due to torque reversals and driveline vibrations causing the threads on the front propeller shaft to transmission flange retaining bolt to wear down. As the bolt shaft diameter decreases, the clearance may increase between the bolt and the transmission output shaft flange creating a vibration or noise.
Correction
Important: It is important to follow the new procedures in this bulletin because the automatic and manual transmission fastener attachments are different.
Important: The Propeller Shaft Replacement procedure has been updated within SI.
A newly designed shouldered retaining bolt and new installation procedure is now available. Install three new bolts, washers and nuts. Refer to the appropriate procedure in this bulletin.
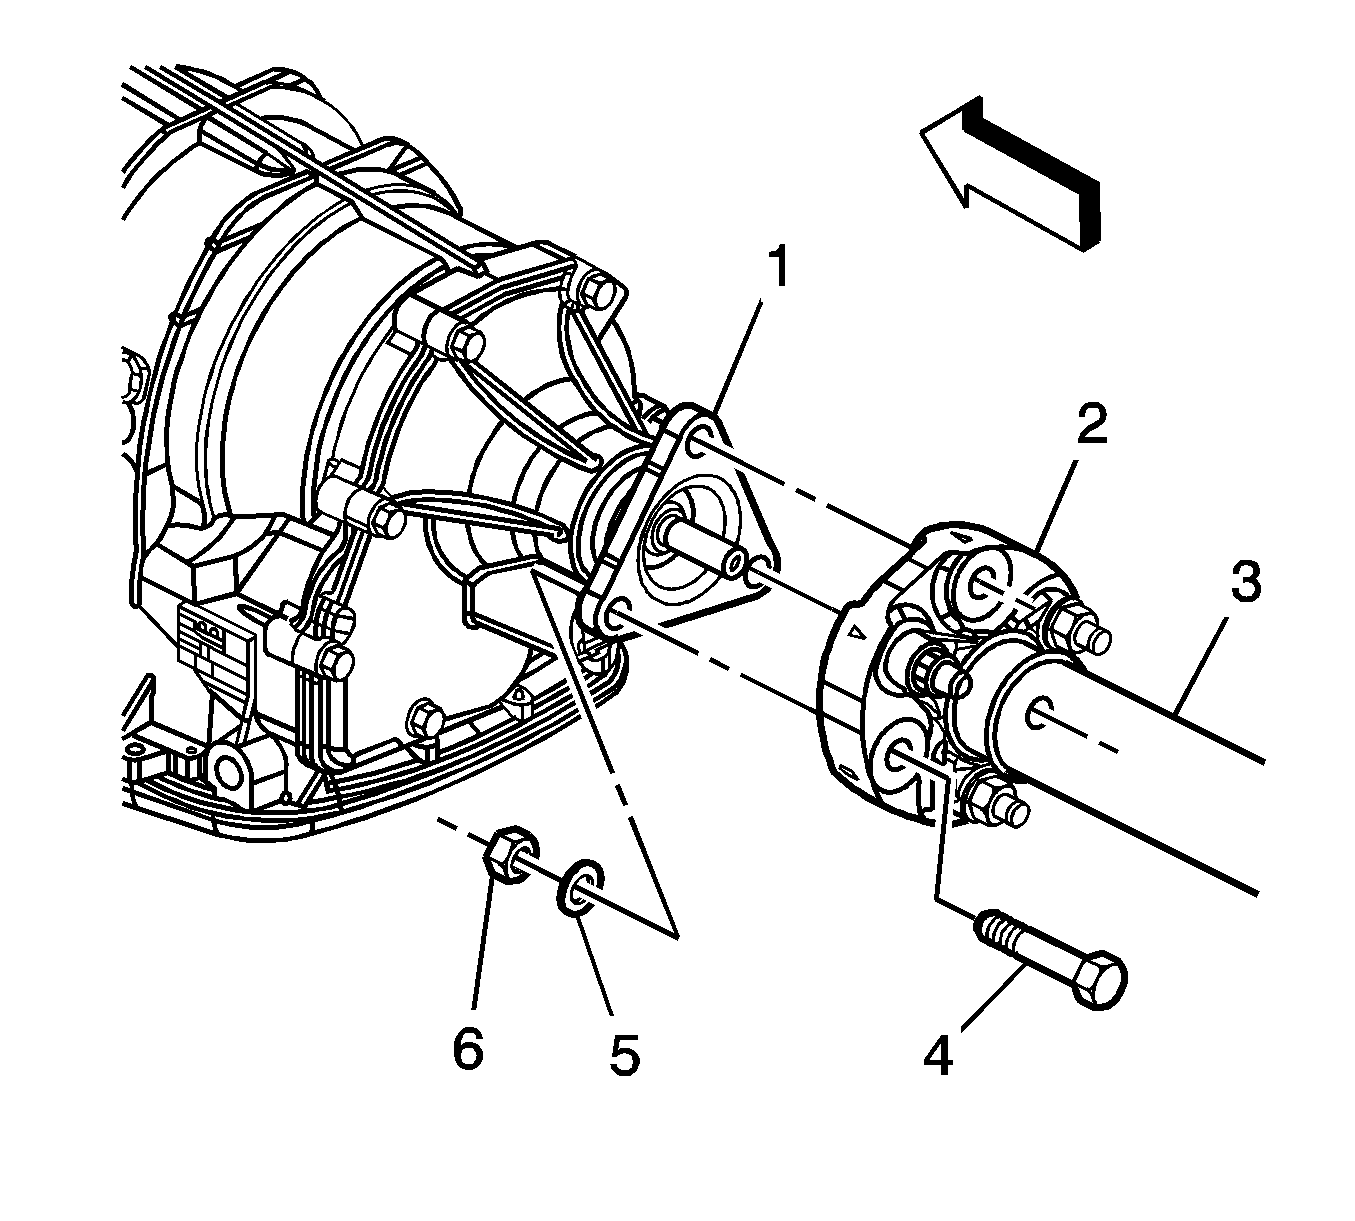
Automatic Transmission Front Prop Shaft To Flange Bolt Installation
- Place the shifter lever in Neutral.
- Raise and suitably support the vehicle. Refer to Lifting and Jacking the Vehicle in the General Information sub-section of the Service Manual, SI Document #813128.
- Remove the exhaust system. Refer to Exhaust System Replacement in the Engine Exhaust sub-section of the Service Manual, SI Document #783469.
- Remove one front prop shaft to transmission flange bolt.
- Install a new bolt (6), P/N 11588658, with the bolt head to the forward side of the AUTOMATIC transmission output shaft flange (1).
- Install a new washer (5), P/N 11588689, and new nut (4), P/N 11516073, to the rearward side of the front propeller shaft coupler (2).
- Repeat Steps 4 -- 6 for the two remaining bolts.
- Tighten the new nuts.
- Verify that the nuts on the propeller shaft coupler to differential flange bolts are tightened to 85 N·m (63 lb ft).
- Remove one rear prop shaft to differential flange bolt.
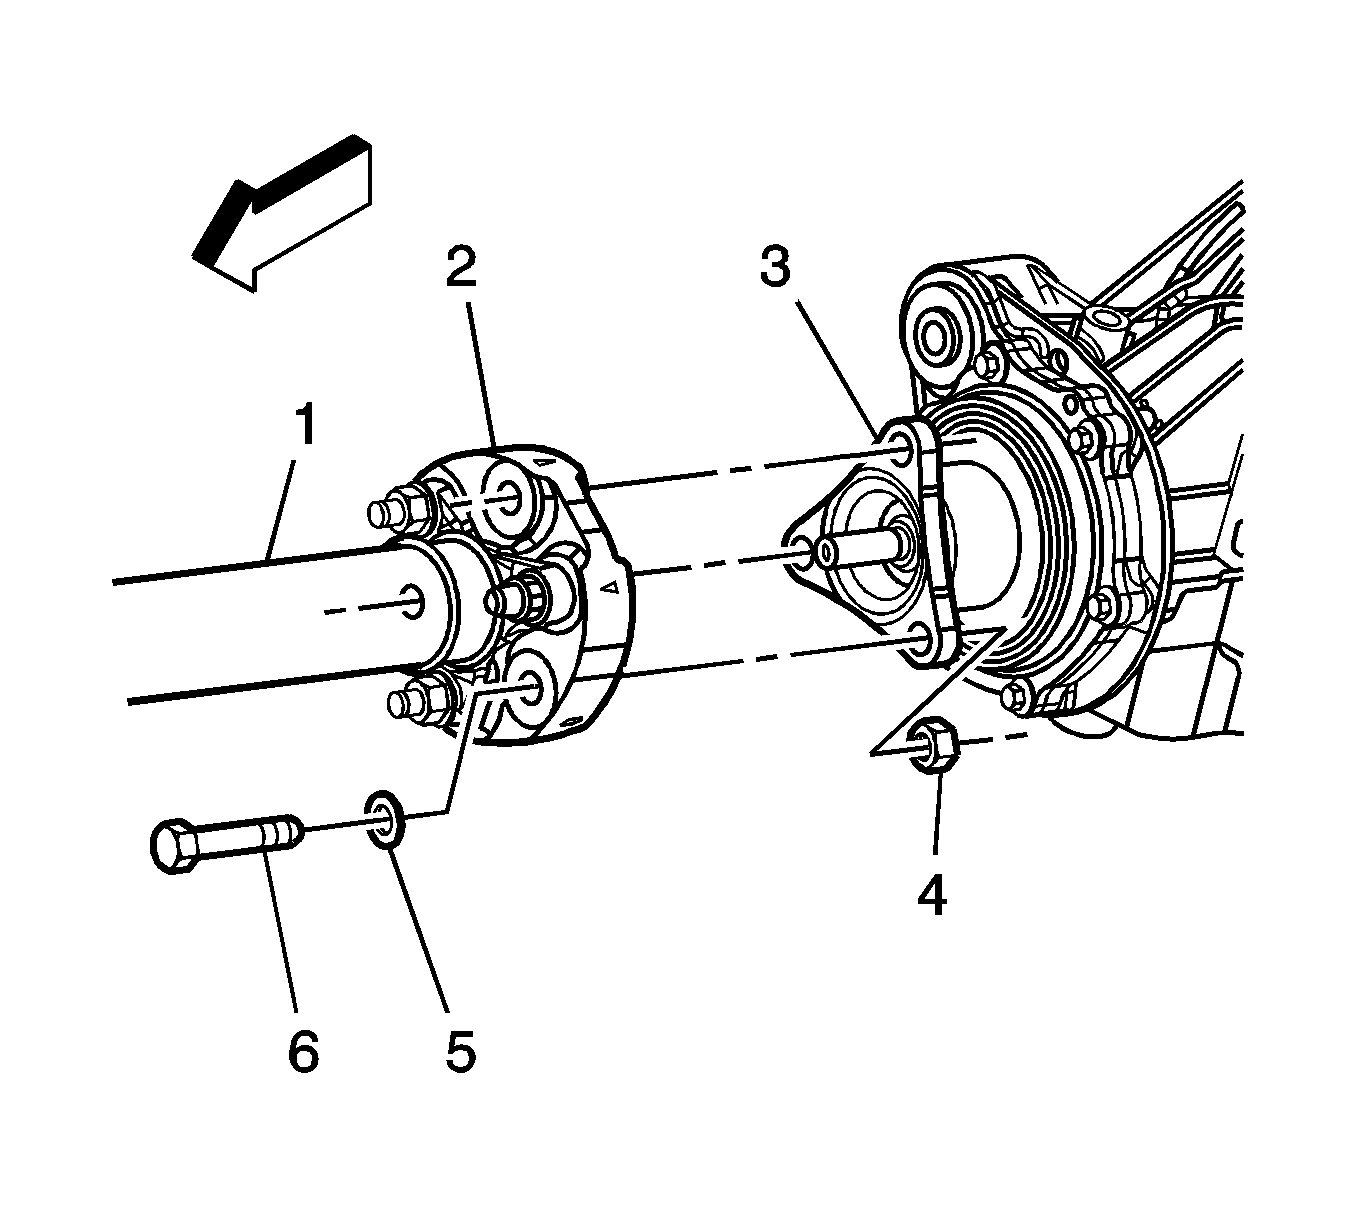
- Install a new bolt (6), P/N 11588658, and washer (5), P/N 11588689, with the washer and bolt head to the forward side of the rear propeller shaft coupler (2).
- Install a new nut (4), P/N 11516073, to the rearward side of the DIFFERENTIAL output shaft flange (3).
- Repeat Steps 10 -- 12 for the two remaining bolts.
- Tighten the new nuts.
- Install the exhaust system. Refer to Exhaust System Replacement in the Engine Exhaust sub-section of the Service Manual, SI Document #783469.
- Lower the vehicle.
- Place the shifter lever in Park.
Important: DO NOT REMOVE all three propeller shaft to transmission flange bolts at the same time. DO NOT REMOVE the coupler from the propeller shaft.

Tighten
Tighten the nuts on the propeller shaft to AUTOMATIC
transmission flange bolts to 85 N·m (63 lb ft).
| • | If the nuts are loose, replace the bolts, washers and nuts. Go to Step 10. |
| • | If the torque on the nuts is to specification, go to Step 15. |

Important: DO NOT REMOVE all three propeller shaft to differential flange bolts at the same time. DO NOT REMOVE the coupler from the propeller shaft.
Tighten
Tighten the nuts on the propeller shaft to DIFFERENTIAL
flange bolts to 85 N·m (63 lb ft).
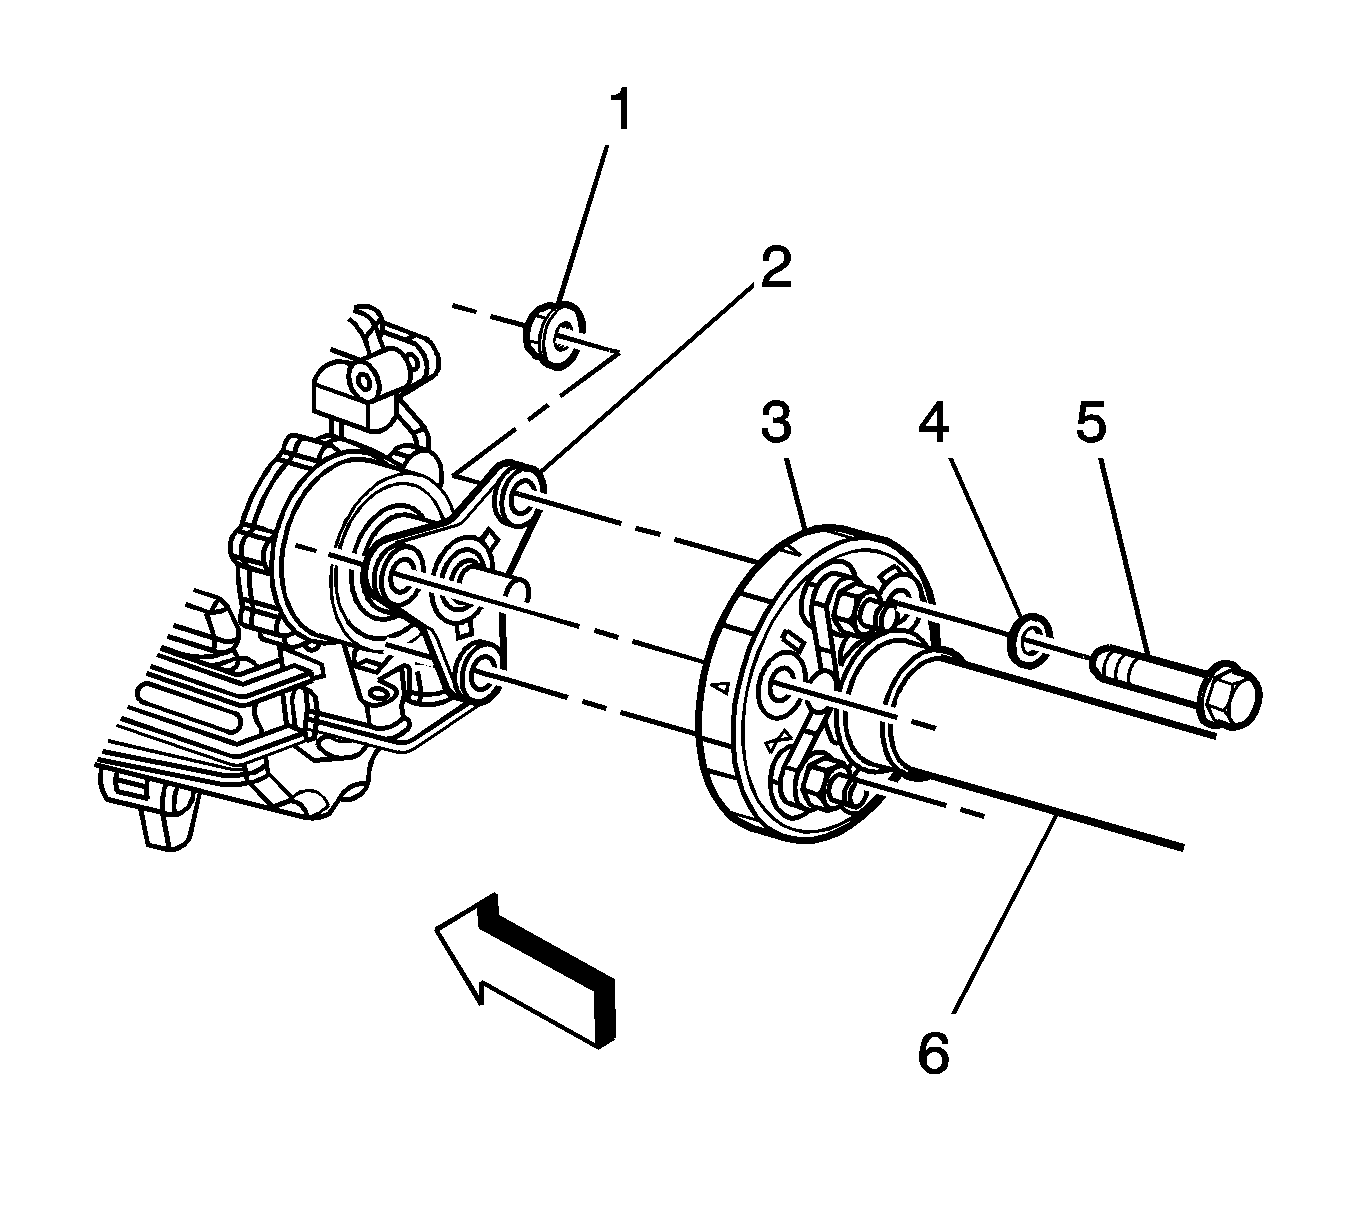
Manual Transmission Front Prop Shaft To Flange Bolt Installation
- Place the shifter lever in Neutral.
- Raise and suitably support the vehicle. Refer to Lifting and Jacking the Vehicle in the General Information sub-section of the Service Manual, SI Document #813128.
- Remove the exhaust system. Refer to Exhaust System Replacement in the Engine Exhaust sub-section of the Service Manual, SI Document #783469.
- Remove one front prop shaft to transmission flange bolt.
- Install a new bolt (5), P/N 11588658, and washer (4), P/N 11588689, with the washer and bolt head to the rearward side of the front propeller shaft coupler (3).
- Install a new nut (1), P/N 11516073, to the forward side of the MANUAL transmission output shaft flange (2).
- Repeat Steps 4 -- 6 for the two remaining bolts.
- Tighten the new nuts.
- Verify that the nuts on the propeller shaft coupler to differential flange bolts are tightened to 85 N·m (63 lb ft).
- Remove one rear prop shaft to differential flange bolt.
- Install a new bolt (6), P/N 11588658, and washer (5), P/N 11588689, with the washer and bolt head to the forward side of the rear propeller shaft coupler (2).
- Install a new nut (4), P/N 11516073, to the rearward side of the DIFFERENTIAL output shaft flange (3).
- Repeat Steps 10 -- 12 for the two remaining bolts.
- Tighten the new nuts.
- Install the exhaust system. Refer to Exhaust System Replacement in the Engine Exhaust sub-section of the Service Manual, SI Document #783469.
- Lower the vehicle.
- Place the shifter lever in Park.
Important: DO NOT REMOVE all three prop shaft to transmission flange bolts at the same time. DO NOT REMOVE the coupler from the propeller shaft.

Tighten
Tighten the nuts on the propeller shaft to MANUAL
transmission flange bolts to 85 N·m (63 lb ft).
| • | If the nuts are loose, replace the bolts, washers and nuts. Go to Step 10. |
| • | If the torque on the nuts is to specification, go to Step 15. |

Important: DO NOT REMOVE all three propeller shaft to differential flange bolts at the same time. DO NOT REMOVE the coupler from the propeller shaft.
Tighten
Tighten the nuts on the propeller shaft to DIFFERENTIAL
flange bolts to 85 N·m (63 lb ft).
Parts Information
Part Number | Description | Qty |
|---|---|---|
11588689 | Washer-Special Flat | 3 |
11588658 | Bolt-Hex Head | 3 |
11516073 | Nut | 3 |
Warranty Information
For vehicles repaired under warranty, use:
Labor Operation | Description | Labor Time |
|---|---|---|
F1040 | Joint, Front Disc -- Replace | 0.7 hr* |
*This is a unique labor time for this labor operation and is to be used only with this bulletin. | ||
